> For the complete documentation index, see [llms.txt](https://userguide.dcentwallet.com/llms.txt). Markdown versions of documentation pages are available by appending `.md` to page URLs; this page is available as [Markdown](https://userguide.dcentwallet.com/external-service/polygon-bridge.md).
# How to use Polygon Bridge
This is a guide for moving assets from the Ethereum Network to the Polygon Network using the D'CENT Wallet. The D'CENT Mobile App's dapp browser (Discovery Tab) supports both Ethereum and Polygon networks, this allows moving assets between the two networks through the dapp browser.
{% hint style="danger" %}
Discovery is a browsing function that allows you to use blockchain-based decentralized app (DApp) services. Since all dapp services (including Polygon Bridge) are not operated by D'CENT, you should seek assistance from each dapp service operator for any questions you may have while using the dapp service. Also, it is very important for users to understand that there is a risk of financial loss when using the dapp service, and the user is responsible for all risks that may occur while using the service.
{% endhint %}
## How to transfer Ethereum based assets to the Polygon Network (mainnet)
### **STEP 1: Create Ethereum account and Transfer assets**
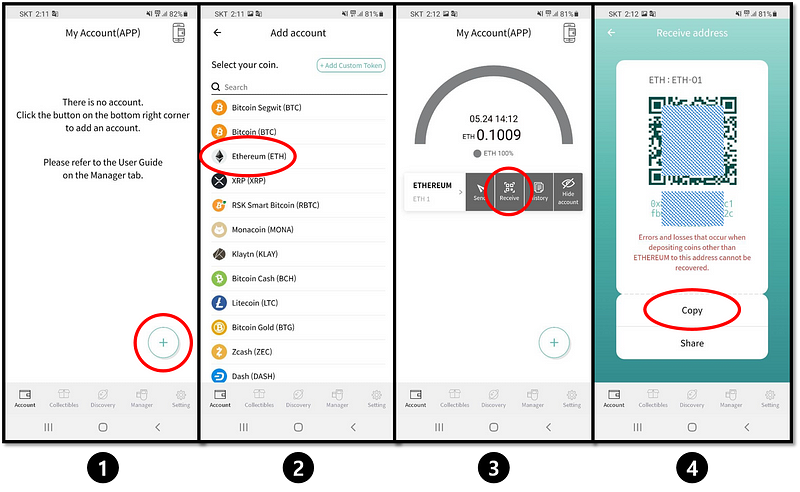
**1)** From the main screen, press the (+) button to create an Ethereum account\
**2)** Select Ethereum to add\
**3)** From the main screen, view the Ethereum address (press **Receive** button)\
**4)** Copy the Ethereum address and receive ERC20 assets to this account.
### **STEP 2: Create Polygon (mainnet) account**
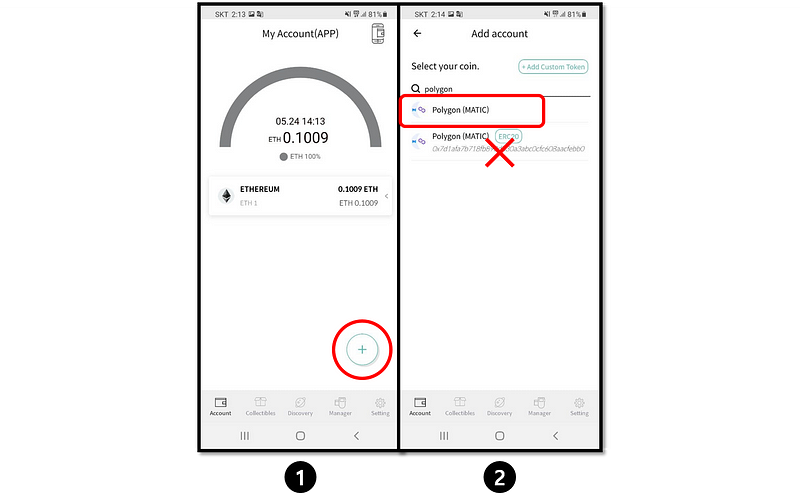
**1)** From the main screen press (+) button to add a Polygon (mainnet) account\
**2)** Search for “Polygon” and choose **Polygon (MATIC)**
### **STEP 3: Change the Network on Dapp browser to Ethereum**
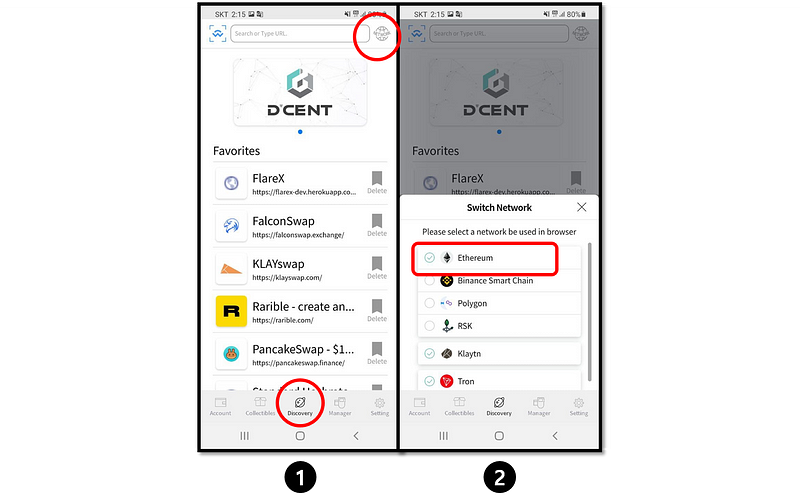
**1)** From the Discovery Tab, click on the network icon located at the top-right\
**2)** Set the network to Ethereum
### **STEP 4: Visit Polygon Bridge site and Login**

**1)** From the discovery tab, enter the following URL for Polygon bridge site: [**https://wallet.matic.network**](https://wallet.matic.network)\
**2)** At the bridge site, select **Metamask** as a wallet to login with\
**3)** Continue by clicking OK button\
**4)** Site login will require a signature. Click OK and authenticate(sign) with a fingerprint or PIN
### **STEP 5: Requesting for asset transfer**
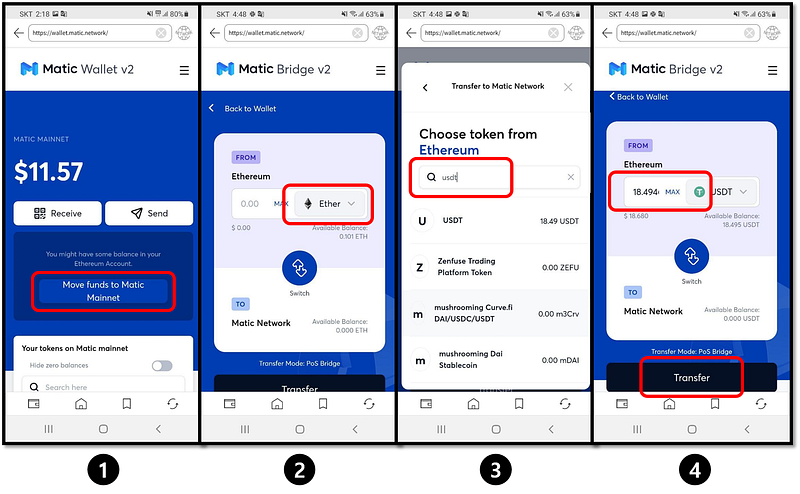
**1)** Click on **Move funds to Matic Mainnet** button\
**2)** Press “**Ether”** button to select an asset to transfer\
**3)** Search for an asset to transfer (ie: USDT)\
**4)** Enter transfer amount and press **Transfer** button

**5)** Press **Continue** to proceed\
**6)** Review the fee requirement and press **Continue** to proceed\
**7)** Press **Continue** to proceed
### **STEP 6: Approving asset transfer**

**1)** Click OK to proceed and authenticate(sign) with a fingerprint or PIN\
**2)** Wait for the transaction to complete\
**3)** Press **Continue** to complete
### **STEP 7: Viewing the asset transferred to the Polygon mainnet**
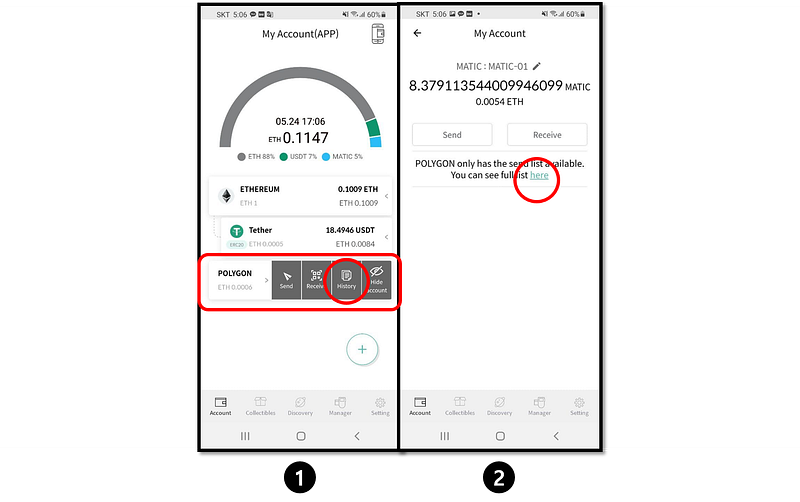
**1)** On your Polygon (**mainnet**) account, press **History** button \
**2)** Press **here** to see the details of the transactions

**3)** From the external site, click on the **Token list**\
**4)** Click on **USDT** from the list\
**5) Copy** the contract address
### **STEP 8: Add custom token account in the D’CENT Wallet**
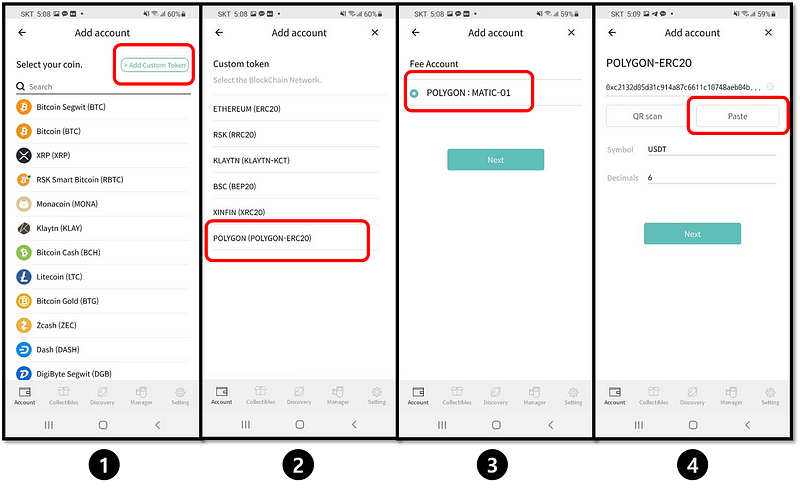
**1)** From D’CENT Wallet, click on **Add Custom Token** button\
**2)** Choose (**POLYGON-ERC20**) as the network \
**3)** Choose your **POLYGON MATIC** as the linking gas(fee) account\
**4)** Press the **Paste** button to paste in the contract address which was copied from **STEP 7** above. Press Next and **POLYGON based USDT token account** will be created
## **How to request for Token listing**
Visit [D’CENT Homepage](https://www.dcentwallet.com/en) and make a request.
## **How to receive a small amount of MATIC coin**
In the Ethereum network, the transactions fee is paid using the ETH coin. Similarly for the Polygon network, MATIC coin is used to pay for the transactions fee.
If you have just completed transferring the asset to the Polygon network, you don’t be able to do anything because you won’t have any MATIC coin. Polygon network is providing a small amount (0.001 MATIC coin) to support users from the following faucets:
{% embed url="" %}
{% embed url="" %}
---
# Agent Instructions
This documentation is published with GitBook. GitBook is the documentation platform designed so that both humans and AI agents can read, navigate, and reason over technical content effectively. Learn more at gitbook.com.
## Querying This Documentation
If you need additional information that is not directly available in this page, you can query the documentation dynamically by asking a question.
Perform an HTTP GET request on the current page URL with the `ask` query parameter, and the optional `goal` query parameter:
```
GET https://userguide.dcentwallet.com/external-service/polygon-bridge.md?ask=&goal=
```
`ask` is the immediate question: it should be specific, self-contained, and written in natural language.
`goal` is optional and describes the broader end goal you are ultimately trying to accomplish on behalf of the user. GitBook uses it to tailor the answer towards what is most useful for that goal.
The response will contain a direct answer to the question and relevant excerpts and sources from the documentation.
Use this mechanism when the answer is not explicitly present in the current page, you need clarification or additional context, or you want to retrieve related documentation sections.