As of Mar 2026, the following blockchain networks are currently supported for the swap service. Additional blockchain networks are planned to be supported in the future.
You can also search from the App store to install D'CENT mobile app.
Search for "D'CENT wallet" from the App store.
Basic setup for Mobile App
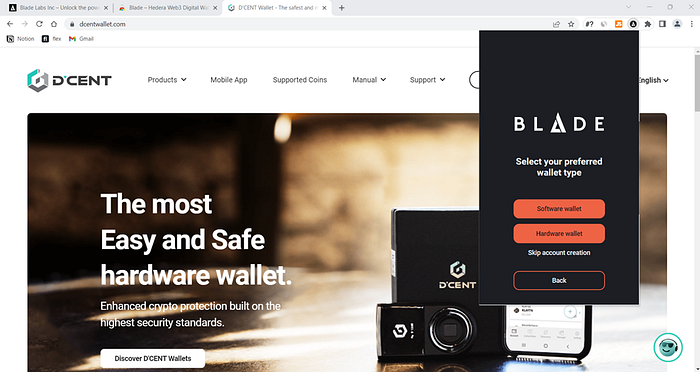
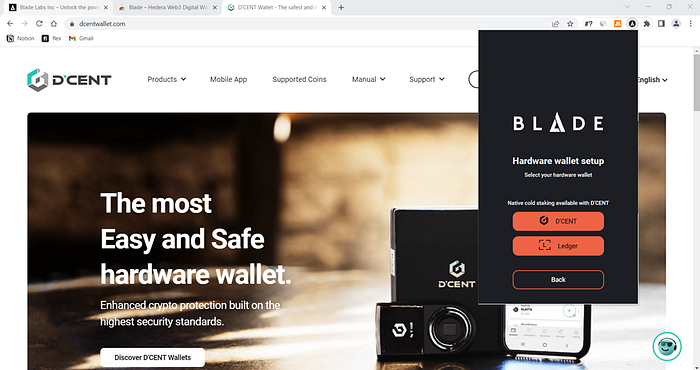
Select wallet mode
This guide is based on D’CENT mobile app version 8.0.0.
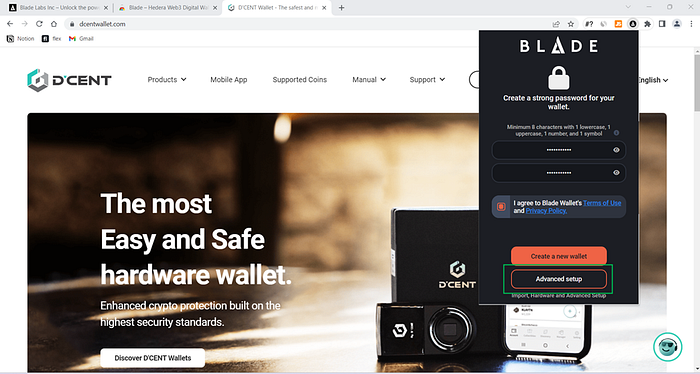
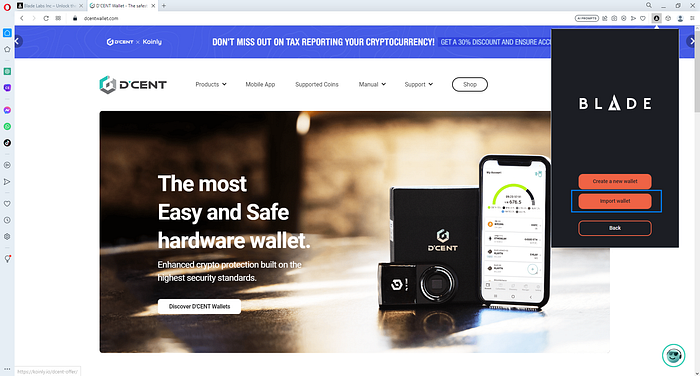
If you are launching the mobile app for the first time, you will need to go through the initial setup and select a wallet mode. When the app launches, select “Biometric Wallet” as shown below.
You can change the wallet mode at any time from the Settings tab in the mobile app. If you are using a biometric cold wallet, make sure to set the wallet mode to "Biometric" in the mobile app. For instructions on how to change the wallet mode, refer to this guide.
Register password for Mobile App
Register mobile app password for access protection. To set the password, enter the same 6-digit number twice. Mobile App password is required every time you run the D'CENT mobile app. Make sure to remember it.
Mobile App password can be changed from the at any time. Instead of password, you can also use biometric authentication to protect access to your wallet if your mobile phone supports the feature.
Mobile App Permission Settings
A permission request popup will appear when you launch the D’CENT mobile app. Review the permissions being requested, then click “Confirm” button to proceed.
Next, click the “Allow” button for both the Notification and Find Bluetooth Devices permissions to continue.
The Notification permission is optional. You can click the “Don’t allow” button and still connect your wallet without any issues. However, the Find Bluetooth Devices permission is required for syncing with the cold wallet. If access is denied, the cold wallet cannot be synced, and usage will be restricted. Therefore, be sure to allow this permission.
Bluetooth pairing with Biometric Wallet
First, turn on the cold wallet, unlock using your fingerprint or PIN authentication.
You can connect your cold wallet to the D'CENT mobile app via Bluetooth using the following steps.
1) Open the D'CENT mobile app and select "Bluetooth icon" at the top of the "My Wallet" tab.
2) A "Search Device" popup will appear, displaying the device name that matches the Device ID(D'CENT-iD-<numbers or letters>) shown on your cold wallet screen.
Please refer to this guide on how to check the device ID of your cold wallet.
If the device ID of your cold wallet does not appear in the "Search Device" popup, please make sure that Bluetooth is enabled in your iPhone’s settings. If you're unsure how to access the Bluetooth menu, please refer to .
3) When your D'CENT device is selected, your wallet will start the synchronization automatically. Synchronization will take few seconds to complete.
4) When synchronization is complete a connection indicator will appear in the top of the mobile app.
Now, you can tap the "Add Account" button to add the necessary coin accounts. For detailed instructions on adding coin accounts, clickhere.
How to Check the Device ID
Each biometric cold wallet has a unique device ID. You can check the device ID of each device using the following steps.
1) Turn on the cold wallet, authenticate using your fingerprint or PIN, then navigate to the "Settings" menu and press "OK" button.
2) Select the "Device Info." menu and press "OK" button.
3) On the Device Info screen, the Device ID(D'CENT-iD-<numbers or letters>) will be displayed
After checking the device ID, press the Back (↩) button on your cold wallet to return to the previous screen.
Manage All Wallets
This guide is based on D’CENT mobile app version 8.1.0.
The Manage All Wallets menu allows you to easily manage all wallets registered in a single D’CENT mobile app.
Accessing the Manage All Wallets Menu
You can access the Manage All Wallets menu from the Settings tab or the My Wallet tab in the D’CENT mobile app.
When you open the menu, you will see a list of all wallets currently registered. You can also click the “+ Add” button to register additional wallets.
For instructions on how to add each type of wallet, please refer to the user guide below.
When you click the More (⋮) button next to a registered wallet, a management menu will appear.
From this menu, you can view and configure additional information related to the selected wallet, such as firmware details, backup and recovery, and more.
Menu composition for each mode
You can check how to use the Manager menu for each wallet mode in the following sections.
D’CENT Mobile App features a native DApp browser that is built into the application, which allows accessing web-based blockchain services by connecting a wallet account to log in.
From the DApp browser, you can use Ethereum-based DApp such as Maker Dao, Compound, Uniswap, and Kaia-based BApp service such as KLAYSTATION.
Using DApp service on the Discovery tab
This guide is based on D’CENT mobile app version 8.0.0.
You can use DApp service in the "Discovery" tab located at the bottom menu of the app. Here, it lists various services that can be used in conjunction with D’CENT wallet. You can simply click on a service to access the DApp.
D'CENT App for the Android Phone will show a list of various 3rd party operated DApp services.
For iPhone, the list of third-party DApp services shown in the D'CENT app is limited due to Apple’s policy.
You can also view the list of DApp services grouped by type, such as Staking, Exchange, and DeFi.
Unlisted DApp services can be accessed by entering the URL or through Google search.
Using the Bookmark function
Users can save the visiting service site as a "favorite (or bookmark)", which creates a shortcut for faster access the next time.
Favorites can be added in the following ways:
1) From the DApp service site
Tap the "More (⋮)" button at the bottom of the site and select "Add to favorites."
2) From the Discovery tab service list
Tap the star icon next to a service to add it to your favorites.
Added favorites can be found in the “Favorite” section of the Discovery tab. You can also remove a favorite by tapping the star icon again.
Supported Networks
As of December, 2025, following networks are supported on D'CENT wallet's dapp-browser. More networks will be added overtime.
You can see how to switch blockchain network of dapp-browser in the below link.
Metamask Integreation (https://qrbase.dcentwallet.com/) : EVM compatible address in the D'CENT Wallet can be connected with the Metamask
Astar portal (https://portal.astar.network/) : Astar Portal is the official Astar Network application for using everything that Astar Network offers.
FTSO Portal () : A service that allows users to delegate vote power to their preferred FTSO provider and earn rewards
KLAYswap () : Kaia-based DeFi service that allows for token exchange based on liquidity pool and deposit and staking through liquidity mining
SwapScanner () : A service that swap exchange token through major DEX aggregators and earns interest through cryptocurrency deposit
Orbit Bridge () : Bridge service that supports token conversion between each mainnet
XDSea () : A peer-to-peer decentralized marketplace for buying and selling NFTs based on the XDC network
cBridge () : A service that Multiple blockchain bridge service and transfers assets between blockchains with low fees
Tokamak DAO () : A service that allows TON coin holders to directly participate in decision-making regarding major agendas that affect the Tokamak network ecosystem.
Zapper () : Ethereum-based DeFi dashboard service
Compound () : Stake cryptocurrency and earn interest
PoolTogether () : No-loss lottery to earn interest gained from the PoolTogether staking pool
Uniswap () : Swap exchange various cryptocurrency pairs and provide liquidity to pools
Yearn.fi () : A service that collects various DeFi services and provides a method to obtain maximum profits through automated protocols.
1inch.exchange () : DEX aggregator that provides optimal swap exchange service
OpenSea () : NFT market place for Collectibles, Game items, Digital Arts, and more.
Rarible () : A creator-centered NFT marketplace service that allows you to easily create, buy, and sell items such as works of art and game items as NFTs.
KaiaPotter () : A service that allows you to stake KAIA in a simple and safe way developed by Hashquark
Intract Quests () : A quest-based platform where users can interact with various Web3 projects and earn rewards.
Musikhan () : Play on MusiKhan and step into the future of K-POP and RWA.
Stake WCT () : Stake to earn rewards, participate in governance and support the future decentralization of the network.
SynFutures () : A decentralized derivatives marketplace for everything from crypto to NFTs and Bitcoin hash rates.
MOMO.FUN () : MOMO.FUN is the world’s first Meme + DeFi platform powered by AI Agent
SuperEarn () : Leveraging Kaia stablecoins, provides one-tap access to on-chain yield without DeFi complexity by automatically allocating assets across diversified portfolios
beraBTC () : A Bitcoin-pegged token that enables users to mint wrapped Bitcoin directly from on-chain assets across EVM chains
Flare XRPFi Yield () : Deposit XRP and earn more XRP as a reward, powered by the Flare network
Magnetic () : A trading platform on XRPL where you can swap tokens, earn rewards, and move assets in one place
Banxa () : Buy and sell XRP directly with credit card or bank transfer, used worldwide.
XPMarket () : A one-stop service to trade XRPL tokens, check prices, and manage your holdings
Soil () : A service where users can deposit XRP or RLUSD and earn returns backed by real-world assets such as treasuries
DEX-Trade () : A global exchange service where users can buy and sell XRPL tokens using dollars and other currencies
Squid () : A cross-chain bridge service that lets users move or swap XRP across multiple blockchains
xrpl.to () : A dashboard service where users can view XRPL token prices, charts, and rankings at a glance
Bithomp () : A blockchain explorer for looking up XRPL transactions, wallet addresses, and token information
XRPScan () : Real-time explorer to view all XRPL transactions, accounts, and network activity.
First Ledger () : All-in-one platform to discover, trade, and launch new tokens on XRPL
Many more great services will get added to the list over time.
The purpose of synchronization is to hold the same correct information between the Biometric Wallet and the mobile app. Following processes will occur during the synchronization:
Verify previously synchronized information
Check whether there is a history of ever been synchronized with the Biometric Wallet. If there is no history, the synchronization process adds additional process of creating accounts by looking up the address information.
Synchronize account information
1) Search the account information of the Biometric Wallet and compare it with the account information registered in the mobile app.
2) Create an account that is not registered in the mobile app among the account information available from the Biometric Wallet.
3) If you have account information in the Biometric Wallet, the existing accounts will be retrieved even if you delete the mobile app and reinstall it.
On your iPhone, Drag the notification bar at the top of the screen down to find the Bluetooth menu.
Find Bluetooth menu from the iPhone's settings
You can find the Bluetooth menu in the iPhone's settings
Finding the Bluetooth menu on your Android phone
Depending on your Android phone model, finding the Bluetooth menu may be different.
Find Bluetooth menu from the upper drag down menu
On your Android phone, Drag the notification bar at the top of the screen down to find the Bluetooth menu.
Find Bluetooth menu from the "Settings"
Settings > Connections > Bluetooth, you can enable and enter the Bluetooth menu from here.
Sending XRP using D'CENT Wallet
Enter the receiver address and the Destination Tag
1) From mobile app, press the “Send” button of the Ripple (XRP) account to be used for the transaction.
2) Enter the wallet address of the other party (receiver) and enter the Destination Tag if you are sending XRP to an address that is created by an Exchange.
When sending XRP to an address that exists on the Exchange, you MUST enter the Destination Tag to complete normal deposit into the receiver's account.
If you send XRP WITHOUT entering the Destination Tag to an address that exists on the Exchange, the deposit amount may be lost forever.
A Destination Tag is not required if you send XRP to a personal wallet such as D'CENT Wallet.
However, if the other party (receiver) provides you with a Destination Tag, you must enter it.
How to view all the BTC public addresses
Viewing all the BTC addresses
Bitcoin uses 15 public addresses, and when you create a BTC account in D'CENT wallet, 15 public addresses are automatically created. To see the full list of BTC public addresses, run the mobile app and do the following:
1) Press the "Receive" button on your BTC account.
2) Press the down arrow (∨) button to the right of “View all BITCOIN addresses”.
3) You can check all 15 public addresses. For your reference, the address shown on the "Receive" screen of your BTC account defaults to the first address in the list of 15 addresses.
Unboxing
Checklist for newly purchased D'CENT Biometric Wallet
Before you use the wallet, you must check the product is authentic.
A package with D'CENT Wallet contains the following:
D'CENT Biometric Wallet (main device)
Troubleshooting Guide (Mac)
First, disconnect your D’CENT wallet from your computer.
Press and hold both the "Down (v)" button + "Power" button for few seconds to force the device to power off.
If your device is "brick"ed during the firmware update, you can still access the bootloader mode by pressing and holding both "OK" button + "Power" button for 10 seconds.
From the bootloader mode, you can try updating the firmware to recover your Biometric Wallet.
In rare cases, Mac OS system fails to recognize the D’CENT wallet even though it was recognized before. This issue can be solved by checking the following in the system's settings.
Go to About This Mac > Overview > System Report
Look under Hardware > USB > See if D'CENT is shown as in the picture below
Checking account info on Biometric Wallet
From the Biometric Wallet, you can check the account information that is synchronized with the mobile app.
The main screen of the device lists various coin accounts. Select and choose an account to view the details.
For more information on how to create an account, please see .
For more information on synchronizing between Biometric Wallet and mobile app, please see
Troubleshooting Guide (Android Bluetooth Error)
For a seamless experience in connecting your phone with the hardware wallet, please check the following:
1) You have enabled Bluetooth on your Android Phone. Refer for how to access the Bluetooth menu.
2) Make sure you are using the Biometric Wallet mode when using D'CENT App with your Biometric Wallet.
If your biometric wallet was previously connected but now fails to connect, or if the device is not detected in the "Search Device" popup after changing phones, performing an Android Bluetooth settings reset may help resolve the issue.
1) Go to Settings.
D'CENT Backup Card (Wallet Recovery)
For Android App 4.6.0 or higher / iOS App 4.6.0 or higher
One of the key conveniences of the D'CENT All-in-One Wallet is its unique backup method. Rather than using a traditional mnemonic code, the private key is backed up using state-of-the-art encryption technology, which securely transfers the private key to a spare Backup Card. This method is both easy to use and highly secure, giving users peace of mind that their assets are protected.
The Backup Card is a hardware wallet withno datainside the secure chipset and it is used for creating the exact same clone of your All-in-One Wallet.
Buy a D'CENT Backup Card 👇👇👇
Biometric Wallet
When your Biometric Cold Wallet is connected, clicking the More (⋮) button in the Settings tab will display the following menu, as shown in the image.
You can check the firmware version of your Biometric Wallet. If the firmware is not up to date, a “New” icon will appear to indicate that an update is available.
By pressing the "Firmware Update" button, you can check for the latest version and find instructions on how to update.
Click for more information on firmware updates.
Step 3: Recover backup image
To recover a backup image, please have your Backup Card ready.
1) Click the More (⋮) button in the "Settings" tab.
2) Select "Recover Card".
3) Click on "Start Recovery".
4) On the back of your phone, tag the Backup Card
Step 1: Set up your Backup Card
Before the Backup Card can be used, the factory PIN must be changed to your own PIN.
1) Click the More (⋮) button in the "Settings" tab.
2) Select the "Change Card PIN" menu.
3) Check "I have checked the information", then click the "Start" button.
4) From your Backup Card, find the factory PIN by removing the ribbon masking.
How to remove (hide) a coin account
Accounts that have been created can be removed (hidden) from the "My Wallet" Tab by using the "Hide" function.
1) Tap the account you want to hide to navigate to the Account Details page.
2) Tap the [︙] (More) button in the top right corner of the Account Details page.
3) Select "Hide account" from the menu.
4) Tap the "Hide" button. The account will no longer be visible in your asset list.
How to add a custom path account
This guide details the instructions for adding a custom path BTC account.
1) Tap on "Settings" tab.
2) Scroll down and tap "Laboratory".
3) Enable "Custom Path Account".
4) Navigate to the "My Wallet" tab and tap the "Add Account
How to receive coin
In order to receive cryptocurrency assets, you must first create an account to check the address where you can receive them.
D'CENT Biometric Wallet offers a convenient feature of showing the account address in the QR code.
From the main screen select the coin account you want and press OK button to see the account info.
Press OK button again to see the address in hex(numbers + characters) form.
Biometric Wallet mode
1) From the mobile app, press the "Send" button of the coin account to be used for the transaction.
2) You can directly enter the address of the other party (Receiver) in the address field or
Press "QR Scan" to operate the camera and scan an address in QR code format.
Checking transaction status and history
After sending or receiving a transfer to your wallet account address, you can check the transaction history from the mobile app.
1) In the D'CENT mobile app, tap the desired coin account to open the Account Details screen.
2) On the Account Details screen, you can view your coin balance and transaction history.
Transactions sent from your account appear in Red.
Software Wallet mode
1) From the mobile app, press the "Send" button of the coin account to be used for the transaction.
2) You can directly enter the address of the other party (Receiver) in the address field or
Press "QR Scan" to operate the camera and scan an address in QR code format.
Click
How to receive or send an NFT token
Let’s see how to send NFTs from another wallet to D'CENT Wallet. In our example, we have NFTs using Metamask at Rarible, an NFT marketplace. At this time, the situation is where you want to send NFT to D'CENT Wallet. The process of transferring an NFT from other exchanges and wallets to D'CENT Wallet is similar.
1. Check the NFT you currently have. In this example, we have an NFT in the MetaMask wallet connected to the Rarible Marketplace. To transfer this NFT token to the D'CENT Wallet, click on Transfer.
2. The MetaMask (or wallet that is currently linked to the service) screen will be triggered, and you will have to create a send transaction. After entering the address, set the fee and click OK. This will send the NFT transfer transaction to the blockchain network (Ethereum in the example).
3. When the NFT transfer transaction gets completed from the blockchain network, you will see that an NFT received to your D'CENT Wallet will be displayed on the Collectibles Tab.
Card type Wallet mode
1) From the mobile app, press the "Send" button of the coin account to be used for the transaction.
2) You can directly enter the address of the other party (Receiver) in the address field or
Press "QR Scan" to operate the camera and scan an address in QR code format.
Click
How to use RSK account
Send and Receive RSK (RBTC) coin
If you don't have RSK account, create new account. Coin name for RSK is "RSK Smart Bitcoin(RBTC)".
For more details of creating an account, click below link.
From your coin account, click "Receive" to view your account address.
For more details of receiving coin, click below link.
The procedures to send RSK coin are same as sending general coin. You can see in the below link to check how to send coin.
How to use XRP account
If you have added your Ripple (XRP) wallet address for the first time, it is disabled. requires a purchase or transfer of Ripple of 1 XRP or higher to convert the Ripple wallet address to an activated state. Therefore, the corresponding 1 XRP will permanently lock-up at the corresponding wallet address.
If a permanent lockup is made at the address of the Ripple wallet, it is assumed that only 99 XRP can be transferred, excluding the 1 XRP, which is the permanent lockup amount.
Users' ripple wallets assigned by the Exchanges use the same address. In other words, User # 1, User # 2, User # 3, all use the same ripple address. To distinguish a user's account from another user, the Exchange will assign a Destination Tag to the user's account, which is an uniquely identifiable number.
Therefore, when sending XRP to a recipient wallet address created from the Exchange, you MUST enter the Destination Tag so that the Exchange will complete the deposit to the recipient's wallet account.
Picture above is an example of XRP wallet account created from an Exchange such as Binance.
When you press "Deposit" for XRP, it will show the XRP deposit Tag (9-digit unique number
How to use TRON account (TRX, TRC10, TRC20, TRC721)
If you don't have a Tron account, create a new account. The coin symbol name for Tron is "TRX".
For more details on how to create an account, click the link below.
When you have added a new Tron account in the D'CENT Wallet, this account do not exist on the Tron blockchain just yet. To use Tron account, you must first pay the account generation fee of 1 TRX as required by . Additionally, the Tron account needs to be activated before any information can be found via API queries or on blockchain explorer.
To make your Tron account exist (account creation) on the blockchain, simply send more than 1 TRX to your Tron address in the wallet.
Tron account creation fee = 1 TRX
Switch DApp Browser Account
How to change the account and network for the D'CENT in-app browser
By clicking the Network (🌐) icon on the top right corner of the "Discovery" tab, you can change the account and blockchain network used in the DApp browser.
You can either select a different account that has already been added to the wallet from the list, or search and select the desired account and network using the search bar.
For the list of supported networks, please refer to .
The more blockchain networks will be added to the supported list for D'CENT dapp browser.
Transactions received to your account appear in Green.
The transaction status is displayed as "Completed", "Pending", or "Failed".
Tap "See Full History" to check your wallet address details on a blockchain explorer.
3) Selecting a transaction will display its detailed information, including:
Confirmation status
TXID (Transaction ID)
Sender and recipient addresses
How to check transaction history
If the transaction history does not appear, try refreshing the screen by pulling it down and releasing it.
The fee of RSK is automatically calculated after setting the sending amount. The calculated fee is based on current average transaction fee on RSK blockchain network.
You can change the fee by sliding the bar or by directly entering the fee value in the advanced fee mode.
If the fee is set too low, the transaction may not get confirmed in the blockchain network.
ERC721 Token (NFT)
The ERC721 token is also called NFT (Non-fungible Token) and NFT is a non-replaceable token. While each ERC20 token has the same value, the ERC721 token has a unique value for each token.
In other words, it is impossible for the NFT to replace one token with another.
ERC20 is issued for functions similar to currency or points. On the other hand, ERC721 is used in cases where each token has a unique value, such as a game item.
Recovery phrase record sheet
Welcome Guide
Specification sheet
Using chargers with an output voltage of 6V or higher and some high-speed chargers (including PD chargers) with a variable output voltage exceeding 5V may cause product failure.
Check external package
Make sure the package Seal(Authenticity Sticker) is intact on both sides
Normal package
Abnormal package
Double-check that the package is not damaged and make sure that the Seal is not torn or missing.
Inside the package
Precautions when charging the battery
What to do when the Biometric Wallet screen gets stuck during a firmware update
What to do when the Biometric Wallet is not recognized by the Mac
If the Biometric Wallet is still not recognized, the issue may be caused by a faulty USB charging cable or a problem with the USB port on your PC.
Please try using a different USB charging cable, switching to another USB port on your PC, or connecting to a different PC. When changing the USB charging cable, make sure it supports data transfer.
.
Without the mobile app, you can also check coin account address and QR code form of the address from the Biometric Wallet.
If there are too many unused accounts and you want to delete account information, you can do the following. In this case, all account information is deleted.
1) On your Biometric Wallet, navigate to "Setting > Security > Delete Account"
2) Enter your PIN and when you confirm the warning message by "OK button", all your account info will be deleted.
3) Synchronize with your mobile app and you will notice that there is no account shown on the mobile app screen.
From the mobile app, you can re-add the accounts that you would like to see again.
Even if the Biometric Wallet is not synchronized with the mobile app, the basic account information for each coin can be checked from the Biometric Wallet.
After the reset is complete, enable Bluetooth on your phone and relaunch the D’CENT app. Try connecting your biometric wallet again. Refer here for how to connect the wallet.
How to solve issues relating to Bluetooth connection errors
Reset Android Bluetooth Settings
This reset will remove all saved Bluetooth and Wi-Fi connections. You’ll need to reconnect your devices afterward.
The reset menu location may vary depending on your phone model or Android OS version.
This reset will remove all saved Bluetooth and Wi-Fi connections. You’ll need to reconnect your devices afterward.
Depending on your phone model or Android OS version, you may see "Reset network settings" instead of "Reset Wi-Fi and Bluetooth settings."
When you click the Device Info menu, you can view your Biometric Cold Wallet’s device information, including the Bluetooth name, firmware version, and KSM version.
And you can also change the device name displayed when booting the Biometric Wallet by clicking the edit icon next to “My D’CENT”.
Starting from version 8.1.0 of the D'CENT mobile app, a "Delete Device" option is available for removing registered biometric cold wallets. This feature allows you to delete unused cold wallets directly within the mobile app for better wallet management.
Deleting the device from the app does not delete any of the private keys associated to the wallet accounts you have created. You can recover your assets by reconnecting the device via Bluetooth.
When you tap the "Delete" button, you will be prompted to authenticate with either your 6-digit mobile app password or biometric verification to proceed.
This guide is based on D’CENT mobile app version 8.1.0.
Firmware update
Mobile Firmware update via OTG cable is only available on the Andorid phones. Please click here for more details.
5) The message "Recovery available card" will be shown along with the number of available recovery attempts. Click on "Confirm" to continue.
6) Click on the "Load" button to paste in the encrypted backup image data. Click on "Next" to continue.
7) Enter the encryption password which was used to encrypt the backup image. Click on "Next" to continue.
8) Enter the PIN of your Backup Card.
9) On the back of your phone, tap the Backup Card.
10) When the message "Backup image recovery completed" appears, click on "Close" to finish the recovery process.
1) Click the More (⋮) button in the "Settings" tab.
2) Select "Scan New Card".
3) On the back of your phone, tag the Backup Card.
4) If the message "This card is a backup card" is displayed, it means that the backup card has been successfully recovered. Please check whether the address displayed on the screen matches the address shown on the original All-in-One Wallet.
How to recover the backup image to a Backup Card
The number of recovery attempts indicates how many times you can try entering the backup image password. You are allowed up to 10 attempts.
How to check if the backup card has been successfully recovered
5) Enter this 6-digit factory PIN. (ie: 130478)
6) On the back of your phone, tag the Backup Card to scan.
7) Enter a new PIN for your Backup Card. (ie: 123456)
8) Enter the same new PIN. (ie: 123456)
9) On the back of your phone, tag the Backup Card to scan.
10) Click the “Confirm” button to complete the PIN change process.
Change the factory PIN of the Backup Card
If you want, you can set the new PIN of the Backup Card to the same as the All-in-One Wallet's PIN.
When removing the ribbon masking, please be careful not to use sharp tools as this may damage the card wallet.
The PIN of the Backup Card is different from the 6-digit password used in the D'CENT mobile app.
If confused, it may result in restricted wallet access, so please make sure to remember the PIN you set for your Backup Card.
"Hide account" function does not delete your account permanently, it just hides the account from D'CENT wallet. Therefore, you can re-add the hidden account at any time.
1) Tap on "Add account+ " in the "My Wallet" tab.
2) Select the previously hidden coin to add it back to the asset list.
3) Once added, the account and its balance will be visible again in your asset list.
In the case of using the Biometric Wallet mode, your Biometric Wallet must also be connect in order to hide an account. And the hidden account is synchronized with the your biometric wallet.
Hide account
To remove a native asset account such as Ethereum, all the token accounts that are linked to this native asset account must be removed first.
Re-add hidden account
+
"
button.
5) Search for BTC and select the entry with a number appended to BTC (e.g., BTC - 5757).
6) Name your account (optional) to complete the account addition.
Likewise, you can also add custom path accounts for networks such as ETH or BNB.
The "Vendor Lock-In Account" is a type of custom path account that enables the creation of wallet addresses compatible with external wallets such as MetaMask or Phantom Wallet.
If you've recovered a wallet in D'CENT using a mnemonic phrase created by an external wallet but some addresses appear differently, adding a Vendor Lock-In Account allows you to use the same addresses as those created in the external wallet.
The steps to add a Vendor Lock-In Account are the same as adding a Custom Path Account.
1) Tap on "Settings" tab.
2) Scroll down and tap "Laboratory".
3) Enable "Custom Path Account".
4) Navigate to the "My Wallet" tab and tap the "Add Account+ " button.
5) Search for "Vendor" in the search bar to find Vendor Lock-In accounts for Ethereum, Base, and Solana.
6) Name your account (optional) to complete the account addition.
Add a Custom Path Account
Add a Vendor Lock-In Account
Requirements for Vendor Lock-In Account
Minimum Supported Version
D'CENT Mobile App: v8.0.0 or higher
Press OK button for one last time to see the address in the QR code.
Present the QR code to the sender to scan with the mobile camera.
If QR code is read correctly, your address will be automatically inserted in the sender's wallet.
Run the mobile app and you will see your accounts in the My Wallet tab.
From your coin account, click "Receive" to view your account address.
Your account address in QR code can be scanned by the sender's camera.
To share the hex address to your sender, use the "Copy" or "Share" function.
When adding a cryptocurrency account to your D'CENT wallet, please make sure it is on the same network as sender's coins. If the support network is different, you will not receive coins.
You can just run the mobile app to see the account address.
You can use it more safely if you check the address once again from the Biometric Wallet.
Click "Paste" to enter the copied address.
3) When the address is entered, click the "Next" button.
1) Enter the number of cryptocurrency you want to send, or enter the amount in local currency.
2) Set the transaction fee. (Slow / Normal / Fast)
By setting it to "Fast" and paying more fees, it is likely that the processing time of the transfer transaction will be reduced.
3) Once you have set the amount and fee, click the "Next" button.
4) Check if the transaction details displayed on the screen are correct and click the "Send" button.
1) Check the transaction information displayed on the Biometric Wallet again. If the information is correct, click the "OK" button(CONFIRM).
2) Scan your fingerprint for final approval of the SEND transaction. If the fingerprint is not registered, enter the PIN number for the final approval.
3) When the transaction data is transmitted to the blockchain, the mobile app displays a message that the transaction has been completed. Click the "OK" button to return to the main screen.
If you are using the Biometric Wallet mode, you can send coins only when your Biometric Wallet is connected with the mobile app.
Enter the Receiver address
Enter the amount to send and set the fee
Final confirmation from your Biometric Wallet
"Paste"
to enter the copied address.
3) When the address is entered, click the "Next" button.
1) Enter the number of cryptocurrency you want to send, or enter the amount in local currency.
2) Set the transaction fee. (Slow / Normal / Fast)
By setting it to "Fast" and paying more fees, it is likely that the processing time of the transfer transaction will be reduced.
3) Once you have set the amount and fee, click the "Next" button.
4) Check if the transaction details displayed on the screen are correct and click the "Send" button.
1) Enter the 6-digit password you've set to protect access to your mobile app.
If you have set up additional authentication methods in your mobile app, you can authenticate with fingerprint or Face ID.
2) When the transaction data is transmitted to the blockchain, the mobile app displays a message that the transaction has been completed. Click the "OK" button to return to the main screen.
App Wallet is a software wallet that can be used free of charge without a hardware wallet. If you want more secure asset management, please purchase D'CENT Wallet.
Enter the Receiver address
Enter the amount to send and set the fee
Final confirmation from your App Wallet
Let’s see how to send out an NFT token from D'CENT Wallet to another wallet or exchange. In the example, the situation is where the MetaMask will receive the NFT token while connected to Rarible, an NFT marketplace. Sending from D'CENT Wallet to other exchanges and wallets is a similar process.
1. From the Collectibles Tab of your D'CENT Wallet, select your NFT collection and then click the Send button. When the screen changes, enter the recipient's address.
2. After checking the recipient's address, set the fee and finally check the transaction details to be sent to the blockchain network.
3. After the transaction is transmitted to the blockchain network, you will need to wait a certain period of time for the transaction to be completed. When the transaction is completed, you will see that the NFT token that was sent will no longer appear in the collectibles list.
Receiving an NFT token to D'CENT Wallet
Sending an NFT token from D'CENT Wallet to another wallet
"Paste"
to enter the copied address.
3) When the address is entered, click the "Next" button.
1) Enter the number of cryptocurrency you want to send, or enter the amount in local currency.
2) Set the transaction fee. (Slow / Normal / Fast)
By setting it to "Fast" and paying more fees, it is likely that the processing time of the transfer transaction will be reduced.
3) Once you have set the amount and fee, click the "Next" button.
4) Check if the transaction details displayed on the screen are correct and click the "Send" button.
5) Enter the PIN for your Card Wallet
1) From the mobile app, a screen will prompt you to tag the Card Wallet.
2) Tag the Card Wallet on the NFC antenna located on the back of the mobile phone. The location of the NFC antenna varies by the phone model.
3) When the transaction data is transmitted to the blockchain, the mobile app displays a message that the transaction has been completed. Click the "OK" button to return to the main screen.
To use the Card Wallet, the NFC function must be enabled from the settings of the mobile phone.
Enter the Receiver address
Enter the amount to send and set the fee
If the PIN is not matched, you can try 10 times. If all 10 times trials are over, Card Wallet will be locked and you can never use the Card Wallet. Remember carefully your PIN for Card Wallet.
Final confirmation from your Card Wallet
).
On the bottom, the XRP address is shown.
In the case of a XRP wallet created on a personal wallet such as D'CENT Wallet, there is no destination tag and only the address is created.
Ripple (XRP) account activation
Depending on the exchange services, transferring fund to an inactive XLM account address may be restricted.
When sending funds to the Ripple wallet address that exists on the Exchange, you must enter the Destination Tag.
XRP wallet created on D'CENT Wallet
Personal wallet such as D'CENT Wallet does not have a Destination Tag for its XRP account.
To keep your Tron account in the activated state, your Tron account must maintain more than 0.1 TRX in the balance. If the balance in the Tron account falls below 0.1 TRX, the account will become deactivated and will no longer read account information from the Tron blockchain.
Tron account activation fee = 0.1 TRX
Q. My USDT token (TRC20) in the Tron account does not show up, what do I do?
A. Remember, if the balance of TRX in your Tron account falls below 0.1 TRX, it will become deactivated. Having at least 0.1 TRX will keep your Tron account (including TRC10 and TRC20) in the activated state and will show the account information for Tron (TRX) and token accounts (TRC10 and TRC20).
You MUST create a backup copy of the All-in-One Wallet before an unfortunate situation happens such as the All-in-One Wallet being stolen, lost, damaged, or card getting blocked. In any one of these situations, all cryptocurrency assets will be lost forever if you did not create a backup copy of the All-in-One wallet.
Using OTG cable for physical connection
By connecting the Android Phone and OTG cable, you can synchronize with the Biometric Wallet via OTG cable instead of Bluetooth.
If you are using the OTG cable to connect, it is recommended to disable the Bluetooth function on your Android Phone.
What is an OTG cable?
OTG stands for "On-The-Go" and refers to cable or adapter device that allow USB devices to connect to Android phones. Typically, one side connects to the mobile phone's charging port, while the other side is a standard USB port (USB Type A). Just connect the OTG cable to your Android phone.
Example of OTG cable
OTG cables are not included in the D'CENT Biometric Wallet package and must be purchased separately.
Types of OTG devices
There are various types of OTG cables, such as Adapter type and Cable type, and there is a C to C cable type device that can be directly connected to the mobile phone and Biometric Wallet charging port without Adapter or Cable.
Please use an OTG cable that is compatible with your Android phone or Biometric Wallet charging port.
Example of OTG devices : Adapter type / Cable type / D'CENT 2-IN-1 OTG Cable / C to C cable
Using Biometric Wallet by connecting with an OTG cable
Launch the D'CENT mobile app
Please launch the D'CENT mobile app first. (Biometric Wallet mode)
Below is a picture showing that there is no connection to with the Biometric Wallet.
Depending on the OTG cable you own, connect the Biometric Wallet and the Android device as shown in the picture below.
1) When an OTG cable is connected, you will see the following pop-up. Press "OK".
2) When connection is made, Synchronization will begin with the Biometric Wallet and you can start using it when it finishes.
You can update the firmware of Biometric Wallet from the mobile phone using an OTG cable.
Please refer to the user guide below for instructions on how to update the firmware using an OTG device.
25th Word (the Passphrase)
Do you remember? If anyone gets access to your mnemonic code (24 words), they can steal all of your cryptocurrencies by simply creating the exact same wallet.
The passphrase (25th word) is an advanced security feature on the D’CENT Biometric hardware wallet. It adds an extra word to your existing mnemonic code (24 words) to create an entirely new set of private keys (accounts). This means that even if your mnemonic code is exposed to someone, that person cannot recreate the same wallet that you have without knowing the 25th word.
The passphrase is a word that is chosen by you and can be up to 8 characters consisting of numbers and or alphabets. Please carefully choose your 25th Word which you can remember perfectly.
If you already have cryptocurrency assets in your wallet, please move all assets to another address, and then set the 25th word.
Please note that completing the setting of the 25th word will replace it with a new private key, and the coin account you previously managed will not be confirmed.
How to set up the 25th word (Passphrase)
Requirements
To use the passphrase feature, the D’CENT Biometric Wallet device must have a security chipset with KSM version 1.1 or higher. An older model of the Biometric wallet with the KSM version below the requirement does not support the passphrase feature.
KSM version can be checked from the "Setting > Device Info"
1) To access the 25th Word menu, go to "Setting > Security > 25th Word"
2) Enter your wallet PIN (4 to 8 digits) to authenticate.
Read the Warning carefully. Performing the setup of the 25th Word will completely delete your existing wallet on the device.
Click on the "OK" button on the device to proceed. You will be prompted to enter all 24 words from your mnemonic code.
3) After entering all 24 words, click on "I am ready" on the review screen to proceed. Read the Warning carefully. In the next step, you will be asked to choose your own 25h Word. Click on the "OK" button to proceed.
4) Choose your own 25th Word (the Passphrase). The 25th Word can be 1 to 8 characters in length and can consist of numbers and or alphabets. Please carefully choose your 25th Word which you can remember perfectly. Without your 25th Word, you cannot recover your wallet. Enter your 25th Word and verify by entering the exact same 25th Word.
5) After completing Step 4 above, your Biometric wallet will power down automatically. Power on your Biometric wallet and your wallet will have an entirely new set of private keys (accounts).
How to use the All-in-One Wallet
How to add coin/token accounts
Adding a new cryptocurrency account is very easy. Simply press the (+)button at the bottom right corner of the App and select the asset(s) you wish to add to the wallet.
All-in-One Wallet supports all ERC20 types of Token assets. There are over 3,000 token assets are listed in D'CENT Wallet which can be added simply by searching the asset from the list. For the non-listed token assets, users can manually add these Token accounts.
All-in-One Wallet provides the safe storage of Non-fungible Tokens (NFTs) based on ERC721 and ERC1155 standards. D'CENT App (the Collectibles Tab) allows viewing and management (Send, Receive, View history) of NFTs stored in the hardware wallet.
You can find more information about using the Collectibles Tab from the link below.
All-in-One Wallet also provides the Discovery Tab (the built-in dApp browser of D'CENT App), which allows the user to easily connect to a wide range of blockchain-based services, including games, NFTs, NFT marketplaces, DeFi, lending and borrowing, the Metaverse, and more.
You can find more information about using the Discovery Tab from the link below.
While using the All-in-One Wallet, you will be asked to enter the PIN of the hardware wallet for the following occasions:
1) When signing the transaction
2) When changing the current PIN to a new PIN
Buy a D'CENT Backup Card 👇👇👇
Wallet recovery using the mnemonic (recovery words) from the Ledger wallet
Both the Ledger wallet and the D'CENT wallet follow the same BIP standards for wallet recovery. However, each wallet service may have used a different wallet derivation path to generate a private key for each type of digital asset that each wallet service currently supports.
Below is a screenshot that compares the account addresses (ie: BSC & ETH) between the Ledger wallet and D'CENT wallet. In this example, D'CENT wallet was recovered using the mnemonic code from the Ledger wallet. Notice how the addresses for the BSC and ETH accounts are the same because the wallet derivation paths are the same between these 2 wallet services.
List of recovery-compatible assets (mainnets)
The wallet derivation paths for the following cryptocurrencies are the same between the Ledger wallet and the D'CENT wallet. This means that using the Ledger's mnemonic code, the same accounts(private keys) can be generated on the D'CENT wallet.
Binance Smart Chain (BSC - BNB)
Bitcoin Cash (BCH)
Cosmos (ATOM)
DASH (DASH)
Dogecoin (DOGE)
Ethereum (ETH)
Ethereum Classic (ETC) - select 'Ethereum Classic - Legacy' when adding to D'CENT wallet.
Horizen (ZEN)
Polygon (MATIC)
Solana (SOL)
Stellar (XLM)
XRP (XRP)
Zcash (ZEC)
TRON (TRX)
It is likely that you also held token assets in the Ledger wallet. Token assets are digital assets issued by blockchain projects (service providers) via smart contracts that exist on EVM-compatible networks such as Ethereum, Binance Smart Chain, Tron, Polygon, and more.
Each EVM-compatible network has a name for its token standard which is represented or marked as 'ERC20' for tokens on the Ethereum network, 'BEP20' for tokens on the Binance Smart Chain network, 'TRC10' and 'TRC20' for tokens on the Tron network, 'Polygon-ERC20' for tokens on the Polygon network, and so on. The token standards help identify easily which network(s) the token assets were issued on.
For example, let's say you held ETH coins and USDT tokens (ERC20) in the Ledger wallet. To recover these assets, you must add two accounts to the D'CENT wallet. First, add the Ethereum account to recover ETH coins. Next, add the USDT (ERC20) account linking it to your Ethereum account and your USDT tokens will be found.
You can easily search for which digital assets are supported (listed) in the D'CENT wallet by visiting the link below.
If the token asset that you are looking for is not displayed in the list, you can also manually add the account as a custom token account. For detailed instructions, please refer to the guide below.
How to create a coin account
How to create an account
From the "My Wallet" tab, click the "Add account+ " button to create an account.
In the case of using the Biometric Wallet mode, your Biometric Wallet must also be connect in order to create an account.
Select the Coin/Token
Select the coin you want to add from the list. You can also search by coin name or symbol name.
Click for a full list of cryptocurrencies supported by D'CENT Wallet.
What if the Coin/Token you want to add is not on the list?
If you cannot find your coins or tokens to add, you can ask the D'CENT team to add it to the list.
Click the "Crypto Asset Request" link and fill out the form. The D'CENT team will try to reflect your need as quickly as possible.
When trying to add a token account without the fee account
To create token accounts such as ERC20, BEP20, RRC20, and KCT, the corresponding mainnet account must be created first.
To create ERC20 token account: Ethereum account is required
To create BEP20 token account: Binance smart chain account is required
To create RRC20 token account: RSK account is required
After selecting the coin / token to add, please set the account name. If you click the “Add account” button without entering a name, the default name will be displayed. The account name is the nickname for the account, and it is displayed in the account information of the mobile app and also on the Biometric Wallet.
When the account creation is completed, your account will appear on the "My Wallet" tabscreen. The account balance information is retrieved from the blockchain network.
Now you can try SEND or RECEIVE from your account.
When an account is created in the Biometric Wallet mode, the created account information is also updated in the Biometric Wallet. For more information, refer to .
You can create 80 accounts with Biometric wallet.
Step 2: Create backup image
You MUST create a backup copy of the All-in-One Wallet before an unfortunate situation happens such as the All-in-One Wallet being stolen, lost, damaged, or card getting blocked.
How to create the backup image of the All-in-One Wallet
To create a backup image, please have your All-in-One Wallet ready.
1) Tap the banner at the top of the "My Wallet" tab or go to the "Settings" tab and select "Backup".
2) Click on "Backup".
3) Click on "Start Backup".
4) Tag the All-in-One Wallet to proceed.
5) A message "This card can be backed up" will appear, along with the number of available backups for your All-in-One Wallet will be displayed. Click on "Confirm" to continue.
6) Enter an encryption password to secure the backup image data. Re-enter the same password, then tap "Next".
7) Enter the PIN for the All-in-One Wallet.
8) Tag the All-in-One Wallet on the back of your phone to scan. Make sure to use the All-in-One Wallet, not a backup card.
9) Once the backup image is created, tap the “Share backup image” button.
10) Tap the copy icon or choose an app/channel (such as messaging or email) where the backup image can be safely stored.
11) Paste the copied backup image into the selected app or channel and store it securely.
Buy a D'CENT Backup Card 👇👇👇
Mobile App introduction
From a single D'CENT mobile app, users are given the choices of using Biometric Wallet, Card type Wallet, or the Software Wallet.
You can also easily manage your cryptocurrency assets through the mobile app by adding cryptocurrency accounts, checking the portfolio of coins you own on one screen, and conducting transactions such as sending and receiving coins.
Mobile App download
For Android
You can install D'CENT mobile app by searching for the app directly from the Google Play Store.
Search for the keyword "D'CENT Wallet".
To install the mobile app for Android, please click here.
For iOS
You can install D'CENT mobile app by searching for the app directly from the App Store.
Search for the keyword "D'CENT Wallet".
To download the D'CENT mobile app for iOS, please click .
My Wallet : You can view your existing coin accounts or add new ones. You can send and receive coins, check your transaction history, and manage your assets with ease. Additionally, by tapping the "NFTs" tab, you can view all NFT assets stored in your wallet at a glance.
Insight : You can check coin prices and current trading trends. Additionally, you can compare the prices of each asset across different platforms.
Swap : You can trade your desired assets, including cross-network transactions.
Discovery : It is a DApp browser that allows access to various Web3 services such as DeFi, DEX, and NFT marketplace. You can easily connect your D'CENT wallet by entering the URL in the search box, doing a Google search, or selecting the desired service from the "LIST".
Settings : Provides the ability to change app settings, such as changing the supported language, local currency, and password of the mobile app. Additionally, you can easily and conveniently manage Biometric,Card, and App Wallet types through the "Manage All Wallets" menu.
How to use Ethereum account
Send and Receive Ethereum (ETH) coin
How to create an Ethereum account
If you don't have Ethereum account, create new account. Coin name for Ethereum is "Ethereum (ETH)".
For more details of creating an account, click below link.
1) The fee of Ethereum is automatically calculated after setting the sending amount. The calculated fee is based on current average transaction fee on Ethereum blockchain network.
2) You can select the fee from "Slow," "Normal" or "Fast" or adjust it manually in the advanced fee settings.
The fee of ethereum is consist of "GAS fee" and "GAS Limit". You can manually set the GAS Limit and GAS fee on "Advanced" fee setting option.
The unit of GAS fee is "Gwei" which is one of ETH's sub unit.
1 ETH = 1,000,000,000 gwei
The real fee to be paid is calculated as “Used GAS amount” x “GAS fee” .
You can set the maximum amount of GAS as setting GAS Limit. Transaction can be confirmed faster if GAS fee is higher.
How to add a custom token account
Custom tokens are token-type cryptocurrencies that are not listed in the support list. Custom token accounts can be added manually by the user for management.
For custom added accounts, only the amount of cryptocurrency held is displayed. Other information such as the market price and converted balance is not displayed.
To request official support for a specific token from D'CENT Wallet, please use the Google form below. Requesting support for a new blockchain network can take a significant amount of time.
Adding custom tokens is straightforward and easy. Before you can add a custom token, make sure you have already created its respective blockchain account.
For example, if you intend to add an ERC20, you must first have created an Ethereum account in the wallet.
1) Click the "Add Account+ " button.
2) Select the "Custom" tab.
3) Tap the Network field to view the list of supported networks.
4) Select the network where the token you want to add was issued, then tap "Next".
5) Choose the account that will cover transaction fees for this account, then tap "Next".
6) Enter the "Smart contract address", then check the displayed coin information. If the information is correct, tap "Next".
7) Verify the "Decimals" places entered, then tap "Next".
8) Set an account name and tap "Create" to add the token.
How to use Binance Smart Chain account
D'CENT Wallet supports Binance Smart Chain (BSC) and BEP20 tokens
The firmware (v.2.6.0 or higher) for D’CENT Biometric Wallet supports Binance Smart Chain and the BEP20 protocol. Additionally, the D’CENT Mobile App (v.5.1.0 or higher) will also support Binance Smart Chain and BEP20 tokens.
What is Binance Smart Chain?
Binance Smart Chain is an innovative solution to bring programmability and interoperability to Binance Chain. It relies on a system of 21 validators with Proof of Staked Authority (PoSA) consensus that can support short block time and lower fees. The Binance Smart Chain also supports EVM-compatible smart contracts and offers interoperability for Cross-chain transfer.
How to set up D’CENT Wallet
You can download the latest version of the D’CENT Mobile App here:
👉 For Android
👉 For iOS
If you are using an older version of the firmware on D’CENT Biometric Wallet, you will need to upgrade the firmware to the latest version (v.2.6.0 or higher) from the official firmware update site.
👉 Official Firmware Update Site
You can also find a fully detailed instructions guide below.
👉
Run the D’CENT Mobile App and authenticate to unlock access.
1) From the "My Wallet" Tab, press the (+) button to add a wallet account.
2) In the search field, type "Binance" to search.
3) Choose "Binance Smart Chain" from the list shown.
4) Press the "Create" button to proceed.
5) In the "My Wallet" Tab, notice that a new Binance Smart Chain account.
You can access Dapp services using the built-in dapp browser found in the "Discovery" Tab.
1) Go to the "Discovery" tab in the bottom menu.
2) Click on the "Network icon(🌐)" located in the upper right-hand corner.
3) Switch the network to "Binance Smart Chain".
4) You can access a dapp service by entering the URL in the search field.
👉
Using TrustLine for XLML
How to add a TrustLine
NOTE: Adding a TrustLine on the Stellar (XLM) ledger will reserve 0.5 XLM, meaning this reserved amount gets locked in the XLM account.
1) A TrustLine can be added by simply searching for the name of the TrustLine asset. In this example, we will add Stronghold Token (SHX).
2) Select your XLM mainnet account which will be used to pay for transaction fees of the trustline activities. Click on the "Next" button.
3) Click on the "Create" button.
4) You can see that Stronghold Token (SHX) is added underneath the XLM mainnet account.
Remember that just adding a TrustLine does not mean you can receive the Trust Asset(issued currency) to this account. You must first SET (activate) the TrustLine before you can receive funds.
1) Click on the TrustLine account and click on the "Receive" button.
2) Notice that before activation, the address is not displayed. Click on "Set Trustline" to start the activation.
3) Note that setting(activating) a TrustLine will reserve 0.5 XLM (at the time of writing). To activate the TrustLine, click on the "OK" button.
4) When the TrustLine is activated, the account will display the address.
A TrustLine can be deactivated at any time, only when the balance in the TrustLine account is completely emptied out. The 0.5 XLM that was reserved in the Stellar account will become liquid again.
👉 Disabling a TrustLine account will free up 0.5 XLM which was reserved (locked) in your XLM account.
1) Click on the TrustLine account (ie: SHX) that you wish to disable (deactivate) and click on "Details History".
2) Tap the [︙] (More) button in the top right corner and click on "Disable Trustline"
3. Click on "Disable Trustline".
4. Click on "Disable" to proceed with the TrustLine deactivation.
To remove any unused TrustLine account, click on the account and click "Hide account" button.
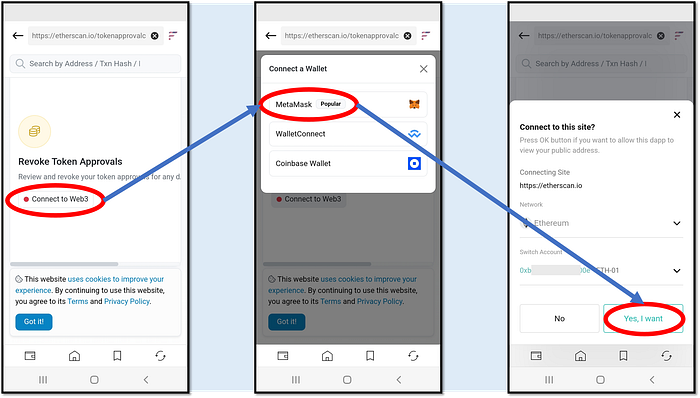
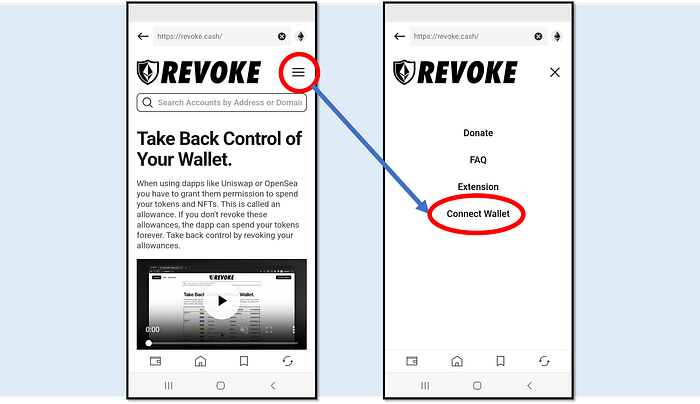
Connecting your wallet to a dApp site
Accessing a DApp Site
Follow the steps below to access a DApp site:
1) Select your desired service from the list or search for the DApp site using the search bar.
2) Check the service information (such as supported network) and the notice. Then, tick the checkbox "I have read and agree to the above," and click the “Go to Service” button.
3) Once the DApp site opens, click the “Connect” button to connect your D'CENT wallet.
Connect Wallet to a DApp Site
When you access a decentralized application (DApp) site, the website typically detects the blockchain wallet in use and automatically triggers a connection request.
At this point, review the account information being connected, then tap the “Connect” button to link your D'CENT wallet to the DApp site.
Wallet connection may not be automatically triggered when visiting a DApp site. In this case, you can manually connect your wallet by clicking the "Connect" or "Connect Wallet" button from the site’s menu. Then, choose "D’CENT" or "WalletConnect" from the wallet connection options to link your D’CENT wallet to the DApp site.
How to use KAIA account
Send and Receive Kaia (KAIA) coin
How to create an KAIA account
If you don't have Kaia account, create new account. Coin name for KAIA is "Kaia (KAIA)".
For more details of creating an account, click below link.
The fee of Kaia is consist of "GAS fee" and "GAS limit". The unit of GAS fee is "Ston" which is one of KAIA's sub unit.
1 KAIA = 1,000,000,000 ston
The real fee to be paid is calculated as "Used GAS amount" x "GAS fee".
GAS fee is fixed on Kaia, and you can change GAS Limit on fee setting stage.
Notes on Wallet Recovery - Legacy account
With the mobile app update to version v5.3.1, accounts created for Kaia (KAIA), Ethereum Classic (ETC), and RSK (Rootstock) now generate with the same address as the Ethereum account.
Therefore, if you have been using the D'CENT app wallet or biometric wallet before this update, you will need to create a "Legacy" account after wallet recovery to access your previously held assets.
How to Add a "Legacy" Account
1) If the newly created account does not include "Legacy" in its name, proceed with adding the Legacy account.
2) Tap the "Add Account+" button, then select the account labeled "Legacy" from the list (e.g., Kaia Legacy).
3) Once the process is complete, an account with "Legacy" in its name will be created, allowing you to access your previously held assets.
4) If an account without "Legacy" is displayed, tap the "Hide Account" button to remove the newly created account.
Troubleshooting Guide (Windows)
First, disconnect your D’CENT wallet from your computer.
Press and hold both the "Down (v)" button + "Power" buttonfor few seconds to force the device to power off.
If your device is "brick"ed during the firmware update, you can still access the bootloader mode by pressing and holding both "OK" button+ "Power" buttonfor 10 seconds.
From the bootloader mode, you can try updating the firmware to recover your Biometric Wallet.
In rare cases, Windows system fails to recognize the D’CENT wallet even though it was recognized before. This issue can be solved by uninstalling the device driver and reinstalling it again from the Windows Device Manager.
Using TrustLine for XRPL
This is an instruction guide on how to add a TrustLine account to your XRPL and how to activate it in order to receive the Trust Asset (IOU).
1) Click on the "Add account+ "button and search for the name of the Trust Line account you’d like to add.
2) For example, we will add "Elysian (ELS)". Search for "ELS" and click on the Elysian (ELS) TrustLine from the list.
3) Select your XRP account to set it as the Fee Account. Click "Next"
How to use PancakeSwap
Guidance on how to use PancakeSwap in D'CENT wallet's dapp browser
This is guidance on how to use PancakeSwap which is a DeFi service based on Binance Smart Chain (BSC). Since dapp browser (Discovery tab) of D'CENT wallet supports Binance Smart Chain, you can use PancakeSwap service through D'CENT dapp browser.
First, create an account of Binance Smart Chain.
1) Click "Add account +" button in the "My Wallet" tab
2) Enter "Binance Smart Chain" in the search field. And select "Binance Smart Chain (BNB)" from the search list.
Connect with Kaia Wallet extension
Kaia Wallet is a PC browser based extension wallet for the Kaia platform. Users will be able to interact with the Kaia Wallet to perform Kaia-based transactions including KAIA and BApps, while the owner verification and authorization are performed through biometric authentication on the D’CENT Biometric hardware wallet.
[Kaia Wallet is available here]
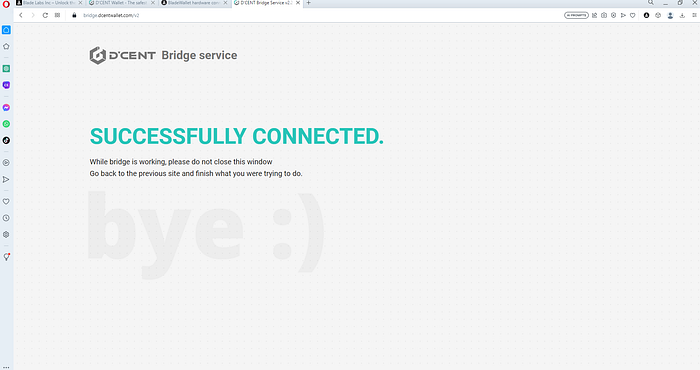
1) Download and install the D’CENT bridge program on your PC. Installing the bridge program will enable communication between the PC browser and the hardware wallet.
[D’CENT bridge program]
2) Plug in your D’CENT Biometric Wallet to the USB port on your PC and authenticate yourself to unlock the hardware wallet.
SegWit
What is Segregated Witness?
SegWit stands for Segregated Witness and, is a method of separately storing the signature part of the transaction record in order to reduce the data size stored in the block.
At the time SegWit was proposed, there were too many bitcoin transaction, it caused higher transaction fee. It was very important to solve bitcoin's block size limitation. This proposal has been adopted,
Before adopting SegWit, the saturation of the bitcoin block size caused the transaction fee to continue to rise. A resolution to reduce the block size received greater attention than the security enhancement effect to prevent transaction volatility.
In Bitcoin blocks, signatures take up surprisingly large amount of data space. If you save the signature separately in the block, more transactions data can be included in the data space that was once previously occupied by the signature data. In SegWit block, digital signature is collected separately to save 1MB of data space in a block, this will allow adding more transactions into that data space.
ERC20 Token
ERC20 token is a token used on Ethereum. On Ethereum, tokens can be issued in the form of smart contracts. Tokens that conform to the ERC20 standard among smart contracts are called ERC20 tokens.
Currently, almost all tokens running on Ethereum follow the ERC20 standard.
For a list of ERC20 tokens supported by D'CENT Wallet, refer to the following link.
If the fee is set too low, the transaction may not get confirmed in the blockchain network.
Advanced Fee Setting
(IMPORTANT!!) How to set (activate) TrustLine
How to disable a TrustLine
How to remove a TrustLine account
GAS Limit is automatically calculated in D'CENT mobile application.
Press Windows+R on your keyboard.
Type in "control panel" and press Enter to access the Control Panel.
For Windows 11, 10 or Windows 8, choose "Hardware and Sound".
For Windows 7, choose "System and Security".
From this Control Panel screen, look for and choose "Device Manager".
For Windows 11, 10 or Windows 8, check under the "Devices and Printers".
For Windows 7, check under "System".
Press Windows+R on your keyboard.
Type in "cmd" and press Enter to run the Command Prompt (a black window).
Type in "devmgmt.msc" and press Enter.
From the Device Manager screen, look for "Human Interface Devices".
Check if there is a "USB Input Device" marked as error (yellow triangle with exclamation mark). You will need to check if this is indeed a D'CENT device.
Right Mouse Click on this device and select "Properties".
From the USB Input Device Properties window, select "Details".
Under Property, choose "Hardware Ids".
Correct device ID for D'CENT is "PID_2130", "PID_2131" or "PID_2141".
From the "Device Manager", Right Mouse Click on the error marked device and select "Uninstall device".
On the top menu of Device Manager, press Action then select "Scan for hardware changes". This will scan for any new devices attached and will automatically install the driver to detect your Biometric Wallet.
What to do when the Biometric Wallet screen gets stuck during a firmware update
What to do when the Biometric Wallet is not recognized by the PC
How to access Device Manager (method #1)
How to quickly access Device Manager (method #2)
What should I do from the Device Manager?
If the Biometric Wallet is still not recognized, the issue may be caused by a faulty USB charging cable or a problem with the USB port on your PC.
Please try using a different USB charging cable, switching to another USB port on your PC, or connecting to a different PC. When changing the USB charging cable, make sure it supports data transfer.
to continue.
4) You can label your account or set it as default. Click "Create" to add this Trust Line account.
5) The Trust Line account added should show up under the XRP account.
Remember that just adding a Trust Line account does not mean you can receive the Trust Asset (IOUs) to this account. You must first set (activate) the TrustLine before you can receive funds.
1) Click on the Trust Line account and click on the "Receive" button.
2) Notice that before activation, the address is not displayed. Click on "Set Trustline" to start the activation.
3) Note that setting(activating) a TrustLine will reserve 0.2 XRP (at the time of writing). To activate the TrustLine, click on the "OK" button.
4) Activating a TrustLine will send a transaction to the XRPL blockchain network and a small transaction fee is required. Enter your password to sign this transaction. If you are using a Biometric wallet, you will sign from that device.
5) When the TrustLine is activated, the account will display the address.
A TrustLine can be deactivated at any time, even if there is remaining funds in that account. However, the funds remaining in the deactivated TrustLine account will become non-transferable. The 0.2 XRP reserved from setting a TrustLine will become liquid again only if the TrustLine has no remaining balance. Therefore, before you deactivate a TrustLine, it is highly recommended to empty the account.
👉 Disabling a TrustLine account will free up 0.2 XRP which was reserved (locked) in your XRPL account.
1) Select the TrustLine account you want to deactivate and navigate to the Account Details screen.
2) Tap the [︙] (More) button in the top right corner and click on "Disable Trustline".
3) Read the message and Click on "Disable".
4) Disabling a TrustLine will send a transaction to the XRPL blockchain network and a small transaction fee is required. Enter your password to sign this transaction. If you are using a Biometric wallet, you will sign from that device.
5) Once the TrustLine gets disabled, you will see a message that shows “Trustline is not activated yet”.
Removing a TrustLine account from your wallet is fairly easy.
1) Click on the TrustLine account you wish to remove.
2) Click on "Hide account" to remove this account from the wallet.
How to add a TrustLine account
How to set (activate) TrustLine
How to disable a TrustLine
How to remove a TrustLine account
3) Select the "Add accont" button to complete account creation.
In order to use Binance Smart Chain based dapp services, switch the network to Binance Smart Chain.
1) Click "Network(🌐)" icon in the "Discovery" tab.
2) You can add a site to your favorites by clicking the More (⋮) button at the bottom of the "Discovery" tab and selecting "Add to Favorites."
1) In order to connect D'CENT wallet with PancakeSwap, please click "Connect" button
2) When the PancakeSwap site requests a wallet connection, check the account to be connected and click the "Connect" button.
3) You will see that your D'CENT Wallet is successfully connected to the PancakeSwap site.
Discovery is a browsing function that allows you to use a blockchain-based decentralized app (dapp) service. Since all dapp services (including PancakeSwap) are not operated by D'CENT, any inquiries that arise while using dapp services must be directed to each dapp service operator. In addition, there is a risk of financial loss when using the dapp service, and the user is responsible for all risks that may occur while using the service.
Create Binance Smart Chain account
Switch dapp browser network to Binance Smart Chain
Move to PancakeSwap site
Connect Wallet
3) From your browser, click on the Kaia Wallet icon.
4) Unlock Kaia Wallet and click the "Manage Accounts" icon on the top menu.
5) From the Manage Accounts screen, click on "Connect". In the next screen, select "D’CENT" as your hardware wallet and click "Connect".
6) From your browser will display a page confirming the successful connection to the bridge program. and a screen for selecting an account (address) to connect will be displayed. Select the account you want to connect to and press the "Next" button.
7) From your browser, click on the Kaia Wallet extension icon again to open the wallet service. You will notice that the Kaia Wallet now displays the Kaia account from the D’CENT Biometric Wallet.
Only one Kaia account created in the D'CENT biometric wallet can be connected to the Kaia Wallet. Even if you have created multiple Kaia accounts in your D'CENT biometric wallet, you can only connect to the first account created.
Furthermore, if you have both a Kaia legacy account and a Kaia account, you can only connect one.
With the introduction of SegWit, major networks have shortened the processing time of tasks and lowered the transaction fees.
Connect Android device and Biometric Wallet with OTG cable
Allow USB access
Firmware Update
In order to update the firmware, your OTG cable must capable of data transfer.
How to use the Discovery Tab (dApp browser)
🚨 Caution: Permanent blocking of the All-in-One Wallet
As a security measure, a total of 10 attempts are available to enter the correct PIN.
The secure chipset on the All-in-One Wallet keeps count of how many authentication attempts have failed. If the incorrect PIN is entered 10 consecutive times, the secure chipset on the hardware wallet will be blocked permanently. This means that any cryptocurrency assets stored in the All-in-One Wallet will no longer be accessible and lost forever.
Make sure to create a backup of your All-in-One Wallet with a spare D'CENT Backup Card.
Please make sure to tag the "All-in-One Wallet" and not the Backup Card.
The available backup count indicates how many times you can create a backup image for the All-in-One Wallet. You can create up to 10 backup images.
The encryption password must be 4 to 8 characters long and consist of letters (a–z, A–Z) and numbers (0–9). Please make sure to remember it perfectly, as you will not be able to recover your wallet without it.
Pease make sure to tag the "All-in-One Wallet" and not the Backup Card.
If you don't have a Backup Card, you MUST save this encrypted backup image data in a safe place or send it to yourself in a message or email. You can recover this backup image onto a Backup Card at a later time. Make sure to perfectly remember the encryption password which was used to encrypt the backup image. If you forget this encryption password, you will not be able to recover your wallet.
How to add Binance Smart Chain account in D’CENT Wallet
How to access Binance Smart Chain Dapps from the native Dapp browser in D’CENT Wallet
Useful Link: List of Binance Smart Chain Dapp Services
You can download the D'CENT Mobile App by clicking on this link.
Mobile App basic setting
Select Wallet mode
If you are launching the mobile app for the first time, you will need to go through the initial setup and select a wallet mode.
This guide is based on D’CENT mobile app version 8.0.0.
When the app launches, select “Biometric Wallet” as shown below.
You can change the wallet mode at any time from the Settings tab in the mobile app.
If you are using a biometric cold wallet, make sure to set the wallet mode to "Biometric" in the mobile app. For instructions on how to change the wallet mode, refer to this guide.
App Password Registration
To protect your D'CENT mobile app, you must set a 6-digit password. This app password will be required every time you launch the D'CENT mobile app, so be sure to remember it.
A permission request popup will appear when you launch the D’CENT mobile app. Review the permissions being requested, then click “Confirm” button to proceed.
Next, click the “Allow” button for both the Notification and Nearby Devices permissions to continue.
If the permission popup does not appear, or if you accidentally clicked the “Don’t allow” button, you can manually enable the Nearby Devices permission by following the steps shown below.
First, turn on the cold wallet, unlock using your fingerprint or PIN authentication.
You can connect your cold wallet to the D'CENT mobile app via Bluetooth using the following steps.
1) Open the D'CENT mobile app and select "Bluetooth icon" at the top of the "My Wallet" tab.
2) A "Search Device" popup will appear, displaying the Device ID(D'CENT-iD-<numbers or letters>) of the cold wallet.
Please refer to on how to check the device ID of your cold wallet.
3) When you tap the device ID, the cold wallet will sync automatically. It may take a few seconds for the synchronization to begin.
4) When synchronization is complete:
A connection indicator will appear in the top of the mobile app.
A blue Bluetooth connection light will stay turned on in the top right corner of the cold wallet.
Now, you can tap the "Add Account" button to add the necessary coin accounts. For detailed instructions on adding coin accounts, click.
Each biometric cold wallet has a unique device ID. You can check the device ID of each device using the following steps.
1) Turn on the cold wallet, authenticate using your fingerprint or PIN, then navigate to the "Settings" menu and press "OK" button.
2) Select the "Device Info." menu and press "OK" button.
3) On the Device Info screen, the Device ID(D'CENT-iD-<numbers or letters>) will be displayed
If you're having trouble connecting the cold wallet, please refer to the Troubleshooting Guide below.
Firmware Update (from computer)
Firmware update indicator
Whenever new coin support is added or bug fix has been made, a new firmware will be available for installation. Your mobile app will show an indication when a newer version of the firmware is released.
Firmware update can be done from the PC or Mac.
Before you update the firmware
Make sure you have your Mnemonic Code (24 seeds/words) for recovery
24 words were provided during the Initial Setup of your Biometric Wallet and you have written them down on the recovery card. Make sure you still have the recovery card.
Unlike other products, your wallet will still remain safely intact inside the secure chip even after updating the firmware. This means that you don't need to recover your wallet every time you update the firmware as other products requires you to do.
(Keep your recovery card secured and ready just in case your Biometric Wallet is no longer accessible, possibly due to "brick"ed device or something that went wrong during the update process.)
After you update the firmware, you cannot roll-back to the previous version
Firmware update will take approximately 3 minutes to complete.
It is recommended that the D'CENT mobile app is not running during the firmware update.
How to update firmware
Requirements for the firmware update
✅ Firmware can ONLY be updated from using a personal computer running a 64bit OS (Windows or Mac).
✅ Must use Google Chrome browser.
✅ Must use a USB cable that is capable of data transfer.
(If your Biometric Wallet's charging port is Micro USB 5 PIN Type, we recommend using the USB cable included in the package box)
If you are ready, click to go to the Firmware Update homepage.
1) Connect the computer and the Biometric Wallet using the USB cable
2) Authenticate with fingerprint or PIN to unlock your Biometric Wallet
1) On the firmware update page, click the "Connect D'CENT hardware wallet" button.
2) When the browser prompts a connection popup, click the D'CENT device and click "Connect" button.
If the connected Biometric Wallet is already running the latest firmware version, the following screen will be displayed.
3) Click the "Start the update" button.
4) Click the "Reboot to bootloader mode" button. Biometric Wallet is automatically rebooting into bootloader mode.
When entering bootloader mode, the following screen appears on the display of the Biometric Wallet.
5) Once the Biometric Wallet has rebooted into bootloader mode, click the "Keep updating" button.
6) When the browser prompts a connection popup, click the D'CENT device and click "Connect" button.
7) Firmware update from the webpage will take approximately 3 minutes to reach 100%. Please wait.
8) From the Biometric Wallet, you can also check the progress of firmware update.
When the firmware update is completed, the Biometric Wallet will automatically reboot to its normal working mode.
Now you can check the latest firmware information by running the D’CENT mobile app and connecting the Biometric Wallet.
If you are having trouble updating the firmware, please refer to the troubleshooting guide below.
Firmware Update (from mobile)
Mobile Firmware update
Currently the mobile firmware update is only possible for the Android Phones.
Android users with an OTG cable can perform firmware update directly from their phone.
OTG cable
OTG cable is an adapter or cable-type device that can update the firmware of the Biometric wallet on an Android phone. Please use an OTG cable that is compatible with your Android phone or Biometric Wallet charging port.
Example of OTG cables
In order to update the firmware, your OTG device must capable of data transfer.
If your Biometric Wallet's charging port is Micro USB 5 PIN Type, you can update using D'CENT Genuine OTG cable.
D'CENT Genuine OTG cable can be purchase from D'CENT official website.
Firmware update indicator
When D'CENT adds support to a new blockchain network, a new firmware will be available for installation. Your mobile app will show an indication when a newer version of the firmware is released.
Before you update the firmware
Make sure you have your Mnemonic Code (24 seeds/words) for recovery
24 words were provided during the Initial Setup of your Biometric Wallet and you have written them down on the recovery card. Make sure you still have the recovery card before you proceed with the firmware update.
Unlike other products, your wallet will still remain safely intact inside the secure chip even after updating the firmware. This means that you don't need to recover your wallet every time you update the firmware as other products requires you to do.
If you use a separate OTG device, it must be capable of data transfer.
Firmware update will take approximately 3 minutes to complete.
Depending on the OTG cable you own, connect the Biometric Wallet and the Android device as shown in the picture below.
When the Biometric Wallet is connected with Android phone using the OTG device, a pop-up will show up on the phone's screen. Make sure you press "OK" to allow connection.
Click the More Options (⋮) button in the "Settings" tab and select "Firmware Update."
1) Click on "Update" button.
2) Wait until the Biometric Wallet is detected.
3) Click on "Start the update" button.
4) Click on "Reboot to bootloader mode" button.
5) Biometric Wallet will automatically reboot. When the pop-up shows up on your Phone's screen, make sure to press "OK" to allow connection.
6) Click on "Keep updating" button.
7) Wait patiently (approximately 3 minutes) for the firmware update to complete. When the firmware update has completed, the Biometric Wallet will automatically reboot to its normal working mode.
8) Click on "Go to My Wallet" button to finish.
Biometric Wallet "Setting" menu
Bluetooth Menu
This menu is for connecting Biometric Wallet via Bluetooth with Android phone or iOS phone.
For connecting Bluetooth for Android, more information can be found here.
For connecting Bluetooth for iOS, more information can be found here.
Security Menu
Change PIN
The (4 to 8 digits) PIN is used for authentication if fingerprint authentication fails, and your PIN is also required when adding or deleting fingerprint data. You can change your PIN by entering the old PIN and entering the new PIN twice. Carefully choose your PIN and remember them. For instructions on how to change PIN, please refer .
You can enroll up to 2 fingerprints on the Biometric Wallet.
When enrolling a new fingerprint, you must enter your PIN.
Delete Account menu is for erasing all public information of your wallet accounts. However, this will not delete any of the private keys associated to the wallet accounts you have created. When you synchronize your Biometric Wallet and with the Mobile App, you will notice that there is no account showing under the "Account" Tab. If you re-add a coin account from the Mobile App, your existing account will reappear.
This menu is for deleting all the fingerprint data. To delete, you must first enter PIN and confirm to delete.
Device Wipe is for resetting your Biometric Wallet to factory state. This means the Biometric Wallet will be in the same condition as if newly purchased.
If you perform the Device Wipe, your whole wallet will be deleted including all your private keys.
To perform Device Wipe, you must enter your PIN, read the warning message displayed and press "OK" button to confirm [OK & OFF]. When device is powered on, you will notice that your Biometric Wallet is in the factory state.
The passphrase (25th word) is an advanced security feature available on the D’CENT Biometric hardware wallet. It adds an extra word to your existing mnemonic code (24 words) to create a completely new set of private keys (accounts). You can find detailed information in the link below.
From the Seed Check menu, you can check whether the mnemonic code (24 words or 25th word) you have matches with the mnemonic code in the device you are currently using.
24 word : After entering all 24 words, click "I am ready" on the next Review screen to start the match verification.
If the 24 words you have entered are correct, it will be marked as "Match" on the screen.
25 word : If you have set the 25th word (the Passphrase), you can check by first entering all 24 words and then entering the word you set as the 25th word.
You can change the language used on the Biometric Wallet.
Language support : English, Korean, Chinese, Japanese, Spanish
You can check the Biometric Wallet device information from this menu.
Card Wallet (All-in-One Wallet)
This guide is based on D’CENT mobile app version 8.1.0.
When your Card Wallet is connected, clicking the More (⋮) button in the Settings tab will display the following menu, as shown in the image.
Scan new card
You can change the Card Wallet you want to use through the "Scan new card" menu.
Click the "Scan new card" menu and tag the another Card Wallet.
Change Card PIN
Click for more information how to change the factory PIN to your own PIN.
You can change the 6-digit PIN of your currently used Card Wallet in the “Change Card PIN” menu.
Please follow the steps below to change your PIN:
1) Select the “Change Card PIN” menu.
2) Check “I have checked the information”, then click the “Start” button.
3) Enter your current card PIN.
4)Tag the Card Wallet to your mobile phone.
5) Enter a new 6-digit PIN.
6) Re-enter the new PIN to confirm.
7)Tag the Card Wallet again to apply the change.
8) Click the “Confirm” button to complete the PIN change process.
You can create a backup image of your Card Wallet to prepare for cases where the card is lost, damaged, or becomes unusable due to more than 10 failed PIN attempts.
Click for detailed instructions on how to back up your Card Wallet.
If your Card Wallet is lost, damaged, or locked after 10 or more failed PIN attempts, you can restore the backup image using a Backup Card.
Click for detailed instructions on how to recover your Card Wallet.
When you click the "Card Info" menu, you can view the Card Wallet address, number of available backups, and other details about the cardwallet.
If a backup card is scanned, the message "This is a backup card." will be displayed.
And you can change the card name displayed in the "My Wallet" tab.
Starting from version 8.1.0 of the D'CENT mobile app, a "Delete Card" menu is available for removing registered card wallets. This feature allows you to delete unused cold wallets directly within the mobile app for better wallet management.
Deleting the card from the app does not delete any of the private keys associated to the wallet accounts you have created. You can re-scan the card to register it again, but you must manually re-add any previously used accounts to recover assets.
When you tap the "Delete" button, you will be prompted to authenticate with either your 6-digit mobile app password or biometric verification to proceed.
How to use Stellar Lumens (XLM) account
Check the Firmware version
Stellar (XLM) coin is supported on the Biometric Wallet installed with firmware version v2.1.0 or higher. Please refer to the link below for instructions on how to update the firmware.
There is a case where the Stellar account cannot be created even though the current firmware version is v2.1.0 or higher. This is because the new algorithm used by Stellar cannot be used if the firmware version installed in the product was lower than v2.0.1 when it was originally purchased.
In the event when trying to create a Stellar account from the mobile app, the search result will not display Stellar coin as an account that can be added. See the picture below.
Solution:
You can create a Stellar wallet account after recovering the wallet using the recovery words. But first, you must perform the device wipe from the settings menu of the Biometric Wallet.
1) Click for instructions on how to initialize(device wipe) the Biometric Wallet.
2) Click for instructions on how to recover your wallet.
After adding a Stellar (XLM) wallet from your mobile app, it will be in the disabled (not created on the Stellar network) state.
Due to Stellar's policy, a minimum of 1 XLM must be transferred to the Stellar address to activate the account on the Stellar network.
In addition, 1 XLM in the account will be permanently locked-up. For example, if you have 100 XLM in your account after creating your wallet, you can only transfer 99 XLM (including fee). As shown in the figure, the remaining balance of 1 XLM cannot be sent to another account even when if you try to send the maximum amount.
The Stellar wallet used by an exchange service uses a single address. In other words, all users of the exchange have the same address. To distinguish each user's account, the exchange service manages the user accounts by assigning a unique identification character (Memo) to each user.
Therefore, when sending XLM to a recipient wallet address created from the Exchange, you MUST enter the Memo so that the Exchange will complete the deposit to the recipient's wallet account.
From your XLM account, click "Receive" to view your account address.
If you are sending Stellar coins to your exchange account, you MUST enter the "Memo".
If you are sending Stellar coins to a personal wallet such as D'CENT Wallet, entering Memo is optional. You can enter any notes in the Memo field or choose to change the Memo options.
When sending money, check the address and Memo once again before making the final confirmation.
Using WalletConnect
D’CENT Mobile App has added support for "WalletConnect". You can now connect and access your favorite DApps on PC or Mobile browser using D’CENT wallet addresses.
WalletConnect is an open protocol for connecting DApps on your browser to mobile wallets using end-to-end encryption by scanning a QR code. This allows users to establish connections to websites (DApps) from a browser and carry out transactions securely from D’CENT Wallet without revealing any secret information to the internet.
In this example, we will access a DApp called PoolTogether.
Using DApps on PC browser
You will need your and PC to access the DApp website.
1) Go to the website from your browser and click on "Connect Wallet" button.
2) Select "WalletConnect" from the list and you will get a QR-Code.
1) Launch your D’CENT Mobile App, and QR code scan icon at the top right of the "My Wallet" tab.
Scan the QR code displayed on the PC screen.
After confirming the DApp site address, account, and network information, tap the "Connect" button.
2) When your D’CENT Wallet address is connected to PoolTogether DApp, you will see the following screens on your mobile app and PC. Notice the D’CENT wallet address on the top right corner of the PoolTogether DApp.
1) Launch your D’CENT Mobile App, and QR code scan icon at the top left of the "Discovery" tab.
Scan the QR code displayed on the PC screen.
After confirming the DApp site address, account, and network information, tap the "Connect" button.
2) When your D’CENT Wallet address is connected to PoolTogether DApp, you will see the following screens on your mobile app and PC. Notice the D’CENT wallet address on the top right corner of the PoolTogether DApp.
NOTE : When you perform a transaction on the DApp service you are using, you will be prompted to confirm the transaction on the D’CENT Wallet.
Make sure to keep D’CENT Wallet running on your mobile phone and stay on this activity. If you switch to other Apps, the current DApp (ie: PoolTogether) will lose connection and you will have to reconnect again.
1) Go to the PoolTogether (App) website from your browser and click on "Connect Wallet" button.
2) Click "WalletConnect" from the wallet connection options.
3) Type "D'CENT" in the search bar and select "D'CENT Wallet".
4) When D’CENT Wallet opens, authenticate to the access the D’CENT Mobile App.
5) After confirming the DApp site address, account, and network information, tap the "Connect" button.
6) Now your D’CENT Wallet address is connected to the DApp.
NOTE : When you perform a transaction on the DApp service you are using, you will be prompted to confirm the transaction on the D’CENT Wallet.
D’CENT Wallet has a built-in DApp browser, which supports connecting to DApps much easier by using Web3 wallet (ie: D’CENT). Advantage in using the built-in browser is that you only need to use a single application (D’CENT Wallet) to access a DApp service.
When accessing PoolTogether from the Discovery tab, a wallet connection request will be automatically triggered, allowing you to connect your D'CENT Wallet.
If the DApp service does not support the Web3 interface, you can select "WalletConnect" to establish connection to the DApp. Instructions are similar to the previous methods described in the sections above.
Insight
Insight is a new service that provides accurate information for asset management by intuitively checking the market trend of various cryptocurrency coins.
Insight service provides a real-time updated top 7 list of the most searched cryptocurrency coins on CoinGecko and CoinMarketCap. You can also see real-time market trends, price changes, and detailed information for each coin, and make purchases easily and conveniently.
Access the Insight
1) You can access the Insight service by touching the "Insight" tab on the bottom of the D'CENT app.
2) The Insight tab is structured as follows:
ⒶToken Search Bar: You can search for tokens by name, symbol, or ticker (e.g., $BTC).
Ⓑ Market Cap: Displays the total market cap of the global crypto market.
Bitcoin Dominance: Displays the ratio of Bitcoin’s market cap to the total crypto market cap.
Fear & Greed Index: A metric that reflects the overall sentiment of crypto investors.
Ⓒ Trending: You can compare the real-time top 7 trending tokens based on search data from CoinGecko and CoinMarketCap.
ⒹMarket: Displays the top 100 tokens ranked by market cap.
1) When you access the Insight tab, you can see the Top7 list of the currently most popular cryptocurrencies on CoinGecko and CoinMarketCap.
You can easily switch between services by swiping left and right on the Top7 list screen and compare the ranking of popular coins on each service.
The Top7 list is updated every 5 minutes on CoinGecko and every 10 minutes on CoinMarketCap.
2) Numbers (%) next to the Top7 list display the percentage change in price range the latest 24 hours.
If the same coin is in the Top7 list on both CoinGecko and CoinMarketCap, you can compare the percentage change in price on each service.
3) In the bottom of the Top7 list, displayed are lists of coins that ranked in the Top7 by time: 1 hour ago, 6 hours ago, 24 hours ago.
"Market trend" indicates whether the coins that have entered the trending list in the last 6 hours are mostly Large or Small Cap .
You can select desired coins in the Top7 list to view coin information.
1) The Token Info screen is structured as follows:
ⒶCurrent Price & Market Cap : Displays the current token price and market cap.
ⒷChart Options : You can select to display the chart below by either price or market cap.
ⒸTop 7 Entry Point : Indicates the time when the token entered the Top 7 trending list.
ⒹPrice Chart Interaction : When you tap the price movement chart, you can check how the price and trading volume have changed over time.
By scrolling down the screen, you can view the token’s price movement over the past 24 hours.
Under Market Info, you can check details such as Market Cap, FDV (Fully Diluted Valuation), 24-hour trading volume, Circulating supply, and Total supply.
You can also find links to the token’s official community, contract address, and website.
2) Tap the "Onchain" tab to view the token’s blockchain transaction data.
ⒶMarket Info : Provides data such as market cap, FDV (Fully Diluted Valuation), circulating supply, and maximum supply.
ⒷTrade Volume : You can check the trade volume and count by 5 min / 1 hr / 6 hr / 24 hr intervals.ⒸTrade History : You can view a list of on-chain trade history by network for the selected token.
On the token detail screen in the Insight tab, you can tap the "Swap" button at the bottom to purchase the token directly via the D'CENT Swap service.
Please refer to the guide below for how to use the Swap service.
Multi-Wallet Feature
This guide is based on D’CENT mobile app version 8.1.0.
Please update the D'CENT mobile app to the latest version before using it.
The Multi-Wallet feature allows you to easily manage multiple cold wallets (Biometric Wallets and Card Wallets) and App Wallets on a single mobile phone. For example, you can manage 2 Biometric Wallets, 3 Card Wallets, and 2 App Wallets all from one phone.
To use the Multi-Wallet feature, please update your D'CENT Mobile App to the latest version.
Wallet Management Button
You can easily switch to another wallet by clicking the “Wallet Management” button (Registered Wallets) at the top left of the My Wallet tab.
When you press the "Wallet Management Button", the following will be displayed depending on the registered wallet:
If no wallets are registered, or if you want to add another wallet (Biometric Wallet, Card Wallet, or App Wallet), you can do so by clicking the “Manage All Wallets” button.
For instructions on how to add each type of wallet, please refer to the user guide below.
When multiple wallets are registered, selecting your desired wallet and clicking the “Change” button will reload the portfolio and account information in the "My Wallet" tab according to the selected wallet mode. Additionally, the "Wallet Management button" at the top left will display the currently active wallet type.
When Biometric Wallet is selected, the Wallet Management button in the top left corner of the "My Wallet" tab will display as "My D’CENT".
A Bluetooth icon will also appear in the top right corner, allowing you to quickly and easily connect your cold wallet.
If Card Wallet is selected, it will be displayed as "DCENT-CARD-WALLET".
If App Wallet is selected, it will be displayed as "App Wallet".
If multiplewallets (Biometric, Card Wallets or App Wallets) are registered on a single mobile device, you can quickly switch between them using the “Wallet Management” button.
1) Tap the "Wallet Management button" at the top left corner of the "My Wallet" tab.
2) From the list of registered wallets, select the Cold Wallet(Biometric, Card Wallets or App Wallets) you want to switch to.
3) When the "Would you like to switch wallet?" pop-up appears, tap "Change".
4) The "My Wallet" tab will update to show the portfolio and account information of the selected cold wallet.
Also, you can manage your wallets more efficiently by changing the wallet name based on each wallet’s purpose or owner.
For detailed instructions, please refer to the user guide below.
Starting from version 8.1.0 of the D'CENT mobile app, you can now delete any registered wallet directly within the app. This feature allows you to remove unused wallets for better management.
You can access the delete option by tapping the "More (⋮) button" in the "Settings" tab or by selecting the wallet you want to delete from the Manage All Wallets menu.
The warning message shown when deleting a wallet differs depending on the wallet type (Biometric Wallet, Card Wallet, or App Wallet).
Please refer to the guide below before deleting a wallet to avoid potential asset loss:
Biometric Wallet: After deleting, you can reconnect the cold wallet via Bluetooth, and all previously used accounts will be restored automatically.
Card Wallet: After deleting, you can re-scan the card to register it again, but you must manually re-add any previously used accounts to recover assets.
App Wallet: Before deleting, make sure your mnemonic phrase is backed up. Without a backup, your wallet and assets cannot be recovered. To recover, use the Import Wallet feature and enter the backed-up mnemonic phrase, then re-add your previous accounts.
How to connect to OpenSea
Connecting from D'CENT mobile app's Dapp browser (Discovery)
Blockchain based Dapp services can be accessed via the "Discovery" Tab.
In case of Android, "OpenSea" can be found in the list.
For iOS, you will need to do a search by entering "opensea" in the search bar. From the search result, click on the OpenSea site link.
Access the OpenSea website and click the "Connect" button at the top right.
A wallet connection request will automatically be triggered by the OpenSea website.
Check the account information to be connected and click the "Connect" button to link your D'CENT Wallet to the dApp site.
To complete the wallet connection, a signature request will be initiated.
Click the "Sign in" button, then verify with fingerprint or PIN in your wallet to finish the connection process.
OpenSea supports connections to various networks such as Ethereum, Polygon, Base, and Optimism.
To switch to a different network, tap the network icon at the top right, click "Switch", and then select the desired network.
If you are accessing OpenSea site from a PC environment, you can use "WalletConnect" to connect with your account on D'CENT Wallet.
From the OpenSea site, click the "Connect" button and select "WalletConnect". A QR code will be displayed on your PC screen.
Open the D'CENT mobile app and tap the QR code scan icon at the top of the "My Wallet" or "Discovery" tab to scan the QR code shown on the PC screen. Your wallet will then be connected via WalletConnect.
For more details on how to use WalletConnect, please refer to the user guide below.
All-in-One Wallet (Introduction)
The D'CENT All-in-One Wallet is the ultimate solution for anyone looking for a secure and convenient way to store and manage their cryptocurrency assets. With its bank-grade certified secure chipset and encrypted storage for private keys, users can rest assured that their assets are safe and secure.
The D'CENT All-in-One Wallet supports over 20+ Ethereum EVM-compatible blockchain networks, including Ethereum, Binance Smart Chain, Polygon, Kaia, XDC Network, and many other popular smart contracts platforms.
Mobile App "Settings" menu
D'CENT Mobile App Setting
You can change various settings of the mobile app from the "Settings" menu.
You can manage all wallets currently registered in the app, including Biometric Wallets, Card Wallets, and App Wallets. And you can also add new wallets.
If no wallets are registered, please click the Manage All Wallets button and register the wallet you want to use from Biometric Wallet, Card Wallet, or App Wallet (Software).
For more details about the Manage All Wallets menu, please refer to the guide below.
Set up your All-in-One Wallet
For iOS phones, the NFC function is enabled by default.
For Android, enable the NFC function as "Read/write NFC tags".
To download from the mobile app stores, type D'CENT Walletas the keyword search or use the official download links below.
If you are launching the mobile app for the first time, you will need to go through the initial setup and select a wallet mode.
When the app launches, select “Card Wallet” as shown below.
How to revoke dApp allowances
For all users in the world of cryptocurrencies, understanding the concept of “allowance” (aka. Approval) is crucial. In the crypto space, an allowance refers to granting permission to decentralized applications (dApps) to perform actions on your behalf. However, it’s important to grasp the associated risks and the significance of managing these permissions effectively.
In the crypto realm, dApp allowances involve granting permission to dApps to execute specific actions using your tokens. This permission enables them to transfer your tokens, create new ones, or carry out other operations on your behalf.
Here is an example of an Ethereum wallet searched on the Etherscan that shows dApps granted with allowances:
Failing to manage dApp allowances can expose users to various risks. Here are some examples of potential hazards:
a) Unauthorized Token Transfers: If a dApp gains access to your allowances, it can transfer your tokens without your consent, leading to the loss or theft of your assets.
GasPass
GasPass is a feature that allows you to make transactions without worrying about gas fees by using coupons. By registering various coupons (vouchers) in the “GasPass” menu, the gas fees for transfers or swaps are automatically paid to the blockchain using your available coupons.
Follow the steps below to register your GasPass:
1) In the My Wallet tab, tap the “GasPass” button.
2) Click on “Register Coupon.”
3) Enter the voucher code of the coupon you own, and click“Register.”
You can change your app password later through the appSettings menu.
In addition to the app password, you can also enable fingerprint recognition for added security.
Mobile App Permission Settings
The Notification permission is optional. You can click the “Don’t allow” button and still connect your wallet without any issues. However, the Nearby Devices permission is required for syncing with the cold wallet.
If access is denied, the cold wallet cannot be synced, and usage will be restricted.
Therefore, be sure to allow this permission.
Bluetooth pairing with Cold Wallet
If the device ID of your cold wallet does not appear in the "Search Device" popup, please make sure that Bluetooth is enabled in your Android phone’s settings. If you're unsure how to access the Bluetooth menu, please refer to this guide.
If you prefer not to use Bluetooth, you can also connect your cold wallet to an Android phone using an OTG cable. For detailed instructions, please refer to this guide.
But the All-in-One Wallet is more than just a secure storage solution, it's a gateway to the decentralized world. The built-in dApp browser (Discovery) allows users to easily connect their wallets to a wide range of blockchain-based services, including Games, NFTs, NFT marketplaces, DeFi, lending and borrowing, the metaverse, and more. Another cool feature is the built-in NFT collectibles tab, which allows users to conveniently manage and display NFTs stored in their wallets.
One of the key conveniences of the All-in-One Wallet is its unique backup method. Rather than using a traditional mnemonic code, the private key is backed up using state-of-the-art encryption technology, which securely transfers the private key to a spare Backup Card. This method is both easy to use and highly secure, giving users peace of mind that their assets are protected.
Another convenient feature of the All-in-One Wallet is its ability to sign blockchain transactions with just a tap of the card on a smartphone. This NFC communication makes it incredibly easy for users to manage their assets on the go, without needing a bulky hardware device or complicated software.
Overall, the D'CENT All-in-One Wallet is the perfect combination of security, convenience, and accessibility, making it an ideal choice for anyone looking to take control of their crypto assets and explore the decentralized world.
D'CENT All-in-One Wallet specification
Secure Chipset
It's a bank-grade certified secure chipset for safekeeping private keys.
Factory PINThis is the factory PIN of the hardware wallet which is concealed by ribbon masking. This factory PIN must be changed to your own PIN before the hardware wallet can be used.
Wallet Address
Wallet address is printed on the card surface. Users can present the QR code for quick P2P transactions to receive cryptocurrency assets.
NFC Support
NFC allows users to quickly sign transactions with a simple tap of the card on the smartphone.
Buy a D'CENT All-in-One Wallet 👇👇👇
What is D'CENT All-in-One Wallet?
D'CENT All-in-One card type wallet - the ultimate hardware wallet for the EVM compatible networks
Specifications
You can change the language of the D'CENT mobile app. Supports the following languages:
English
Korean
Japanese
Spanish
Portuguese (Brazil)
Set the currency to display coin / token price.
It supports a total of 39 local currencies, including KRW (South Korean Won), USD (United States Dollar), JPY (Japanese Yen), EUR (European Euro), GBP (British Pound Sterling), CNY (Chinese Yuan), and others.
And it supports BTC (Bitcoin) and ETH (Ethereum) cryptocurrencies.
You can set up push notifications for major coin price fluctuations and market trend updates.
Push notifications are sent in the following cases:
When there are price fluctuations for BTC, ETH, XRP, BNB, or SOL coins on CoinGecko.
When a cryptocurrency newly enters the Top 7 trending list on CoinGecko or CoinMarketCap.
By tapping on a notification, you can view detailed information about the cryptocurrency in the "Insight" tab.
You can set the D’CENT mobile app to either Light Mode or Dark Mode. The app’s appearance will change depending on the selected theme. By default, the theme is set to Light Mode.
(If you select System, the theme will automatically follow your phone’s Light or Dark Mode settings.)
You can manage security settings for the D’CENT mobile app, including App lock, change password, and Biometric authentication.
This setting allows you to enable or disable the app lock when launching the D’CENT mobile app.
By default, this option is enabled.
If you turn it off, the app will open without requiring the 6-digit password or biometric authentication (fingerprint or Face ID).
This setting allows the D’CENT mobile app to automatically lock after a period of inactivity.
The default value is 20 minutes, and you can choose from 5 minutes, 10 minutes, 20 minutes, or Never.
You can change the 6-digit password of the D'CENT mobile app.
The 6-digit password for the mobile app is the password you registered when initially setting up the app.
In addition to the 6-digit password, you can also select another method of authenticating to the mobile app.
For Android phones, fingerprint authentication can be set as a method of authentication.
For iPhones, Touch ID or FaceID can be set as a method of authentication.
The Laboratory menu provides experimental features developed by D’CENT. These features may be modified, discontinued, or removed at any time.
By enabling them, you agree that you are solely responsible for their use.
Enable Testnet : This feature is intended for developers or testing DApp services.
After enabling this option, enter "test" when adding an account to display all available testnets.
Custom Path Account : The Custom Path Account feature is used for recovering assets sent to the wrong network between EVM-compatible blockchains.
This is considered an advanced setting and is not recommended for general users.
Clear Cache : Use this option to delete the cache data stored in the D’CENT mobile app.
Even without disabling notification settings, you can use your phone's Do Not Disturb mode to mute notifications during specific time periods.
For instructions on setting up Do Not Disturb mode on your device, please refer to the following links:
Theme
Security & Authentication
Lock on App Launch
Lock After Inactivity
Change Password
Biometrics
If biometric authentication is canceled or fails, you will be required to enter your 6-digit password.
Laboratory
To protect your D'CENT mobile app, you must set a 6-digit password. This app password will be required every time you launch the D'CENT mobile app, so be sure to remember it.
If you don't remember the 6-digit password, you will have to reinstall the D'CENT App.
A permission request popup will appear when you launch the D’CENT mobile app. Review the permissions being requested, then click “Confirm” button to proceed.
1) On the back of your phone, tag the All-in-One Wallet to scan.
2) Tap the "Allow" button to proceed with notification permission. You can turn notifications On / OFF at any time from the "Settings" menu.
For more details about the notification feature, please refer to this guide.
3) Once the All-in-One Wallet is successfully scanned, wallet synchronization will begin.
4) After the sync is complete, the My Wallet tab will display three default coin accounts: Ethereum, Kaia, and Polygon. You can also tap the “+ Add Account” button to add more coin accounts.
When you first scan the All-in-One Wallet, a banner will appear prompting you to change the factory PIN.
To use the All-in-One Wallet, you must change the factory PIN to your own PIN.
1) At the top of the screen, click on the banner to change the factory PIN.
2) Click on "Change now".
3) Check “I have checked the information”, then click the “Start” button.
4) From your All-in-One Wallet, find the factory PIN by removing the ribbon masking.
5) Enter this 6-digit factory PIN. (ie: 530226)
6) On the back of your phone, tap the All-in-One Wallet to scan.
7) Enter a new PIN for your All-in-One Wallet. (ie: 123456)
8) Enter the same new PIN. (ie: 123456)
9) On the back of your phone, tag the All-in-One Wallet to scan.
10) Click the “Confirm” button to complete the PIN change process.
To use All-in-One Wallet with iOS phone devices, the NFC function is required. NFC function is supported by models starting from iPhone7 and newer. Additionally, the iOS version must be 13 or higher.
Enable NFC on your phone
Download D'CENT App (Android & iOS)
Mobile App basic setting
Select Wallet mode
This guide is based on D’CENT mobile app version 8.0.0.
App Password Registration
You can change your app password later through the app.
In addition to the app password, you can also enable fingerprint recognition for added security.
Mobile App Permission Settings
Set up the All-in-One Wallet
Scan your All-in-One Wallet
Each phone model has an NFC reader positioned at a different part of the phone device. If the card wallet is not recognized, try tapping it in different areas to find the exact position of the NFC reader.
If you have a protective cover on your phone, it may interfere with scanning the card wallet. Please remove the phone cover to improve the scanning performance of your phone and try again.
Change the factory PIN to your own PIN
When removing the ribbon masking, please be careful not to use sharp tools as this may damage the card wallet.
b) Exploitation of Minting Permissions: Malicious dApps may misuse allowances to mint new tokens in your name, potentially devaluing your existing holdings.
c) Account Vulnerability: Allowing unrestricted dApp access could compromise the security of your account, leaving it susceptible to unauthorized control or manipulation.
It’s important to understand the distinction between disconnecting your wallet from a dApp and revoking approvals or allowances. While these processes may seem similar, they have fundamental differences that impact the level of access and control granted to dApps.
When you disconnect your wallet from a dApp, you are essentially canceling the permission for that dApp to access certain information, typically revoking the dApp’s ability to view your public address, token balances, and past activity. Disconnecting your wallet helps limit the visibility and interaction of the dApp with your account.
Revoking an approval or allowance goes beyond disconnecting your wallet. When you revoke an approval, you are essentially cutting off the dApp’s access to the contents of your wallet entirely. This means the dApp can no longer retrieve or manipulate your tokens. Revoking an approval is a more stringent action that ensures the dApp is completely barred from accessing and moving your assets.
It is crucial to note that while disconnecting your wallet limits certain permissions and visibility, it does not guarantee the same level of security as revoking approvals.
a) Preventing Unauthorized Actions: By regularly reviewing and revoking unnecessary allowances, you limit the ability of dApps to perform actions on your behalf, reducing the risk of unwanted transactions or token misuse.
b) Protecting Token Integrity: Revoking allowances from unused or suspicious dApps ensures they cannot tamper with or create tokens associated with your account, preserving the integrity of your token portfolio.
c) Enhancing Account Security: Proper permission management minimizes the chance of a malicious dApp taking over your account, preserving your privacy, control, and overall security.
NOTE: Network fees are charged for revoking dApp Allowances as they are blockchain transactions. Depending on the revocation service you use, additional fees may apply.
Revoking dapps allowances using D’CENT Wallet from the Etherscan platform (1)
From D’CENT Wallet’s Discovery tab (the dApp browser), visit Etherscan (https://etherscan.io) and click on ‘Token Approvals’ under the Services sub-menu.
Revoking dapps allowances using D’CENT Wallet from the Etherscan platform (2)
Click on ‘Connect to Web3’ and select ‘MetaMask’ to trigger a wallet connection on D’CENT Wallet.
Revoking dapps allowances using D’CENT Wallet from the Etherscan platform (3)
You will be able to see which tokens and dApps are granted with Allowances. Click on the blue ‘Revoke’ button to revoke the allowance.
Another excellent tool for users who use dApps on multiple networks is a third-party platform called ‘Revoke’.
Revoking dapps allowances using D’CENT Wallet from the Revoke Cash platform (1)
From D’CENT Wallet’s Discovery tab (the dApp browser), visit Revoke (https://revoke.cash). Click on the main menu and click on ‘Connect Wallet’.
Revoking dapps allowances using D’CENT Wallet from the Revoke Cash platform (2)
Click on ‘MetaMask’ to trigger a wallet connection with D’CENT Wallet.
Revoking dapps allowances using D’CENT Wallet from the Revoke Cash platform (3)
Once connected, you will be able to see details of token assets and allowances granted to the smart contract that they’ve interacted with in the past. Scroll the screen to the right and you can find the ‘Revoke’ buttons under the Actions menu.
What are dApp Allowances?
Recognizing the Risks of Unchecked Allowances
Am I safe if my wallet is disconnected?
Disconnecting wallet vs. Revoking allowances
Considerations for effective permission management
How to revoke dApp Approval(Allowances)
Example of revoking allowance using Etherscan (Ethereum):
Example of revoking allowance using ‘Revoke’ (multichain):
4) A confirmation message will appear indicating that the coupon has been successfully registered.
Once a coupon has been successfully registered, you will see your Total Gas Balance displayed in the GasPass menu.
To view the details of a registered coupon, click the “Active Coupons” button.
The Coupon Details screen will show the coupon’s Registered amount, Used amount, Expiration date, Usage count, and other relevant information.
Sending coins with GasPass is no different from the usual method.
Please refer to this guide to learn how to send coin.
1) After entering the amount you want to send and setting the network fee, click the "Next" button.
2) On the transaction review screen, GasPass is automatically applied, and the network fee will be deducted using the available coupon balance. You can also manually disable GasPass if needed.
Click the "Send" button to proceed.
3) If GasPass is applied, you will first need to sign the transaction to automatically pay the network fee with the coupon. Check the transaction details on your wallet and authenticate with your fingerprint or PIN.
4) You will then need to sign the transaction to send the coin. Please check the transaction details on your wallet and authenticate with your fingerprint or PIN.
5) Once the transaction has been sent to the blockchain, a confirmation message will appear in the mobile app. Tap the “OK” button to return to the main screen.
Please refer to this guide to learn how to use Swap service.
1) When using the swap service, if you have a registered GasPass, it will be automatically applied on the estimate screen after you enter the swap amount.
2) You can also confirm that GasPass is applied on the swap transaction review screen. If needed, you can manually disable GasPass. Click the “Confirm” button to proceed.
3) If GasPass is applied, you will first need to sign the transaction to automatically pay the network fee with the coupon. Check the transaction details on your wallet and authenticate with your fingerprint or PIN.
4) You will then need to sign the transaction to send the coin. Please check the transaction details on your wallet and authenticate with your fingerprint or PIN.
5) Once the transaction data is sent to the blockchain, the mobile app will display the expected amount of tokens you will receive. Click the “Complete” button to return to the main screen.
Please refer to this guide to learn how to check transaction history.
When a transaction is created with GasPass applied, the gas fee (network fee) is paid in advance to the blockchain using a coupon. Therefore, the transaction status will display “Preparing Gas.”
In addition, the TXID will show the issued coupon ID (gascouponid).
Once the gas fee has been successfully paid with GasPass and the transaction is confirmed, the transaction status will update to “Confirmed.” The TXID will then be updated to the actual transaction ID.
By clicking the “Usage History” button in the GasPass menu, you can view a detailed breakdown of gas fees deducted for each transaction.
GasPass currently supports the following networks:
Ethereum (ERC20)
Base (BASE-ERC20)
Solana (SPL-Token)
Kaia (KAIA-KCT)
Flare Network (FLR-ERC20)
How to Register GasPass
How to Send Coins Using GasPass
Sending Coin
Swap
How to Check Transaction History with GasPass Applied
How to Check GasPass Usage History
If multiple gas coupons are registered, they will be applied automatically starting with the one closest to expiration.
After you update the firmware, you cannot roll-back to the previous version
Updating the firmware from an Android phone
Connect Biometric Wallet with Android Phone using an OTG cable
Proceed with the firmware update
Enroll Finger
The second fingerprint added has the same privileges as the default fingerprint. Coin transfer is also possible, so please be extra careful when adding the second fingerprint that is other than yours.
Delete Account
This feature is useful if you have previously added many wallet accounts but they are no longer used or you do not wish to see them appear on the Mobile App.
Before you perform the "Delete Account", make sure you keep track of which coin accounts you have previously created.
Delete Finger
If there are 2 fingerprint data saved, both of them will be deleted at once.
Device Wipe
When you confirm [OK&OFF] to Device Wipe, all information will be deleted including private keys. Make sure you have your Mnemonic Codes before you perform Device Wipe.
What happens if I can't authenticate to my hardware wallet?
Authentication using Fingerprint or PIN is required to unlock your hardware wallet. If a user fails to authenticate over multiple attempts on the Biometric Wallet, the device will automatically wipe itself and delete all information stored inside. You can recover your wallet using the 24 words mnemonic.
Total tries on Biometric Wallet: 5 tries of Fingerprint(if registered) + 10 tries of PIN
In the case of the Card wallet, failing 10 consecutive authentication attempts will permanently block the card.
Total tries on Card Wallet: 10 tries of PIN
Will I lose my crypto assets if I lose my D'CENT Wallet?
We provide a recovery function in case the wallet fails or the wallet is lost. You can restore the entire wallet using the 24 recovery words given when creating the wallet. For more details on wallet recovery, please click here.
Are crypto assets stored in the hardware wallet?
The crypto asset itself is not stored in the hardware wallet. Private keys are stored in the hardware wallet, and only other information related to the account is managed. Crypto assets exist on the blockchain network, and the software application reads the information and displays the calculated balance.
How does the asset get recovered when I recover my wallet?
It uses 24 recovery words to recreate the private key that the hardware device has stored in the past. The original crypto asset does not exist in the hardware wallet, but exists on the blockchain. The recovered key is used to retrieve the information of the existing cryptocurrency asset and display it in the mobile app. Click to learn how to recover your wallet for fingerprint authentication type cold wallet.
The wallet's private key is generated by the security chip inside the hardware when the customer receives the hardware device and creates the wallet. The private key generated inside security chip is never exposed to the outside. For this reason, the customer's private key is also unknown to the manufacturer.
IoTrust does not operate a server that manages customer's private key and personal information. However, IoTrust does operate general management servers, such as firmware management servers and homepage servers, which are specifically for managing hardware firmware.
You can see the full list of all the coins supported:
D'CENT Biometric Wallet and mobile app connects primarily using Bluetooth.
If you are using Android, please refer .
If you are using iPhone, please refer .
On Android phones, you can also connect via a USB cable. Click for how to connect USB cable with an Android phone.
You can use the Biometric wallet with more than one phone. However, you can only use the Biometric wallet with a phone that is currently connected via Bluetooth. If you intend to use the Biometric wallet with multiple phones, make sure you disable or disconnect the Bluetooth connection on the first phone then establish Bluetooth connection on the secondary phone that you will use.
You can certainly use it on a new phone. The D'CENT Mobile App (Biometric wallet mode) only holds publicly available information such as the cryptocurrency accounts(public addresses) that you have added for management.
D'CENT Mobile App only provides user interface so that you can get a view of accounts information. Notice that every time that you run D'CENT Mobile App, it synchronizes with the Biometric Wallet. During the synchronization, the Biometric wallet provides the correct account information (public address) to the D'CENT Mobile App, making sure that what you see on the Mobile App is the correct account address.
In the case of Bitcoin, it is recommended to change the address once it is used to protect a certain level of privacy because anyone can see the transaction details and balance when the address is exposed. This is proposed in the BIP-32 and BIP-44 specifications related to Bitcoin, and many hardware wallet companies support this function.
In the case of D'CENT, we provide a function that shows the list of used addresses from the mobile app to mitigate the discomfort of not knowing the previously used Bitcoin addresses.
To find out how to check all your BTC public addresses, please click .
Since the D'CENT mobile app maintains a transaction record for all addresses, there is no problem to continue using the bitcoin address before the change. For more information about the Bitcoin address, please click .
When transferring Bitcoin, fragments(small amounts) of bitcoins from many blocks are collected and transmitted. If your Bitcoin balance is fragmented in too many blocks, it will take a lot of time to collect and to send them all. This isn't always the case, but the larger the number of Bitcoins you send, the more likely it will be to collected from multiple blocks, which will usually take more time.
If a transaction takes too much time, it can have multiple side effects. Customers may think that the Wallet function has stopped working and it actually increases the chances of an error. For this reason, D'CENT provides a method for dividing and transmitting multiple transactions if the bitcoin account balance is highly fragmentation. For example, a large sum of single bitcoin transfer request may be divided into 2 transactions, thus the customer will confirm twice.
Due to the nature of blockchain cryptocurrency protocol, a transaction cannot be canceled or changed once the transaction is broadcasted to the blockchain network. The only option you have is to wait for the pending transaction to complete. If a pending transaction is not validated by the blockchain network for an extended period of time, the pending transaction will get dropped.
However, for an Ethereum transaction, a pending transaction can be canceled by sending a new transaction with a small amount of Ethereum and a higher transaction fee to your own Ethereum address. If the newly sent transaction gets validated first before the previous pending transaction, the pending transaction will be canceled.
After the transfer, the remaining balance in your account must be at least 1 XRP.
Balance before remittance-(remittance amount + commission)> = 1 XRP.
Many exchanges require a Destination Tag when depositing XRP as an exchange. When sending money to an exchange, please make sure that the Destination Tag is required before sending money. If you do not fill in the Tag, your money may get lost forever or it may take a very long time for the Exchange to recover your fund.
requires a transfer of Ripple of 1 XRP or higher to convert a newly created XRP wallet address to an activated state. The cost of address activation is 1 XRP and it will be locked up to the XRP account, this means that the reserve amount of 1 XRP cannot be withdrawn.
In most cases, it is the case that you entered the address incorrectly or it takes a long time due to low transaction fee paid.
If you received a coin, please check it on the mobile app.
Try refreshing the account balances while remaining on the "Account" tab. Pull down the screen and release to refresh.
Try searching the address from Block Explorer and check if the SEND / RECEIVE was successful.
D'CENT Biometric Wallet shows all supported coins.
The mobile app uses a method of adding an account, so please only add the account you actually use. If you added a lot of accounts for testing, you can delete all the account information by following the instruction as below.
To delete all accounts information on Biometric Wallet, go to [Setting] -> [Security] -> [Delete Account].
With exception to the publicly disclosed transaction data from the blockchain, ALL important data is processed inside the security chip in the Biometric Wallet. Therefore, even if the data transmission in the Bluetooth communication is tracked, the assets inside the cold wallet cannot be hacked.
For Android phones, you can use it by connecting with an OTG cable. Please click for more information.
Since the D'CENT Biometric Wallet does not have internet network function, it is necessary to communicate with external software to transfer coins. We recommend using the D'CENT mobile app.
D'CENT Wallet is a product made by top experts who have long worked in cryptographic chip and Secure OS development. Credit card, banking card, USIM card, TEE, etc. have been developed for nearly 20 years and D'CENT Wallet is developed using security techniques learnt in the field.
The following is a brief introduction to security considerations.
Using smart card security chip (credit card and bank sector certified for security) for secure key storage and secure processing of transaction signing
Fingerprint algorithm is mounted on the smart card to process fingerprint information only within the security chip
Proprietary Secure OS
D'CENT Biometric Wallet has been subjected to security inspection by a third-party professionals in security auditing, and you can check the contents .
In general, the firmware update is performed by connecting the device to a personal computer.
For those in possession of the OTG cable, the firmware update can be performed directly from the mobile phone (Android only). OTG cable connection is not supported by Apple devices.
Firmware update usually takes around 5 minutes. It may take up to 10 minutes. If there is no progress after this time, please press and hold both the "Down button" + "Power button" to force shutdown and try again. Detailed guide can be found .
Although highly unlike for D'CENT (IoTrust) to stop the wallet service, but if that situation ever happens, you will be able to continue managing your assets in the following ways.
Customers manage assets by transferring funds to another wallets other than D'CENT.
D'CENT will release the mobile app or software to the public for anyone to use or modify if the service is stopped.
We are continually promoting integration with other popular software wallets. Customers will be offered a variety of options to choose from among several alternatives.
The main information that allows managing your wallet are password, fingerprint, and recovery card. In case of emergency, you can manage it in the following way.
Share recovery words
If you have shared the recovery word with your family, your family can use them to recover the assets.
Enroll second fingerprint
Currently, there are no other wallets available other than the D'CENT mobile app. Since we are working with several software wallets, using D'CENT hardware with other wallets are not far away.
We will announce it separately when the work is completed.
Since each wallet is a separate wallet, they all use different keys. Assuming that you are using the mobile app in all 3 different modes, then you are using 3 different wallets with different private keys.
The original Card type wallet can be backed up using a BACKUP Card wallet. More information on a BACKUP Card can be found .
For iPhone 7 or higher and iOS 13 or higher, you can use the Card type Wallet.
You can find out more .
D'CENT Wallet uses the price information provided by , which is the world’s largest independent cryptocurrency data aggregator with over 6,000 different crypto assets tracked across more than 400 exchanges worldwide.
Using Binance exchange for transfers (XRP example)
Sending fund to your Binance wallet account
Check the receiving address on Binance
To send cryptocurrency to your Binance account, you need to know the address.
First, login to your Binance account and choose a wallet of your choice such as 'Spot Wallet'.
1) Select 'Deposit'
2) Select your cryptocurrency type from the drop down list (ie: XRP).
3) Notice the 9-digit XRP Deposit Tag. This Tag is absolutely required when sending fund to an exchange's wallet address.
4) Also notice the XRP account address. This is the recipient address where you send the XRP fund to.
Preparing for a Send transaction from D'CENT Wallet
Run the D'CENT mobile app on your phone and make sure your smartphone is connected together with the D'CENT Biometric Wallet.
1) From your cryptocurrency account(ie: XRP), press the 'Send' button.
2) Press the 'QR scan' button to scan the QR code presented by Binance. This will automatically enter the recipient address.
3) You MUST enter the destination tag (or deposit tag) assigned to your XRP account by Binance exchange.
4) When you have entered both the recipient address and the destination tag, press 'Next' to continue.
5) Enter the amount to send in either in XRP amount or by fiat value.
6) Press 'Next' to continue.
7) Review the transaction details and press 'Send' to continue.
8) On your D'CENT Biometric Wallet, check the details and press the 'OK' button to confirm. You will also need to authenticate using either your fingerprint or PIN.
9) Once authenticated, your Send transaction will be broadcasted to the blockchain network.
10) Go back to your Binance account and check that you have received the fund sent from your D'CENT Wallet. Look under the section 'Recent Deposit History' for details of your transaction history.
To send cryptocurrency to your D'CENT wallet account, you need to know the address.
From the mobile, press the 'Receive' button to see the account address.
There are 2 options to copy your account address(in hex form):
Option1) Copy - this will copy the address for pasting it to a message or email.
Option2) Share - this will copy the address and give you an option to share it through a SNS app of choice if installed on your phone.
Login to your Binance account, and click on 'Spot Wallet'.
1) Select 'Withdraw'
2) Select your cryptocurrency type from the drop down list (ie: XRP).
3) Paste D'CENT account address into the line 'Recipient's XRP Address'.
4) Check enable the 'No Tag' box. Note that private wallet such as D'CENT wallet does not have a destination tag.
5) Enter the amount to send.
6) Click the 'Submit' button to continue.
If you have setup a second factor authentication, you will be asked to authenticate for the second time through a different channel. Below is an example of Google Authentication supported by Binance exchange.
7) Confirm the 2nd authentication and your withdraw request will be processed by the Binance exchange.
8) Check for status of your transaction from Binance. You can also check from D'CENT wallet.
Using Coinbase exchange for transfers (Bitcoin example)
Sending fund to your Coinbase wallet account
Check the receiving address on Coinbase
To send cryptocurrency to your Coinbase account, you need to know the address.
First, login to your Coinbase account and then press the 'Receive' button.
The picture below is an example of how Coinbase displays your account address, for example Bitcoin.
The upper portion is the Bitcoin address shown in QR code and just below it is the same address in hex format.
You can switch to a different cryptocurrency account by making your selection from the 'Currency' section.
Preparing for a Send transaction from D'CENT Wallet
Run the D'CENT mobile app on your phone and make sure you connect your phone together with the D'CENT Biometric Wallet.
1) From your cryptocurrency account(ie: Bitcoin), press the 'Send' button.
2) Press the 'QR scan' button to scan the QR code presented by Coinbase.
3) If the QR code is read correctly, you will see that the recipient address has been entered automatically. It is always a good practice to double check the recipient address and make sure it is the correct address that you want to send fund to.
4) Press 'Next' button to continue.
5) Set the transaction fee first. Fee amount can be changed by using the slider button. If you set the fee to 'High', it is more likely that your transaction will be accepted with priority and processed faster by the blockchain network.
6) Next, set the amount to Send. You can enter the number of cryptocurrency to send or enter the amount by the fiat value. If you intend to send the whole available amount, then just press the 'Max' button.
7) Press the 'Next' button to continue.
8) In the next screen, double check the transaction details of the recipient address and the sending amount. Press the 'Send' button when details are correct.
9) On your D'CENT Biometric Wallet, check the details and press the 'OK' button to confirm. You will also need to authenticate using either your fingerprint or PIN.
10) Once authenticated, your Send transaction will be broadcasted to the blockchain network.
11) Go back to your Coinbase account and check that you have received the fund sent from your D'CENT Wallet.
From Coinbase, you can check the history of Recent Transactions. If the status is showing as 'PENDING', this means that your fund is still being processed by the blockchain network to get more confirmations. To view the detailed transaction history, you can click 'View Transaction', which will open a new window redirecting you to the block explorer where you can check the status.
To send cryptocurrency to your D'CENT wallet account, you need to know the address.
From the mobile, press the 'Receive' button to see the account address.
There are 2 options to copy your account address(in hex form):
Option1) Copy - this will copy the address for pasting it to a message or email.
Option2) Share - this will copy the address and give you an option to share it through a SNS app of choice if installed on your phone.
From your Coinbase account, press the 'Send' button.
Below are the screenshots of Coinbase wallet interface.
1) Enter the amount to send
2) Paste in the D'CENT account address where 'To' is shown.
3) Write something on the 'Note' section if you want to keep track of what the transaction was for (ie: dcentwallet).
4) Press the 'Send' button to continue.
5) The second screenshot on the right will show the detailed information of the Send transaction that you are about to submit. Press the 'Send now' button to continue.
6) Enter the 2-step verification code from SMS that you received.
7) Press 'Confirm' button to submit the Send transaction request.
App Wallet (Software)
You can start using the App Wallet by selecting "Mobile App Wallet" when you first launch the D'CENT mobile app after installation.
Alternatively, if you are already using a cold wallet (Biometric Wallet or Card Wallet), you can also add an App Wallet by going to "Settings > Manage All Wallets" and selecting "Add App Wallet".
When you first use the App Wallet, a message indicating the required backup (24 mnemonic code) for the App Wallet will be displayed.
In the D'CENT mobile app, a message indicating the required for backup is displayed at the top of the "My Wallet" tab, when adding a cryptocurrency account, and in the "Settings" tab.
Therefore, you must back up the 24 mnemonic code of the App Wallet and store it in a safe place.
Connect with HashPack wallet extension (including HBAR native staking)
This is a comprehensive guide to using a user-friendly HashPack Wallet together with the D'CENT Biometric Hardware Wallet. When connected, HashPack Wallet provides the user interface to accessing the Hedera ecosystem while D'CENT Biometric wallet offers the highest protection of your private keys by securing it offline.
As we are collaborating with HashPack, you will be managing your assets through HashPack extension dashboard and interfaces.
For this, you can go on the HashPack and hit the “Get HashPack” button. Then “Install on Chrome”. You will be redirected to the chrome web store page of the official HashPack Extension and will be able to install it from here.
As of now the integration of HashPack Wallet and D’CENT only works with our D’CENT Biometric Wallet, therefore if you do not have one yet, you need to get one here:
D’CENT Bridge is a software developed by D’CENT in order to connect your Biometric Wallet to your computer and make some actions such as updates or connecting your Biometric Wallet to HashPack.
FTSO Portal - vote delegation
FTSO Portal is a feature that allows users to interact with FTSO features on the Songbird and Flare Networks. SGB and FLR holders can delegate Vote Power to their favorite FTSO providers on the Songbird and Flare Network.
FTSO portal can be found from the Discovery Tab(DApp browser) of the D’CENT Mobile App.
Go to the Discovery Tab and click "FTSO Portal" from the list.
Connect with Blade wallet extension (including HBAR native staking)
This is a comprehensive guide to using a user-friendly Blade Wallet together with the D'CENT Biometric Hardware Wallet. When connected, Blade Wallet provides the user interface to accessing the Hedera ecosystem while D'CENT Biometric wallet offers the highest protection of your private keys by securing it offline.
1. Blade Wallet Chrome extension
As we are collaborating with Blade Wallet, you will be managing your assets through Blade extension dashboard and interfaces.
For this, you can go on Blade and hit the “Connect Blade Wallet button”. You will be redirected to the chrome web store page of the official Blade Wallet Extension and will be able to install it from here.
2. Have a D’CENT Biometric Wallet
As of now the integration of Blade Wallet and D’CENT only works with our D’CENT Biometric Wallet, therefore if you do not have one yet, you need to get one here:
Re-add only the accounts you want to see from the mobile app.
You can enroll up to 2 fingerprints on the Biometric Wallet. If the second fingerprint is registered in the hardware, it can be used to unlock and access the funds inside.
Does the manufacturer of D'CENT(IoTrust) know my private key?
Does the manufacturer(IoTrust) operate a server? Does IoTrust have my personal information and my private key?
Which cryptocurrency assets are supported on D'CENT Biometric Wallet?
How do I connect D'CENT Biometric Wallet to the mobile app?
I have multiple phones. Can I download the D'CENT Mobile App on my other phone to use my Biometric wallet?
I lost my phone / I am changing my phone. Can I use the Biometric Wallet on the new phone if I download the D'CENT Mobile App?
Why does it take long to transfer a large amount of Bitcoin?
Can I cancel a pending transaction?
Ripple (XRP) remittance is not working. What are the precautions when sending to an Exchange?
Why is the remaining 1 XRP in my wallet not transferrable?
Coin was sent to my wallet, but the balance is not showing. What should I do?
I created many accounts but, now only few of them are actually used. Can't I only see the accounts that I want to see?
"Delete Account" does not delete the private keys or your crypto assets. Make sure to remember or write down which accounts you have.
Isn't it vulnerable to security when connected via Bluetooth?
Can I use my mobile phone and D'CENT Biometric Wallet using the wired connection?
Can I send coins using only the Biometric Wallet without the mobile app or a PC software?
How secure is D'CENT Wallet? What features are included to enhance security?
Can I perform firmware update from my mobile phone?
Firmware update stopped in the middle. What should I do?
Will I be able to continue managing my assets if D'CENT (IoTrust) goes out of business?
Is there a way for my family to access my wallet if I die or no longer able to manage my wallet for any other reasons?
Please register carefully as the second fingerprint also has the same authority to send coins.
Is there another wallet other than the D'CENT mobile app that I can use together with the Biometric Wallet?
There are several wallet modes, such as Biometric Wallet, Card type Wallet, and Software Wallet. Are they all using the same private key?
How to back up Card type Wallet?
Can I use the Card type Wallet on the iPhone?
Where does D'CENT retrieve exchange rate values for cryptocurrencies in its wallets?
Please proceed in the following order to back up your wallet.
1) Tap the "Backup" button on the top banner of the "My Wallet" tab, or go to the "Settings" tab and tap "App Wallet backup" to access the backup screen.
2) Please enter the 6-digit password for the mobile app. (If biometric authentication is enabled in the mobile app, you can use it instead of entering the password.)
3) Read the warning and tick the box. Press the “Backup mnemonic code” button.
4) After checking the warning pop-up for sensitive information, press the "OK" button.
5)Write down all 24 words in the exact order as shown on your screen. You can also use the "Copy to clipboard" button to save temporarily in the clipboard. Press "Verify mnemonic code" button to continue.
6) Check the mnemonic code you wrote down, select the words displayed on the screen, and rearrange the mnemonic code in order.
7) When you have completed verifying by correctly rearranging the 24 mnemonic codes, press the "Complete" button.
8) Press the "Go to My Wallet tab" button to complete the backup.
9) Now, you can tap the "Add Account" button to add the necessary coin accounts.
For detailed instructions on adding coin accounts, clickhere.
Starting from D’CENT Mobile App version v8.1.0, the Multi App Wallet feature allows you to add new App Wallets even if you are already using an existing App Wallet.
You can add a new App Wallet by selecting "Add App Wallet" > "Create New Wallet", or import an existing wallet by selecting "Import Wallet" and entering the mnemonic phrase.
Starting from D'CENT mobile app version 8.1.0, the "Recover Wallet" menu has been renamed to "Import Wallet".
The Import Wallet feature allows you to import not only 24-word mnemonic codes generated by the D'CENT wallet, but also 12 or 24-word mnemonic codes generated from external wallets.
You can import a wallet by following the steps below:
1) Click the "Settings > Manage All Wallets" menu.
2) Select the "Add App Wallet".
3) Click the "Import wallet" menu.
4) Please enter the 6-digit password for the mobile app. (If biometric authentication is enabled in the mobile app, you can use it instead of entering the password.)
5) Read the warning and tick the box. Press the "Start" button to continue.
6)Enter all 24 words of the mnemonic code in the exact order as you have written down. You can also enter 12 or 24 words from an external wallet’s mnemonic code.
You can also use the "Paste" button to paste in the information from the clipboard.
After double-checking that the entered words are correct, press "Import Wallet"
7) Press the "Complete" button to proceed with the import wallet.
8) After completing the recovery, you need to re-add your existing accounts to check your balances.
Tap the "Add account" button to add the accounts you previously managed.
Starting from Mobile App version v5.3.1, for assets that use Ethereum-format addresses such as Kaia, Ethereum Classic, and RSK, the app has been updated to generate accounts that use the same address format as Ethereum when creating a new account.
Please refer to the guide below for more details.
If you restore a wallet using a mnemonic code from an external wallet but find that the address is different and assets are not visible, you may need to enable the Custom Path Account feature and manually add the corresponding "Vendor Lock-In" account.
For detailed instructions on Vendor Lock-In accounts, clickhere.
From the App Wallet Info menu, you can rename your App Wallet. When managing multiple App Wallets, you can manage them more efficiently by changing the wallet name based on each wallet’s purpose or owner.
(e.g., Wallet01, BTConly, MyAssets, ETHwallet, etc.)
Please proceed in the following order to change the App Wallet name.
1) From the "Settings" tab of the D'CENT mobile app, click the "More (⋮)" button.
2) Select the "App Wallet Info" menu.
3) Click the "edit icon".
4) Enter the new name in the field and click the "Save" button.
If you have an App Wallet that is no longer in use, you can delete it from the Delete App Wallet menu.
Please proceed in the following order to delete your App Wallet.
1) From the "Settings" tab of the D'CENT mobile app, click the "More (⋮)" button and select "Delete App Wallet" menu. Or go to the "Manage All Wallets" menu, select the App Wallet you want to delete, and then click "Delete App Wallet" menu.
2) A confirmation message will appear. Make sure your mnemonic backup is complete, then cilck the "Delete" button.
3) Enter the 6-digit password for the mobile app or use biometric authentication to complete the deletion.
This guide is based on D’CENT mobile app version 8.1.0.
Please update the D'CENT mobile app to the latest version before using it.
Using the App Wallet
App Wallet Backup
If you delete the D'CENT mobile app or lose your mobile phone without backing up the mnemonic code, you will lose all your coins in the software wallet.
For secure asset management, be sure to write down your mnemonic code and store it in an offline environment, such as a notebook.
The mnemonic code from your software wallet can also be used to recover your wallet on the Biometric hardware wallet.
Click here for more information about on Biometric Wallet.
Using Multi App Wallet
Note: You can add up to 100 App Wallets using the Multi App Wallet feature.
Import Wallet
Important Notes When Adding an Account
Legacy Account Notice
If assets are not visible after recovering from an external wallet's mnemonic code
Change App Wallet Name
Delete App Wallet
Important: Before deleting an App Wallet, make sure the mnemonic code has been backed up.
If the App Wallet is deleted without the backup, all assets may be permanently lost.
2. Connect your D’CENT Wallet to your computer using the USB cable that comes with it.
1. Click on the HashPack Wallet icon on your browser
2. A pop-up will show up. Click on “Connect Hardware Wallet”
3. You will need to create a password. For safety reasons, do not use passwords used on other platforms, make it at least 8 characters including uppercase, numbers and symbols. Once done, you will need to accept the terms and click “Next”
4. Click on D’CENT Hardware Wallet
5. Here, you need to click on “Import existing wallet”
6. Then, click on “Connect D’CENT”. It will open a window with our D’CENT Bridge service.
7. Once connected, go back to the HashPack tab where you will be able to see the Hbar account we previously created. If you have more than one, you will see all of them.
8. You will be asked to name your wallet and choose the currency you want. Then click import
9. Well done! You now can see your assets. On our side, we had some assets already, so we can easily double check if the amount is correct, as well as the public address. Every data is good.
Staking in crypto involves holding and locking up a certain amount of cryptocurrency in a digital wallet to support the network’s operations. It helps secure the blockchain and validate transactions, and in return, participants earn rewards or additional tokens. In the case of Hedera Network, staking entails holding HBAR (the native cryptocurrency) and delegating it to a network node to help maintain consensus. Stakers receive HBAR rewards in proportion to their stake and play an important role in securing and governing the Hedera network.
For this, there are some requirements:
Your D’CENT Wallet must be plugged to your computer
You must already a HBAR account on your D’CENT Wallet linked to HashPack the way explained above
You must have assets on your account to begin staking
Before starting the process, it is important to note that you will be staking your entire account, you can not stake just part of it. If you want to stake only part of your assets, you will need to create a second account and split your HBAR into two according to how much you would like to stake. You can easily create another account of HBAR following the exam same process you created the first one.
There is no minimum amount of HBAR to start staking. Staking is made by a period of 24 hours from midnight.
As long as you are staking your token, you cannot transfer them, you need to unstake them to be able to use your assets once again.
1. Let’s open the HashPack app. As you can see, there is a Stake tab. Click on it, then “Stake you HBAR”
2. You will be able to choose the node you would like to stake in or just go with the default proposal. We are not recommending one option over the other to you. It is a personal choice. Once selected, make sure to understand and agree with the information displayed then confirm by clicking on Stake.
3. Details are shown on your wallet for final approval. Click on “OK” then you will be able to authenticate yourself via your fingerprint.
4. Transaction is complete, click on done on HashPack extension.
5. On the Stake tab you can now see your staked assets.
You can also have some more data about the reward history, which was our case as we had already stake some token on this node before.
How to do native staking of Hbar via D’CENT Wallet?
Connect to the FTSO Portal site with your wallet (Songbird or Flare) address to continue.
To delegate your vote power to an FTSO provider, you must first to swap SGB or FLR tokens to a wrapped token such as WSGB or WFLR.
For example, we will connect to the FTSO portal using the Songbird Network and swap SGB to WSGB.
Click on the Swap button.
Set the amount to swap and click the button below.
Press "Confirm" to continue.
Press "OK" and authenticate to sign this transaction.
Press "Confirm" to continue.
You can see the swapped WSGB balance in the portfolio section.
Scroll down to "My Delegation' and click on + Add delegation. Note that you can currently add up to 2 delegations.
List of FTSO providers with voting power rates is shown in random order. To delegate Vote Power to an FTSO provider, click on the drop-down button next to the provider’s name.
Enter the amount(% rate) you want to delegate. For example, we have 100 WSGB in the balance. Setting the delegation rate to 50% will delegate 100 WSGB * 0.50% =50 WSGB. Note that you can also check when the reward period will be for each delegation.
To finalize the delegation, you will need to sign a transaction. Press "Confirm" to continue.
Press "OK" and authenticate, which will sign this transaction.
Press "Confirm" to continue.
Note that delegating Vote Power to an FTSO provider does not transfer your WSGB and all of your WSGB stays in your wallet.
From "My Delegation", you can see the delegation status of 50 WSGB(Vote Power) delegated to an FTSO provider.
If there is any reward that can be claimed, it will show up on the "My claimable reward" section.
🚨 Rewards are paid out every Saturday and will disappear if you don’t collect them for 90 days. Be sure to claim your rewards periodically every week. 🚨
To un-delegate your Vote Power from an FTSO, from "My Delegation" Click the "Undelegate" button.
Select the FTSO provider you want to undelegate and click the “Undelegate” button.
Press "Confirm" to continue.
To finalize the undelegation order, you must sign a transaction. Press "OK" and authenticate to sign.
FTSO partners listed are the FTSO providers that have integrated with D’CENT Wallet for the seamless experience in using the FTSO functions while protected by an additional layer of security when users interact with the FTSO provider services. All FTSO partners have put great effort and are dedicated to bringing the best possible FTSO delegation experience to our motivated users in the ecosystem.
Introduction to the D'CENT FTSO Portal
Accessing the FTSO portal
Swapping SGB or FLR tokens to wrapped tokens
Vote Power delegation with WSGB
Checking my delegation status
Undelegating Vote Power
D’CENT FTSO Partners List
3. Install Bridge app
D’CENT Bridge is a software developed by D’CENT in order to connect your Biometric Wallet to your computer and make some actions such as updates or connecting your D’CENT Biometric Wallet with Blade.
If you do not have it installed yet or want to know more about it, we coerce you into reading that guide.
You now have completed all the above actions. Blade Wallet Extension is properly installed as well as the D’CENT Bridge.
Do not forget to have your D’CENT usb cable around in order to connect your D’CENT Biometric Wallet to your computer. It will soon be necessary.
2. Connect your D’CENT Biometric Wallet to your computer using the USB cable that comes with it
1. Click on the Blade Wallet extension on your browser
2. Start the setup by choosing the language of your choice
3. You will need to create a password. For safety reasons, do not use passwords used on other platforms, make it at least 8 characters including uppercase, numbers and symbols. Once done, click on “Advanced setup”
4. As you will connect to your D’CENT Biometric Wallet, you want to click on ‘Hardware wallet’
5. Click on D’CENT Biometric Wallet
6. Here, you need to click on ‘Import a wallet’
7. A new tab should open. It will ask you to plug your D’CENT Biometric Wallet to your computer. Click on ‘Next’
8. After a short wait, you shall be able to click on ‘import account’
9. Well done! You now can click ‘Close’. The tab will be closed as well
10. You can open the Blade Wallet extension and you will be able to see your HBAR account imported from the D’CENT Biometric Wallet . On our side, we had some assets already, so we can easily double check if the amount is correct, as well as the public address.
Staking is the process of locking up HBAR in order to participate in the Hedera network consensus. By staking HBAR, users can earn rewards and help to secure the network.
For this, there are some requirements:
Your D’CENT Wallet must be plugged to your computer
You must already a HBAR account on your D’CENT Wallet linked to Blade the way explained above
You must have assets on your account to begin staking
Before starting the process, it is important to note that you will be staking your entire account, you can not stake just part of it. If you want to stake only a part of your assets, you will need to create a second account and split your HBAR into two according to how much you would like to stake.
There is no minimum amount of HBAR to start staking. Staking is made by a period of 24 hours from midnight. While your HBAR asset is being staked, you cannot transfer them until you unstake them.
1. Let’s open the Blade app. As you can see, there is a ‘Stake’ button
2. Click on it, then you will be able to choose the node you would like to stake in or just go with the default proposal. We are not recommending one option over the other to you as it is a personal choice.
3. Click on ‘Sign’
4. Details are shown on your Biometric Wallet for final approval. Click on ‘OK’ button then you will be able to authenticate yourself via your fingerprint.
5. Transaction is complete, you can verify that indeed your tokens are being staked.
How to do native staking of HBAR via D’CENT Wallet?
Sending fund to your D'CENT wallet account
Check the receiving address on D'CENT wallet
Preparing for a Send transaction from your Binance account
If the 'Next' button is disabled while a red text message 'Address format is incorrect' is shown, this means that the address is incorrectly entered. Notice that there is extra 'bitcoin:' text in the beginning of the address. If this ever happens, just delete the extra text and the 'Next' button will be enabled.
Sending fund to your D'CENT wallet account
Check the receiving address on D'CENT wallet
Preparing for a Send transaction from your Coinbase account
When a new Biometric Wallet is purchased or the device you've been using is reset to factory, you can recover your pre-existing wallet.
Your pre-existing wallet can be recovered by entering all 24 words written down on the Recovery Card which was generated when you first performed the Initial Setup.
Recovering wallet after deleting data on D'CENT device
To perform wallet recovery, you must first reset the Biometric Wallet through "Device Wipe" menu. Once the device has been reset to the factory condition, follow the instructions from the section below to recover your wallet.
"Device Wipe" will delete all data inside your Biometric Wallet. Before you decide to wipe your device, make sure to check that you have your Recovery Card.
Step-1 : Select Language & Recover Wallet
Power on D'CENT Biometric Wallet
To power on the device, press and hold the "Power" button for 3 seconds, which is located on the right-side.
If the cold wallet does not power on, please charge its battery using the USB cable you have, and then turn it on.
Select Language
Use "Up(∧) or Down(∨)" button to select your language and press "OK" button.
Select "Recover Wallet"
To recover wallet, select "Recover Wallet" from the menu.
To protect accessing your wallet, register a new PIN and your fingerprint.
Use Up(∧, increase number value) or Down(∨, decrease number value) button to input your PIN. Pressing the "OK" button on the cold wallet will confirm the input.
When you have entered 4 digits, you will see "OK" text on the screen. If you wish to set your PIN to 4-digits long, then press the "OK" button on the hardware wallet.
If you wish to set the PIN to a longer digit, you can change the ("OK" text) value on the screen by pressing the "Up(∧) or Down(∨)" button. Your PIN can be set to 4, 5, 6, 7, or 8 digits long.
If you register a 4-digit PIN, you will see a "Security level is low" warning on the screen. If you wish to use such a PIN, press the "OK" button on the cold wallet to continue.
Re-enter the same PIN you have set in the previous step to verify for correctness.
※ If the PIN numbers do not match, you will have to restart the PIN registration.
1) To register your fingerprint, touch your finger on the sensor to scan.
Fingerprint sensor is located in the middle of where the navigational buttons are located.
Check the location of .
2) Slightly change the angular positioning of the same finger when scanning and repeat until 100% (8 correct scans) is reached.
Scan your fingerprint one last time to verify registered fingerprint.
※ If the fingerprint does not match, you will have to restart the Fingerprint registration.
.
※ If re-registering fingerprint, try using a different finger instead.
※ If unable to register your fingerprint for any reason, you will be given an option to skip the fingerprint registration. Fingerprint can be registered from the menu at a later time.
※ If fingerprint verification fails, your fingerprint will not be saved.
1) Enter the 24 recovery words recorded on the recovery card, numbered 1 through 24.
※ How to input : Use the "Up(∧)/Down(∨)" buttons - ∧(increase value from a to z) or ∨(decrease value z to a)
2) Press the "Down(∨)" button to review whether the 24 recovery words were entered correctly in order.
3) If all words are entered correctly, select "I am ready" at the bottom of the review menu.
After completing the wallet recovery, connect your hardware wallet to the D'CENT mobile application to synchronize. You need to re-add all the cryptocurrency accounts that you have created in the past. (Try to keep a list of the accounts that you have created, so that you can easily re-add them after the wallet recovery).
Once you have completed the Initial Setup, make sure to visit D'CENT Wallet homepage and check for the latest firmware available. Newer version of firmware may include additional support for cryptocurrency assets and new wallet features.
More information on firmware update can be found from.
Swap
Swap service allows you to quickly and easily exchange one cryptocurrency for another.
D'CENT Wallet's Swap service enables seamless crypto exchanges across various blockchains. To facilitate this, it integrates with aggregators such as 1inch, ChangeNOW, and Changelly.
One of the key advantages of D'CENT Swap is that it provides bridging, cross-chain swaps, and regular swaps all within a single interface. For example, you can swap USDT on the Ethereum network for USDT on the Polygon network effortlessly.
Access the Swap service
1) You can access the Swap service through the following three methods:
① D'CENT App → Tap the "⇄(Swap)" button at the top of the [My Wallet] tab.
② D'CENT App → In the [My Wallet] tab, select the coin account you added → Tap the "⇄(Swap)" button.
③ D'CENT App → Tap the "⇄" icon in the bottom Global Navigation Bar (GNB).
④ D'CENT App → In the [Insight] tab, open the detailed view of a coin → Tap the "Swap" button.
2) When you access the Swap service, a screen will appear where you can select the From token (the token you are sending) and the To token (the token you will receive).
1) Select the token to send in the From section. Only tokens that are currently held in your wallet can be selected in the From field.
For each token, the network, token account name, and available balance will be displayed.
To change the sending token, tap the token account name as shown in the image below.
You can either search for a token or select one from the list.
2) In the To section, select the token you want to receive through the swap.
Just like in the From section, tapping the token account name will open a popup where you can choose a token.
If you want to select a token that is not already added to your wallet, you can either choose it from the "To Token" list or enter the token name in the search box.
1) Select the tokens to swap in the From (sending token) and To (receiving token) sections. Enter the amount of the token you wish to swap in the From section.
2) After entering the amount in the From (sending token) section, the estimated amount and value of the To (receiving token) will be displayed.
You can also check the service provider offering the quote, the swap rate, and the estimated network fee.
By tapping the displayed service provider, you can view other supported liquidity providers and select a different one that offers a better swap rate or is recommended for your transaction.
3) If the receiving token is not yet added to your D'CENT wallet, an "Add Account" button will appear.
Select the account that will cover the network fee, enter a name for the new account, and tap "Add Account" to create the token account.
1)If the selected quote is from a decentralized exchange (DEX) provider.
You can check the Slippage information at the bottom of the screen.
Slippage refers to the difference between the expected price at the time of order placement and the actual price at which the transaction is executed. It typically occurs in highly volatile or low-liquidity markets. By default, the optimized slippage rate for the transaction is recommended and displayed.
Users can manually adjust the slippage settings. In addition to the preset options of 0.5%, 2%, and 5.5%, you can set a custom value anywhere between 0.01% and 50%.
2)If the selected quote is from a centralized exchange (CEX) provider.
You can check the exchange rate information. In this case, there are two exchange rate options:
Flexible (Variable): The rate may change based on market fluctuations.
Fixed: The rate is locked in at the time of transaction confirmation.
1) If the token selected in the From field is based on the ERC-20 standard and the transaction is being processed through a decentralized exchange (DEX), the "Approve" button will appear instead of the "Swap" button. You must first tap "Approve" to authorize the token before proceeding with the swap.
This approval step allows the DEX service provider to access the token for swapping.
For example, if the quoted provider is 1inch, you will need to approve access to the token for 1inch in order to proceed with the swap.
2) Tap the "Approve" button, check the "Confirmed." box on the next screen, and then tap "Confirm".
Review the transaction signature details, tap "Approve", and complete the signature by authenticating with your fingerprint or PIN in the wallet.
3) After the approval is complete, re-enter the amount to swap. If the same service provider (e.g., 1inch) is selected in the quote again, the "Swap" button will now appear.
The provider will also be marked as "Approved" in the provider list.
1) Once you have completed the token approval, tap the "Swap" button. Next, review the transaction details and tap "Confirm" or "Send".
To complete the transaction, check the signature request and authorize it using your fingerprint or PIN in the wallet.
2) After signing the transaction, tap "Swap History" to check the status of the swap.
3) If the status shows "Completed", you can view the swapped cryptocurrency in the "My Wallet" tab.
Connect with MetaMask (QR-based)
D'CENT Wallet - MetaMask integration
MetaMask supports EVM-compatible blockchains (those that run smart contracts) and is widely used across various DApp platforms. In addition to its built-in accounts, MetaMask also supports a QR-based protocol for integrating with hardware wallets.
The D'CENT app utilizes this QR-based protocol to enable seamless integration between D'CENT accounts (EVM-compatible) and MetaMask.
Download and Install MetaMask
First, download the MetaMask Chrome extension from (https://metamask.io/download/) and follow its instructions to install.
How to connect D’CENT Wallet with MetaMask
This function is supported only in Biometric Wallet and App Wallet(Software) mode. Minimum supported version
Biometric Wallet firmware version: 2.19.7 or higher
The QR-based protocol supported by the MetaMask can only be used when a camera(webcam) is installed on the computer.
If you use an external camera device, please check if the camera supports the auto focuing and QR code scanning function.
[Step 1] Preparing to connect with MetaMask in the D’CENT App
1) After running the D’CENT App, enter the "Discovery" tab.
2) Select "MetaMask Integration" from the list.
3) Check the consent box, then click the "Go to Service" button.
4) Click on "Select Account" button.
5) From the list, select the EVM-based account (e.g., Ethereum) you wish to connect.
6) After confirming that the QR code is generated, Proceed to [Step 2].
1) On the MetaMask main screen, click the "Account" button at the top center.
2) Select "Add Account or Hardware Wallet", then click "Add Hardware Wallet".
3) After selecting "QR-based", click the "Continue" button at the bottom.
4) It switches to the QR code scanning page.
5) Scan the QR code prepared in [Step 1] using the camera on your computer.
6) When the QR code scan is completed normally, it will be converted to the account selection page.
7) On the account selection page, select First account and click "Unlock".
(In the case of a D’CENT account, it doesn’t matter which account you choose because all the accounts shown in the QR scan list are the same.)
8) You can check the page where the account of the D’CENT wallet and the MetaMask are linked.
1) On the MetaMask main screen, click the "Send" button.
2) Enter the recipient’s wallet address, then click "Continue" button.
3) Input the amount you wish to send, then click "Continue" button and review the transaction details. Click "Confirm" to proceed. (You can adjust the transaction fee limit by selecting the "Edit" option.)
4) The screen will switch to a QR code format for the signature request.
There are two ways to scan the signature request QR code:
1) From D'CENT App, go to the "Discovery" tab and Click on "MetaMask Integration > Select account to sign (e.g., Ethereum) > QR Scan" button.
2) Alternatively, tap the "QR Scan" button in the top left corner of the "Discovery" tab.
3) When the QR scanning screen appears, scan the signature request QR code generated in [Step 1].
4) Verify the recipient address, then tap "Sign".
5) If you are using a biometric cold wallet, carefully review the displayed information once more. If everything is correct, press "OK", then enter your fingerprint or PIN.
6) If you are using an app wallet, enter the 6-digit password you set when you first launched the app.
7) After signing, you can check the signature in QR code format.
1) Click the "Get Signature" button on the signature request page completed in [Step 1].
2) Scan the QR code prepared in [Step 2] using the camera on your computer.
3) Once the QR code scan is completed, go to the Activity tab in MetaMask to view the transaction details.
Initial Setup
Creating new wallet on the Biometric Wallet
D'CENT Biometric Wallet is equipped with 4-buttons for navigation.
Up(∧)/Down(∨) buttons : Move between selectable items or change value of numbers or characters.
D’CENT App version: Android (5.16.1 or higher) / iOS (5.16.2 or higher)
If you do not have an EVM account, please refer to user guide ‘How to create a coin account’ to create an account and use it.
DO NOT disclose QR code to others.
[Step 2] Connect the D'CENT Wallet by scanning the QR code on your computer
If the camera on your computer is having difficulty reading the QR code, please try again after adjusting the screen brightness to max on your phone.
Example of how to send ETH using MetaMask
[Step 1] Create ETH transaction with MetaMask
[Step 2] Create a signature for the transaction using the D’CENT App
[Step 3] Sending signed data to MetaMask
OK button
: Confirm selected item or input value.
Back button : Move to previous menu or cancel the current input value.
To power on the device, press and hold the "Power" button for 3 seconds, which is located on the right-side.
Use "Up(∧) or Down(∨)" button to select your language and press "OK" button.
Language support : English, Korean, Chinese, Japanese, Spanish
To create a new wallet, select "Create Wallet" from the menu.
To protect accessing your wallet, register a new PIN and your fingerprint.
Firmware below v.2.5.5 only supports 4-digit PIN length.
Use "Up(∧, increase number value)" or "Down(∨, decrease number value)" button to input your PIN. Pressing the "OK" button on the cold wallet will confirm the input.
When you have entered 4 digits, you will see "OK" text on the screen. If you wish to set your PIN to 4-digits long, then press the "OK" button on the hardware wallet.
If you wish to set the PIN to a longer digit, you can change the ("OK" text) value on the screen by pressing the "Up(∧) or Down(∨)" button. Your PIN can be set to 4, 5, 6, 7, or 8 digits long.
If you register a 4-digit PIN, you will see a "Security level is low" warning on the screen. If you wish to use such a PIN, press the "OK" button on the cold wallet to continue.
Re-enter the same PIN you have set in the previous step to verify for correctness.
※ If the PIN numbers do not match, you will have to restart the PIN registration.
1) To register your fingerprint, touch your finger on the sensor to scan.
Fingerprint sensor is located in the middle of where the navigational buttons are located.
Check the location of fingerprint sensor.
2) Slightly change the angular positioning of the same finger when scanning and repeat until 100% (8 correct scans) is reached.
Scan your fingerprint one last time to verify registered fingerprint.
※ If the fingerprint does not match, you will have to restart the Fingerprint registration.
.
※ If re-registering fingerprint, try using a different finger instead.
※ If unable to register your fingerprint for any reason, you will be given an option to skip the fingerprint registration. Fingerprint can be registered from the Setting menu at a later time.
※ If fingerprint verification fails, your fingerprint will not be saved.
Recovery seeds are the codes that you use to recover your wallet.
If your D'CENT Cold Wallet is ever lost, stolen, damage, or wiped and you no longer have any access to your wallet, using recovery seeds is the only method of recovering your existing wallet.
You MUST write down all the recovery seeds on the Recovery Card and keep it secured in a safe place.
Recovery seeds required for recovering your existing wallet is shown only once during initial setup. If you lose your recovery card, there is nothing we can do to help you recover your funds. You are solely responsible to secure your recovery card in all events.
1) Press "OK" button only when you have fully understood the WARNING notice.
2) Write down all the recovery seeds (words) shown on the screen of your cold wallet. Press "OK" button to see the next list of words.
There are 6 lists with total of 24 words and each list has 4 words shown. Make sure you write them down correctly and in the exact same order as shown.
3) When you have written down all 24 words, press "OK" button to continue.
Enter all 24 words written on the recovery card to proceed with verification.
※ How to input : Use the "Up(∧)/Down(∨)" buttons - ∧(increase value from a to z) or ∨(decrease value z to a)
For example, if the recovery word is "patch", enter the first character "p" and press the "OK" button > enter the second character "a" and press the "OK" button > enter the third character "t" and press the "OK" button.
From the list of words available, select the correct word(patch) using "Up(∧)/Down(∨)" buttons and press "OK" button to choose as the answer.
※ If you find yourself having written down the words incorrectly, you can press "OK" button(RETRY) to re-enter the recovery seeds from the lists for review.
Complete your review by entering all 24 words this way.
Congratulation, you have passed the quiz and your new wallet is created. From your cold wallet, you can check the lists of coin accounts available. You are now ready to use your new wallet together with the mobile application.
Once you have completed the Initial Setup, make sure to visit D'CENT Wallet homepage and check for the latest firmware available. Newer version of firmware may include additional support for cryptocurrency assets and new wallet features.
More information on firmware update can be found from here.
Before you begin
D'CENT Biometric Wallet user interfaces
Step-1 : Select Language & Create Wallet
Power on D'CENT Biometric Wallet
If the cold wallet does not power on, please charge its battery using the USB cable you have, and then turn it on.
For safe battery charging, please connect the charging adapter to the outlet first, then charge the cold wallet.
Select Language
After setting up your cold wallet, you can change the Language from the menu.
Select "Create Wallet"
Selecting "Create Wallet" will create a wallet from a new private key.
If you wish to recover an existing wallet, please refer .
Step-2 : Register PIN & Fingerprint
Register a new PIN (4 to 8 digits)
Verify your
PIN
After setting up your cold wallet, you can change the PIN value from the Biometric Wallet menu.
Register Fingerprint
Verify Fingerprint
Step-3 : Write down the recovery seeds
Before you begin - What are recovery seeds(Mnemonic code)?
If you lose your recovery card, there is no other way to recover your existing wallet and your funds will be lost.
Write down the recovery seeds from the lists
When writing down the recovery words, make sure to check that the spelling is correct
Do not take pictures or save images of your recovery words or recovery cards. You are responsible for securely handling your recovery words. D'CENT is not liable for any damage or loss of crypto assets resulting from user negligence, such as the theft of recovery cards or the storage of image files.
Special care must be taken to ensure safe storage (away from fire, water, sunlight or pets).
Recovery Seeds Verification
Enter the first 3 characters
Finding suggestion from the list shown
Step-4 : Completing the Initial Setup
You can find the complete list of cryptocurrency assets supported on D'CENT Biometric Wallet from
Check for the latest Firmware
Step-2 : Register PIN & Fingerprint
Register a new PIN (4 to 8 digits)
Verify your
PIN
After setting up your cold wallet, you can change the PIN value from the Setting menu.
Register Fingerprint
Verify Fingerprint
Step-3 : enter the recovery words
Do not take a photo or save the recovery word or recovery card as an image. The user is responsible for handling the recovery word safely.
D'CENT is not responsible for any damage or loss of cryptocurrency assets caused by the user's negligence, such as theft of recovery cards or storage of image files.
Special care is required for safe storage (away from fire, water, sunlight or pets).
Entering Swap Amount and Selecting a Service Provider
Each token selected in the To (receiving token) section has a minimum required amount for the swap. Please check the displayed minimum amount before proceeding.
The fees required for swapping include service provider fees from platforms such as OKX and 1inch, as well as network fees (gas fees) for executing transactions on the blockchain.
D'CENT does not charge any additional fees for using the swap service.
Slippage or Exchange Rate Settings
When trading meme coins, increasing the slippage tolerance improves the likelihood of a successful transaction. Additionally, if a previous transaction failed, raising the slippage setting can help ensure the trade is completed.
Approve Token
Sign the Transaction and Complete the Swap
If the swap status is "Pending" or "Failed", or even if it shows as "Completed" but the cryptocurrency has not been received, you should contact the service provider using the "Transfer TXID" or the "Exchange TXID" (for ChangeNow, Changelly, Exolix).
You can find the service provider information and the corresponding TXID in the "Swap Detail" screen.
For any inquiries regarding service usage, please first check the answers in our Customer Support Center below.
Please note that D'CENT Wallet only acts as a bridge to external services (dApps) by providing an intuitive swap interface. D'CENT is not directly responsible for any risks that may arise from using these 3rd party services.
D'CENT Wallet for Chrome is a Google Chrome browser-based extension programfor PC that allows you to connect a Biometric Wallet to a PC to manage assets and use various Web3 services.
It provides the same UX as the existing D'CENT mobile app, allowing you to easily and conveniently use the Biometric Wallet in a PC environment.
✅ Biometric Wallet required(All-In-one Card Wallet and App Wallet are not supported.)
✅ It is recommended to use the Biometric Wallet after updating to the latest firmware whenever possible. Please refer to the user guide below for firmware update instructions.
✅ Installation is available on a 64-bit Windows PC or macOS PC
✅ A USB cable that supports data transfer must be used(Please use a Micro USB 5-pin Type or USB Type-C cable depending on the charging port type of your Biometric Wallet.)
If you are ready, you can download the D'CENT Wallet for Chrome through the link below.
1) Click the Extensions button in the Google Chrome browser and select D'CENT Wallet for Chrome.
For reference, if you click the PIN button, you can launch the D'CENT Wallet for Chrome more quickly.
2) Click the "Get Started" button.
3)Set a password to use in the D'CENT Wallet for Chrome.
This password is required to unlock the D'CENT Wallet for Chrome and is separate from your Biometric Wallet or the D'CENT mobile app.
The password must meet the following requirements:
Minimum length of 8 characters
At least one letter (uppercase and lowercase allowed)
At least one number
Do not reuse passwords from other services
For enhanced security, it is recommended to include at least one uppercase letter and one special character.
After entering the same password again for confirmation, click the "Continue" button.
4) After setting the password, connect your Biometric Wallet.
First, turn on your Biometric Wallet, unlock it using your fingerprint or PIN, and connect it to your PC using a USB cable. Then, click the "Connect" button on the D'CENT Wallet for Chrome screen.
5) When the browser connection request popup appears, select D'CENT - Paired and click the "Connect" button.
6) Synchronization between the Biometric Wallet and the D'CENT Wallet for Chrome will begin. It may take a few minutes to complete the synchronization.
Once completed, your accounts and assets stored in the Biometric Wallet will be displayed in the My Wallet tab of the D'CENT Wallet for Chrome.
D'CENT Wallet for Chrome provides the same UX as the mobile app.
Therefore, you can use features such as Add Accounts, Send / Receive coins, Swap, and the DApp browser (Discovery) in the same way as you did on the mobile app, now in a PC environment.
For basic usage such as Add Accounts, Send coins and Swap, please refer to the user guide below.
D'CENT Wallet for Chrome offers three different display modes depending on your usage environment.
The available display modes are Full Screen, Popup, and Side Panel.
You can change the display mode by clicking the More (⋮) button in the My Wallet tab.
With D'CENT Wallet for Chrome, you can connect to DApps in a PC environment without launching the mobile app.
You can access DApps through the Discovery tab in the D'CENT Wallet for Chrome, or by searching for a desired DApp in your PC browser or directly entering the URL.
When connecting your wallet, you can use the D'CENT Wallet for Chrome for the connection.
If you click a DApp from the list in the Discovery tab, the corresponding DApp website will open in your PC browser.
For more details on how to use the Discovery tab, as well as supported networks and the list of available services, please refer to the user guide below.
For EVM-based DApps such as Uniswap, you can connect your wallet using the D'CENT Wallet option provided in the wallet connection menu.
1) In the Discovery tab, select Uniswap from the list to access the DApp website, then click the "Connect" button.
2) In the wallet connection options, select "D'CENT Wallet".
3) A connection request will be displayed in the D'CENT Wallet for Chrome. Select the account or network to connect to Uniswap, then click the "Connect" button.
4) Once the connection is confirmed in Uniswap, you can start using the DApp.
In some DApps such as KLAYswap or Swapscanner, the D'CENT Wallet option may not be available in the wallet connection menu.
In such cases, you can connect using another Extension Wallet such as MetaMask to utilize the D'CENT Wallet for Chrome.
1) In the Discovery tab, select KLAYswap from the list to access the DApp website, then click the "Connect Wallet" button.
2) In the wallet connection options, select "MetaMask".
3) A connection request will be displayed in the D'CENT Wallet for Chrome.
Select the account to connect to KLAYswap, then click the "Connect" button.
4) Once the connection is confirmed in KLAYswap, you can start using the DApp.
For your convenience, you can set D'CENT Wallet for Chrome as the default wallet.
In the My Wallet tab, click the More (⋮) button and select "Set as Default Wallet".
Once set, DApps will automatically connect to the D'CENT Wallet for Chrome without requiring you to select a wallet again.
If you have connected to an unintended DApp or wish to disconnect from a connected DApp, you can do so using one of the following methods:
1) From the My Wallet Tab: Click the Connected DApps icon in the top-right corner → select Manage Permissions → click the Disconnect button.
2) From the Discovery Tab: Go to Connected Sites at the top → select the connected DApp → click the Disconnect button.
Alternatively, you can go to Connected Sites → click Show all → then select Disconnect All to remove all connections at once.
You can set the auto-lock time and change your password in Settings > Security & Authentication within the D'CENT Wallet for Chrome.
The auto-lock time is configured in the “Lock After Inactivity” menu and is set to 30 minutes by default, but can be changed to 5 minutes, 30 minutes, 2 hours, 6 hours, 12 hours, or Never.
In addition, you can lock the wallet by clicking the More (⋮) button in the My Wallet tab and selecting Lock Wallet, or by closing or restarting your browser.
The "Change Password" menu allows you to update the password of the D'CENT Wallet for Chrome.
This password is the one set during the initial setup and is required to unlock the D'CENT Wallet for Chrome.
Q. Is my wallet safe when using it on a PC?
A. D'CENT Wallet for Chrome is protected by its own lock password as well as biometric (fingerprint) or PIN authentication on the Biometric Wallet.
This means that access is not possible while the D'CENT Wallet for Chrome is locked. Even if the password is exposed, any transaction requires signature approval via fingerprint or PIN authentication on the Biometric Wallet, ensuring that your assets remain secure.
Q. I connected via USB, but my D'CENT device does not appear in the device list.
A. Please check the following in order:
Make sure your D'CENT Biometric Wallet is powered on and unlocked using your fingerprint or PIN.
Try a different USB port or cable (the USB cable must support data transfer)
Ensure that Chrome is updated to the latest version
Check that the D'CENT extension is enabled at chrome://extensions/
Q. Where are signature request notifications displayed?
A. Notifications appear as a popup in the Chrome notification area at the bottom right of the browser.
At the same time, the extension icon displays a badge (number) indicating pending notifications.
Clicking the notification will take you directly to the approval/rejection screen.
Q. I am not receiving any notifications. What should I do?
A. Notifications may be disabled in your OS or Chrome settings. Please check the following:
Check Chrome notification settings
Enter chrome://settings/content/notifications in the address bar and ensure that no D'CENT-related items are blocked
Allow Chrome notifications on Windows
Settings → System → Notifications → Google Chrome → Turn notifications ON
Allow Chrome notifications on macOS
System Settings → Notifications → Google Chrome → Enable “Allow Notifications”
Q. Why can’t I see the D'CENT wallet option or why am I prompted to install a wallet on DApp services (e.g., KLAYSwap, Swapscanner)?
A. Some DApps manage their own wallet lists, so the D'CENT Wallet may not appear as an option.
In this case, you can connect using MetaMask-compatible mode.
How to connect:
Disable other EVM wallet extensions such as MetaMask or Rabby
(Turn OFF the extension toggle at chrome://extensions/)
Set the D'CENT Wallet for Chrome extension as the default wallet
Select MetaMask in the DApp wallet connection options
D'CENT Wallet for Chrome will respond in place of MetaMask and connect normally
Q. My D'CENT Extension is not updating to the latest version.
A. This is normal behavior.
Chrome automatically updates extensions on a per-profile basis and checks for updates at regular intervals while each profile is running. As a result, an older version may temporarily be displayed in profiles that are not frequently used. The latest version will be applied automatically after some time.
If you would like to update to the latest version immediately, please use one of the following methods.
Method 1 — Restart Chrome
Chrome checks for extension updates when it starts.
Close all Chrome windows completely.
Launch Chrome again.
→ In most cases, the latest version will be applied shortly afterward. However, downloading and applying the update may take some time. If the version is not updated immediately, please wait a few minutes or use Method 2 below.
Method 2 — Manually Update the Extension
Enter chrome://extensions in the address bar.
Enable Developer mode in the upper-right corner.
Click the Update button in the upper-left corner.
Verify that the D'CENT Wallet extension has been updated to the latest version.
※ Chrome Web Store pages do not provide a dedicated update button. Only "Add to Chrome" or "Remove from Chrome" buttons are available.
※ Reinstalling the extension will also install the latest version. However, some local settings may be reset, so we recommend trying the methods above first.
※ You can check your current version in D'CENT Wallet → Settings → App Info (Check for Updates). The latest available version can be found in Chrome Web Store → D'CENT Wallet → Details → Version.
The PC extension program (D'CENT Wallet for Chrome) is a program dedicated to the Biometric Wallet, and All-In-one Card Wallet and App Wallet (software) are not supported.
If you lose your password, it cannot be recovered. You will need to reset and reinitialize the wallet.
For a stable connection, please fully close the D'CENT mobile app on your phone or turn off Bluetooth.
Using D'CENT Wallet for Chrome
Connecting to a DApp in D'CENT Wallet for Chrome
Connecting to Uniswap with D'CENT Wallet for Chrome
Connecting to KLAYswap with D'CENT Wallet for Chrome
If MetaMask or other Extension Wallets are installed in your browser, you may need to disable them in order to properly use the D'CENT Wallet for Chrome.
Disconnecting a DApp in D'CENT Wallet for Chrome
Setting Auto-Lock Time and Changing Password
For enhanced security, it is recommended to set a shorter auto-lock time or manually lock the wallet when not in use.