You can change the Card Wallet you want to use through the "Scan new card" menu.
Click the "Scan new card" menu and tag the another Card Wallet.
Change Card PIN
You can change the current PIN of your Card Wallet. Please proceed in the following order.
1) Enter your current card PIN number
2) Enter a new PIN number
3) Enter the new PIN number once more
4) Tag the Card Wallet on your mobile phone
Checking transaction status and history
How to check transaction history
After sending or receiving a transfer to your wallet account address, you can check the transaction history from the mobile app.
1) Press the main body of a cryptocurrency account.
2) The picture in the middle is where your transactions are listed. The red numbers indicate send transfers made and the green numbers indicate receive transfers. Next to each transaction, there is a status icon such as a 'check' mark which indicates the state of the transaction. A 'check' mark for instance, indicates the transfer is completed.
3) More detailed information is shown when you press a transaction. Detailed information screen shows the transaction ID(txid) and the addresses involved in the transaction.
Synchronisation du porte-monnaie biométrique avec l'application mobile
Lorsque le porte-monnaie biométrique et l'application mobile sont connectés, la synchronisation démarre automatiquement.
Veuillez vous reporter aux sections suivantes pour savoir comment connecter le porte-monnaie biométrique à l'application mobile
Processus de synchronisation
Le but de la synchronisation est de conserver les mêmes informations correctes entre le porte-monnaie biométrique et l'application mobile. Les processus suivants se produisent pendant la synchronisation :
Vérification des informations de compte sur le portefeuille
Depuis le portefeuille biométrique, vous pouvez vérifier les informations du compte qui sont synchronisées avec l'application mobile.
Même si le porte-monnaie biométrique n'est pas synchronisé avec l'application mobile, les informations de base sur le compte de chaque pièce peuvent être vérifiées à partir du porte-monnaie biométrique.
Card type Wallet
D'CENT Card type Wallet is enabled with NFC technology for simple and convenient experience in using your hardware wallet.
How to use KLAY account
Send and Receive Klaytn (KLAY) coin
How to create an KLAY account
If you don't have Klaytn account, create new account. Coin name for KLAY is "Klaytn (KLAY)".
For more details of creating an account, click below link.
Card type Wallet mode
To use the Card Wallet, the NFC function must be enabled from the settings of the mobile phone.
Enter the Recipient address
How to use coin account
How to send and receive each coin
SegWit
What is Segregated Witness?
SegWit stands for Segregated Witness and, is a method of separately storing the signature part of the transaction record in order to reduce the data size stored in the block.
At the time SegWit was proposed, there were too many bitcoin transaction, it caused higher transaction fee. It was very important to solve bitcoin's block size limitation. This proposal has been adopted,
Before adopting SegWit, the saturation of the bitcoin block size caused the transaction fee to continue to rise. A resolution to reduce the block size received greater attention than the security enhancement effect to prevent transaction volatility.
In Bitcoin blocks, signatures take up surprisingly large amount of data space. If you save the signature separately in the block, more transactions data can be included in the data space that was once previously occupied by the signature data. In SegWit block, digital signature is collected separately to save 1MB of data space in a block, this will allow adding more transactions into that data space.
How to send coin
Methods of sending coin is different depending on the wallet mode you currently use. Please refer to the different wallet modes below.
How to add a custom token account
Custom tokens are token-type cryptocurrencies that are not listed in the support list. Custom token accounts can be added manually by the user for management.
Custom tokens can be added for the following blockchain networks:
✅ Ethereum (ERC20)
✅ Klaytn (KCT)
✅ RSK (RRC20)
How to add a custom token account
Adding custom tokens is straightforward and easy. Before you can add a custom token, make sure you have already created its respective blockchain account.
Vérifier les informations précédemment synchronisées
Vérifiez s'il existe un historique de synchronisation avec le porte-monnaie biométrique. S'il n'y a pas d'historique, le processus de synchronisation ajoute un processus supplémentaire de création de comptes en recherchant les informations d'adresse.
Synchroniser les informations du compte
1) Recherchez les informations de compte du porte-monnaie biométrique et comparez-les aux informations de compte enregistrées dans l'application mobile..
2) Créer un compte qui n'est pas enregistré dans l'application mobile parmi les informations de compte disponibles dans le portefeuille biométrique.
Si vous avez des informations sur vos comptes dans le porte-monnaie biométrique, les comptes existants seront récupérés même si vous supprimez l'application mobile et la réinstallez.
3) Si le solde a été mis à jour, les informations relatives au compte sur l'application mobile et le solde sur le porte-monnaie biométrique seront mis à jour.
ERC20 token is a token used on Ethereum. On Ethereum, tokens can be issued in the form of smart contracts. Tokens that conform to the ERC20 standard among smart contracts are called ERC20 tokens.
Currently, almost all tokens running on Ethereum follow the ERC20 standard.
For a list of ERC20 tokens supported by D'CENT Wallet, refer to the following items.
https://dcentwallet.com/SupportedCoin
ERC721 Token (NFT)
The ERC721 token is also called NFT (Non-fungible Token) and NFT is a non-replaceable token. While each ERC20 token has the same value, the ERC721 token has a unique value for each token.
In other words, it is impossible for the NFT to replace one token with another.
ERC20 is issued for functions similar to currency or points. On the other hand, ERC721 is used in cases where each token has a unique value, such as a game item.
Vérifier les informations du compte (Check account info)
L'écran principal de l'appareil répertorie différents comptes de pièces. Sélectionnez et choisissez un compte pour en afficher les détails.
Pour plus d'informations sur la création d'un compte, veuillez consulter le site suivant ici(here).
For more information on synchronizing between Biometric Wallet and mobile app, please see here.
Vérifiez l’adresse d'un compte (Check account address)
Sans l'application mobile, vous pouvez également vérifier l'adresse des comptes Cryptocoin et code QR de leur adresse à partir du porte-monnaie biométrique.
Suppression des informations de compte sur le porte-monnaie biométrique.
S'il y a trop de comptes inutilisés et que vous souhaitez supprimer les informations relatives aux comptes, vous pouvez procéder comme suit. Dans ce cas, toutes les informations de compte sont supprimées.
1) Sur votre porte-monnaie biométrique, naviguez jusqu'à Setting -> Security -> Delete Account
2)Saisissez votre code PIN et lorsque vous confirmez le message d'avertissement en cliquant sur le bouton OK, toutes vos informations de compte seront supprimées.
3) Synchronisez avec votre application mobile et vous remarquerez qu'il n'y a pas de compte affiché sur l'écran de l'application mobile.
Lorsque l'effacement est effectué, les clés privées des cryptocoin ne sont PAS effacées et restent protégées dans le portefeuille biométrique.
From the mobile app, you can re-add the accounts that you would like to see again.
Receive KLAY coin
From your coin account, click "Receive" to view your account address.
For more details of receiving coin, click below link.
Sending KLAY Coin
The procedures to send KLAY coin are same as sending general coin. You can see in the below link to check how to send coin.
Set the fee for Klaytn
The fee of Klaytn is consist of GAS fee and GAS limit. The unit of GAS fee is "ston" which is one of KLAY's sub unit.
1 KLAY = 1,000,000,000 ston
The real fee to be paid is calculated as "Used GAS amount" x "GAS fee".
GAS fee is fixed on Klaytn, and you can change GAS Limit on fee setting stage.
GAS Limit is automatically calculated in D'CENT mobile application.
1) From the mobile app, press the “Send” button of the coin account to be used for the transaction.
2) You can directly enter the address of the other party (recipient) in the address field, or
A. Press QR Scan to operate the camera.
B. Click Paste to enter the copied address.
3) When the address is entered, click the "Next" button.
Enter the amount to send and set the fee
1) Enter the number of cryptocurrency you want to send, or enter the amount in local currency.
2) Set the transaction fee. (Economic / Normal / Fast)
By setting it to "fast" and paying more fees, it is likely that the processing time of the transfer transaction will be reduced.
3) Once you have set the amount and fee, click the "Next" button.
4) Check if the transaction details displayed on the screen are correct and click the "Send" button.
5) Enter the password for your Card Wallet
If the password is not matched, you can try 10 times. If all 10 times trials are over, Card Wallet will be locked and you can never use the Card Wallet. Remember carefully your password for Card Wallet.
Final confirmation from your Card Wallet
1) From the mobile app, a screen will prompt you to tag the Card Wallet.
2) Tag the Card Wallet on the RFID reader located on the back of the mobile phone. The location of the RFID reader varies by the phone model.
3) When the transaction data is transmitted to the blockchain, the mobile app displays a message that the transaction has been completed. Click the "OK" button to return to the main screen.
With the introduction of SegWit, major networks have shortened the processing time of tasks and lowered the transaction fees.
For example, if you intend to add an ERC20, you must first have created an Ethereum account in the wallet.
1) Click on ‘+Add Custom Token’
2) Select the correct Blockchain Network where your custom token was issued.
3) Enter the smart contract address, Symbol, and Decimals.
4) Press Next to add the custom token.
Connexion avec un téléphone Android
Couplage Bluetooth avec le porte-monnaie biométrique
Afin d'utiliser l'application mobile, vous devez d'abord connecter votre téléphone mobile avec le porte-monnaie biométrique par couplage Bluetooth. Le couplage Bluetooth n'est requis qu'une seule fois lors de la configuration initiale de la connexion.
Au lieu d'utiliser la connexion Bluetooth, vous pouvez également utiliser le câble OTG pour établir une connexion physique entre le téléphone mobile et le porte-monnaie biométrique. Pour plus d'informations, voir ici().
Préparez l'appairage de votre porte-monnaie biométrique
1) Allumez votre appareil et authentifiez-vous pour accéder au portefeuille.
2) Sur votre appareil, faites défiler vers le bas et choisissez le menu "Setting".
3) Choisir "Bluetooth" menu.
4) Choisir "Android" menu.
5) L'écran affiche l'identifiant et le mot de passe de l'appareil pour le Bluetooth. connexion.
L'ID de l'appareil D'CENT est au format D'CENT-iD-<nombre & caractères>.
Le mot de passe Bluetooth est le nombre à 6 chiffres affiché à l'écran.
Sur cet écran, le voyant Bluetooth, situé dans le coin supérieur droit de l'appareil, s'allume. Il est normal que le voyant bleu clignote.
Connexion à partir du téléphone Android
1) Depuis votre téléphone Android, allez dans le menu Bluetooth.
Pour plus d'informations sur la façon de trouver le menu Bluetooth, veuillez vous référer à ce qui suit .
2) Si le Bluetooth est désactivé, veuillez l'activer.
3) Sur l'écran de votre téléphone mobile, l'identifiant de l'appareil D'CENT devrait apparaître.
4) Lorsque vous sélectionnez l'ID de l'appareil D'CENT, vous serez invité à saisir le mot de passe à 6 chiffres.
5) Entrez le mot de passe Bluetooth à 6 chiffres comme indiqué sur l'écran de votre appareil D'CENT.
Lorsque les deux appareils ont été appariés avec succès, le voyant DEL bleu cesse de clignoter et reste allumé.
Lorsque vous avez réussi à coupler votre Biometric Wallet à votre téléphone mobile Android, vous remarquerez que votre Biometric Wallet est maintenant enregistré comme un dispositif couplé.
Téléchargement de l'application mobile
Cliquez pour installer () D'CENT mobile app.
Installer en cherchant dans la boutique Google Play
Vous pouvez également chercher dans la boutique Google Play pour installer l'application mobile D'CENT.
Recherchez "D'CENT Wallet" dans le magasin Google Play.
Configuration de base pour l'application mobile
Sélectionner le mode portefeuille
Si vous installez l'application mobile pour la première fois, vous devez choisir un mode de porte-monnaie. Choisissez le portefeuille biométrique "Biometric Wallet" selon votre choix.
Mot de passe d'enregistrement pour l'application mobile
Enregistrez le mot de passe de l'application mobile pour protéger l'accès. Pour définir le mot de passe, saisissez deux fois le même numéro à 6 chiffres. Le mot de passe de l'application mobile est requis chaque fois que vous utilisez l'application mobile D'CENT. Assurez-vous de le mémoriser.
Le mot de passe de l'application mobile peut être modifié à partir de l’App menu
Terminer la configuration de base de l'application mobile.
Il ne vous reste que quelques étapes pour commencer à utiliser le Biometric Wallet. Tout d'abord, vous devrez synchroniser l'application mobile et le porte-monnaie biométrique, puis ajouter les comptes de pièces que vous souhaitez gérer.
Synchronisation de l'application mobile et du portefeuille biométrique
Après avoir terminé la configuration de base sur votre application mobile, vous allez maintenant procéder à la synchronisation avec le porte-monnaie biométrique.
Lorsque votre application mobile est ouverte, allumez votre porte-monnaie biométrique. Si vous avez déjà effectué l'étape de , La synchronisation commencera automatiquement. La synchronisation prendra quelques secondes pour se terminer.
Si la synchronisation ne commence pas, essayez d'éteindre votre Biometric Wallet et de le rallumer pour lancer la synchronisation.
Lorsque la synchronisation est terminée, vous remarquerez que l'icône Bluetooth (couleur bleu) apparaît dans le coin supérieur droit de l'écran sur l'application mobile.
Vous remarquerez également que la LED Bluetooth reste allumée sur votre porte-monnaie biométrique.
Vous pouvez désormais ajouter un compte de pièces à gérer à l'aide de votre porte-monnaie biométrique. Plus d'informations sur la façon d'ajouter un compte cryptos monnaies peuvent être trouvées ici().
Connexion avec le téléphone iOS
Téléchargement de l'application mobile
Cliquez pour installer (install) l'application mobile D'CENT.
Installer en cherchant dans l'App store
Vous pouvez également chercher dans l'App Store pour installer l'application mobile D'CENT.
Recherche de "D'CENT wallet" depuis l'App Store.
Configuration de base pour l'application mobile
Sélectionner le mode portefeuille (wallet mode)
Si vous exécutez l'application mobile pour la première fois, vous devez choisir un mode de porte-monnaie. Choisissez "Biometric Wallet" selon votre choix.
Mot de passe d'enregistrement pour l'application mobile
Enregistrez le mot de passe de l'application mobile pour protéger l'accès. Pour définir le mot de passe, saisissez deux fois le même code à 6 chiffres. Le mot de passe de l'application mobile est requis chaque fois que vous utilisez l'application mobile D'CENT. Assurez-vous de le mémoriser.
Le mot de passe de l'application mobile peut être modifié à partir de l’ à tout moment.
Bluetooth setting
Dans le menu Réglages de l'iPhone, activez la fonction Bluetooth.
Dans le menu Réglages de l'iPhone, activez la fonction Bluetooth.
Connexion à partir de votre iPhone
1) Allez à l'onglet principal (Compte) de l'application mobile D'CENT. Remarquez l'icône Bluetooth (couleur rouge) située dans le coin supérieur droit de l'écran. La couleur rouge indique que la connexion Bluetooth n'est pas établie. Cliquez sur cette icône pour vous connecter avec le Portefeuille Biométrique.
2) En cliquant sur l'icône, vous verrez une liste de dispositifs disponibles pour se connecter via Bluetooth. Trouvez votre appareil D'CENT et cliquez pour initier le jumelage Bluetooth.
3) Lorsque votre dispositif D'CENT est sélectionné, votre porte-monnaie commencera la synchronisation automatiquement. La synchronisation prendra quelques secondes pour se terminer. Vous remarquerez que l'icône Bluetooth est maintenant en couleur bleu, ce qui indique que la connexion Bluetooth est maintenant établie avec votre porte-monnaie biométrique.
Vous pouvez désormais ajouter un compte de cryptocoin à gérer à l'aide de votre porte-monnaie biométrique. Vous trouverez plus d'informations sur la façon d'ajouter un compte de pièces de monnaie ici().
How to use Ethereum account
Send and Receive Ethereum (ETH) coin
How to create an Ethereum account
If you don't have Ethereum account, create new account. Coin name for Ethereum is "Ethereum (ETH)".
For more details of creating an account, click below link.
From your coin account, click "Receive" to view your account address.
For more details of receiving coin, click below link.
Send Ethereum Coin
The procedures to send ETH coin are same as sending general coin. You can see in the below link to check how to send coin.
Set the fee for Ethereum
The fee of Ethereum is automatically calculated after setting the sending amount. The calculated fee is based on current average transaction fee on Ethereum blockchain network.
You can change the fee by sliding the bar or by directly entering the fee value in the advanced fee mode.
If the fee is set too low, the transaction may not get confirmed in the blockchain network.
Advanced Fee Setting
The fee of ethereum is consist of "GAS fee" and "GAS Limit". The unit of GAS fee is "gwei" which is one of ETH's sub unit.
1 ETH = 1,000,000,000 gwei
The real fee to be paid is calculated as “Used GAS amount” x “GAS fee” .
You can set the maximum amount of GAS as setting GAS Limit. Transaction can be confirmed faster if GAS fee is higher. You can manually set the GAS Limit and GAS fee on "Advanced" fee setting option.
Trouver le menu Bluetooth sur votre téléphone Android
Selon le modèle de votre téléphone Android, la recherche du menu Bluetooth peut être différente.
Trouvez le menu Bluetooth dans le menu déroulant supérieur
Sur votre téléphone Android, touchez la partie supérieure de l'écran principal et faites glisser l'écran vers le bas pour trouver le menu Bluetooth.
Trouvez le menu Bluetooth à partir de "Paramètres".
Réglages > Connexions > Bluetooth, vous pouvez activer et entrer dans le menu Bluetooth à partir d'ici.
Software Wallet Manager
App Wallet Backup
You can back up the mnemonic code (24 recovery words) using the "App Wallet Backup" menu in the software wallet manager.
Store the mnemonic code in a safe place.
If you delete the D'CENT mobile app or lose your mobile phone without backing up the mnemonic code, you will lose all your coins in the software wallet.
1) Select 'App Wallet backup' from the Manager tab.
2) Read the warning and press the 'Start backup' button.
3) Write down all 24 words in the exact order as shown on your screen. You can also use the 'Copy' button to save temporarily in the clipboard. Press 'Backup is complete' to continue.
4) Press 'I understand' to finish.
App Wallet Recovery
You can recover your wallet by using the mnemonic code (24 recovery words).
1) Select 'App Wallet Recovery' from the Manager tab.
2) Read the warning and tick the box. Press the 'Start recover' button to continue.
3) Enter all 24 words in the exact order as you have written down. You can also use the 'Paste' button to paste in the information from the clipboard. Press 'Recover' to recover your wallet.
The mnemonic code from your software wallet can also be used to recover your wallet on the Biometric hardware wallet.
Click here for more information about on Biometric Wallet.
Mobile App "Setting" menu
D'CENT Mobile App Setting
You can change various settings of the mobile app from the "Setting" menu.
Local Currency
Set the currency to display coin / token price. The following five currencies are supported.
USD : United States DOLLAR
KRW : Korean WON
JPY : Japanese YEN
CNY : Chinese YUAN
EUR : European EURO
GBP : British Pound Sterling
AUD : Australian Dollar
BTC : Bitcoin
ETH : Ethereum
Set additional authentication methods for mobile app
In addition to the 6-digit password, you can also select another method of authenticating to the mobile app.
For Android phones, fingerprint authentication can be set as a method of authentication.
For iPhones, FaceID can be set as a method of authentication.
How to use MONA account
Send and Receive Monacoin (MONA)
How to create a MONA account
If you don't have Monacoin account, create a new account. Coin name for Monacoin is "Monacoin (MONA)".
For more details of creating an account, click below link.
From your coin account, click "Receive" to view your account address.
The account of Monacoin supports HD wallet. "HD wallet" is the technical standard suggested in BIP-44 from bitcoin improvement proposal. A monacoin account of D'CENT wallet manage 15 addresses. Any address in the account can be used to receive coin.
Click "v" to see all of the addresses list and choose the address you want to use.
For more information about receiving coin, click below link.
Sending Monacoin
The procedures to send monacoin are same as sending general coin. You can see in the below link to check how to send coin.
Set the fee for Monacoin
The fee of Monacoin is automatically calculated after setting the sending amount. The calculated fee is based on current average transaction fee on Monacoin blockchain network.
You can change the fee by sliding the bar or by directly entering the fee value in the advanced fee mode.
If the fee is set too low, the transaction may not get confirmed in the blockchain network.
Specifications
Front
The design on the front reflects the hearts of the D'CENT team wishing for the cryptocurrency value to go "To the Moon".
More design editions are coming soon.
Back
On the back of the Card type Wallet contains the following information.
NFC Support
Card type wallet works in tandem to your mobile phone through NFC communication.
The card type wallet offers the simplest way of using hardware wallet by Tagging.
Security Chip
The card type wallet has a bank-grade certified security chip which offers highest security for protecting your private keys.
Factory PIN
This is the factory(default) PIN for the hardware wallet. Factory PIN is concealed by ribbon masking for protection and scratch it off to reveal. To use the Card type Wallet, you must first update this factory PIN to your own password.
Wallet Address
One address for your Ethereum, ERC20 Token, ERC721 (NFT) Token.
Curious about ERC20 Tokens? Read more from .
Curious about ERC721 (NFT) Tokens? Read more from .
Address in QR Code
Wallet address can be scanned using the QR scanner. You can present the code to your sender and receive your coin without the D'CENT mobile app.
Software Wallet mode
App Wallet is a software wallet that can be used free of charge without a hardware wallet. If you want more secure asset management, please purchase D'CENT Wallet.
Enter the Recipient address
1) From the mobile app, press the “Send” button of the coin account to be used for the transaction.
2) You can directly enter the address of the other party (recipient) in the address field, or
A. Press QR Scan to operate the camera.
B. Click Paste to enter the copied address.
3) When the address is entered, click the "Next" button.
Enter the amount to send and set the fee
1) Enter the number of cryptocurrency you want to send, or enter the amount in local currency.
2) Set the transaction fee. (Economic / Normal / Fast)
By setting it to "fast" and paying more fees, it is likely that the processing time of the transfer transaction will be reduced.
3) Once you have set the amount and fee, click the "Next" button.
4) Check if the transaction details displayed on the screen are correct and click the "Send" button.
Final confirmation from your App Wallet
1) Enter the 6-digit password you've set to protect access to your mobile app.
2) When the transaction data is transmitted to the blockchain, the mobile app displays a message that the transaction has been completed. Click the "OK" button to return to the main screen.
Mobile App download
Mobile App download for Android
Download Link
To install the mobile app for Android, please click .
Install by searching from the Google Play Store
You can install D'CENT mobile app by searching for the app directly from the Google Play Store.
Search for the keyword "D'CENT Wallet".
Mobile App download for iOS
Download D'CENT mobile app for iOS
To download the D'CENT mobile app for iOS, please click .
Install by searching from the App Store
You can install D'CENT mobile app by searching for the app directly from the App Store.
Search for the keyword "D'CENT Wallet".
D'CENT Backup Card Guide (New version)
This is a guide to creating a copy of your original card wallet to a D'CENT Backup card.
What is a D'CENT Backup card?
D'CENT Backup Card is a hardware wallet with no data inside the security chip, which can be used to make a backup copy of your original card type wallet through secure encryption technology. This means that the data from your original card wallet is encrypted with the user's password and can be transferred to the Backup Card to create an exact same copy of your existing wallet.
Continue to the next sections to find out how you can create a backup image and how it can be recovered on a Backup Card.
Biometric Wallet Manager
Check firmware version
You can check the Biometric Wallet firmware version in D'CENT Manager. If the firmware is not up-to-date, you will be informed about the firmware update.
Firmware update is currently supported only from PC. It is strongly recommended to use the Chrome browser to perform the firmware update from your PC.
Click for more information on firmware updates.
Changing the name of your Biometric Wallet
You can change the name of your Biometric Wallet through the "Device Information" menu. The device name is the name that appears when you boot the Biometric Wallet.
How to use RSK account
Send and Receive RSK (RBTC) coin
How to create an RSK account
If you don't have RSK account, create new account. Coin name for RSK is "RSK Smart Bitcoin(RBTC)".
For more details of creating an account, click below link.
From your coin account, click "Receive" to view your account address.
For more details of receiving coin, click below link.
Send RSK (RBTC) Coin
The procedures to send RSK coin are same as sending general coin. You can see in the below link to check how to send coin.
Set the fee for RSK
The fee of RSK is automatically calculated after setting the sending amount. The calculated fee is based on current average transaction fee on RSK blockchain network.
You can change the fee by sliding the bar or by directly entering the fee value in the advanced fee mode.
If the fee is set too low, the transaction may not get confirmed in the blockchain network.
How to use XRP account
Ripple (XRP) account activation
If you have added your Ripple (XRP) wallet address for the first time, it is disabled. Ripple's policyrequires a purchase or transfer of Ripple of 20 XRP or higher to convert the Ripple wallet address to an activated state. Therefore, the corresponding 20 XRP will permanently lock-up at the corresponding wallet address.
If a permanent lockup is made at the address of the Ripple wallet, it is assumed that only 980 XRP can be transferred, excluding the 20 XRP, which is the permanent lockup amount.
XRP Destination Tag
Users' ripple wallets assigned by the Exchanges use the same address. In other words, User # 1, User # 2, User # 3, all use the same ripple address. To distinguish a user's account from another user, the Exchange will assign a Destination Tag to the user's account, which is an uniquely identifiable number.
Therefore, when sending XRP to a recipient wallet address created from the Exchange, you MUST enter the Destination Tag so that the Exchange will complete the deposit to the recipient's wallet account.
Example of XRP account created from an Exchange
Picture above is an example of XRP wallet account created from an Exchange such as Binance.
When you press "Deposit" for XRP, it will show the XRP deposit Tag (9-digit unique number).
On the bottom, the XRP address is shown.
When sending funds to the Ripple wallet address that exists on the Exchange, you must enter the Destination Tag.
XRP wallet created on D'CENT Wallet
In the case of a XRP wallet created on a personal wallet such as D'CENT Wallet, there is no destination tag and only the address is created.
Personal wallet such as D'CENT Wallet does not have a Destination Tag for its XRP account.
Create backup image
How to create a backup image of your ORIGINAL card wallet
To create a backup image, please have your ORIGINAL card wallet ready.
Follow the steps carefully as described in the instructions.
Step 1) Go to the Manager tab and select 'Backup and Recover Card'.
Step 2) Select 'Create backup image'.
Step 3) Press 'Start' to begin.
Step 4) Tag your ORIGINAL card wallet.
Step 5) Press 'Next' to continue.
Step 6) Enter a password for encrypting the backup image data. Re-enter the same password and press 'Next' to continue.
Step 7) Enter the ORIGINAL card PIN.
Step 8) Tag your ORIGINAL card wallet.
Step 9) Press 'Share backup image' to send the encrypted data (backup image) in a message to yourself. Press 'Finish' to complete the process of creating an encrypted backup image.
If you don't have a Backup Card, you will want to save this encrypted data in a safe place or send it to yourself in a message. You can recover this backup image onto a Backup Card at a later time.
Make sure to remember the password you have set to encrypt the backup image. If you forget the password, you will not be able to recover your wallet.
D'CENT Manager Menu
You can manage hardware wallet or software wallet through the D'CENT Manager menu.
Changing the Wallet mode
You can change the wallet mode by selecting the "Change D'CENT Hardware" menu in D'CENT Manager.
D'CENT mobile app manages each account information from each wallet mode separately, and when the wallet mode is changed, the corresponding account information for the mode is retrieved.
Menu composition for each mode
You can check how to use the Manager menu for each wallet mode in the following sections.
Questions fréquentes (FAQ) Vais-je perdre
mes crypto actifs si je perds mon D'CENT Wallet ?
Nous fournissons une fonction de récupération en cas de défaillance ou de perte du porte-monnaie. Vous pouvez restaurer l'intégralité du portefeuille en utilisant les 24 mots de récupération fournis lors de la création du portefeuille. Pour plus de détails sur la récupération du portefeuille, veuillez cliquer sur le lien suivant .
How to use Binance account
Send and Receive Binance (BNB) coin
How to create an Binance account
If you don't have Binance account, create new account. Coin name for Binance is "Binance chain(BNB)".
For more details of creating an account, click below link.
Utilisation du câble OTG pour la connexion physique
En connectant le téléphone mobile et le câble OTG, vous pouvez communiquer avec le porte-monnaie biométrique via USB au lieu de Bluetooth.
Si vous utilisez le câble OTG pour vous connecter, il est recommandé de désactiver la fonction Bluetooth de votre téléphone Android.
How to use Binance Smart Chain account
D'CENT Wallet supports Binance Smart Chain (BSC) and BEP20 tokens
The firmware (v.2.6.0 or higher) for D’CENT Biometric Wallet supports Binance Smart Chain and the BEP20 protocol. Additionally, the D’CENT Mobile App (v.5.1.0 or higher) will also support Binance Smart Chain and BEP20 tokens.
What is Binance Smart Chain?
is an innovative solution to bring programmability and interoperability to Binance Chain. It relies on a system of 21 validators with Proof of Staked Authority (PoSA) consensus that can support short block time and lower fees. The Binance Smart Chain also supports EVM-compatible smart contracts and offers interoperability for Cross-chain transfer.
Biometric Wallet mode
If you are using the Biometric Wallet mode, you can send coins only when your Biometric Wallet is connected with the mobile app.
Enter the Recipient address
How to receive coin
Receive coin using Biometric Wallet
D'CENT Biometric Wallet offers a convenient feature of showing the account address in the QR code.
From the main screen select the coin account you want and press OK button to see the account info.
Using iOS mobile phone
Using NFC feature on iOS
NFC feature is supported from iPhone7 and newer models. Your iPhone MUST be running iOS 13 or higher.
Connect with Kaikas wallet extension
Using Kaikas extension with Biometric wallet
Kaikas is a PC browser based extension wallet for the Klaytn platform. Users will be able to interact with the Kaikas wallet to perform Klaytn-based transactions including KLAY and BApps, while the owner verification and authorization are performed through biometric authentication on the D’CENT Biometric hardware wallet.
[Kaikas is available here]
Sending XRP using D'CENT Wallet
Enter the recipient address and the Destination Tag
1) From mobile app, press the “Send” button of the Ripple (XRP) account to be used for the transaction.
2) Enter the wallet address of the other party (recipient) and enter the Destination Tag if you are sending XRP to an address that is created by an Exchange.
How to view all the BTC public addresses
Why does my BTC public address change?
The public address of Bitcoin stems from the wallet's xPub (Extended Public Key), this means that a new public address can be derived from it. Once your Bitcoin public address receives an incoming payment, a new address will automatically be generated.
Les actifs cryptographiques sont-ils stockés dans le portefeuille matériel ?
L'actif cryptographique lui-même n'est pas stocké dans le portefeuille matériel. Les clés privées sont stockées dans le portefeuille matériel, et seules les autres informations relatives au compte sont gérées. Les actifs cryptographiques existent sur le réseau blockchain, et l'application logicielle lit les informations et affiche le solde calculé.
Comment l'actif est-il récupéré lorsque je récupère mon portefeuille ?
Il utilise 24 mots de récupération pour recréer la clé privée que le dispositif matériel a stockée dans le passé. Le crypto-actif d'origine n'existe pas dans le portefeuille matériel, mais il existe sur la blockchain. La clé récupérée est utilisée pour récupérer les informations des actifs cryptographiques existant. The recovered key is used to retrieve the information of the existing cryptocurrency asset and display it in the mobile app. Click La clé récupérée est utilisée pour récupérer les informations des actifs crypto-monnaies existant et les afficher dans l'application mobile. Cliquez ici pour apprendre comment récupérer votre portefeuille pour l'authentification par empreinte digitale de type portefeuille froid (cold wallet).
Le fabricant de D'CENT(IoTrust) connaît-il ma clé privée ?
La clé privée du porte-monnaie est générée par la puce de sécurité à l'intérieur du portefeuille hardware lorsque le client reçoit le portefeuille hardware et crée le porte-monnaie.
La clé privée générée à l'intérieur de la puce de sécurité n'est jamais exposée à l'extérieur. Pour cette raison, la clé privée du client est également inconnue du fabricant.
Le fabricant (IoTrust) exploite-t-il un serveur ? IoTrust dispose-t-il de mes informations personnelles et de ma clé privée ?
IoTrust n'exploite pas de serveur qui gère la clé privée et les renseignements personnels du client. Cependant, IoTrust exploite des serveurs de gestion générale, tels que des serveurs de gestion de micrologiciels (firmware) et des serveurs de pages d'accueil, qui sont spécifiquement destinés à la gestion des micrologiciels matériels (hardware firmware).
Quelles sont les crypto-monnaies supportées par D'CENT Biometric Wallet ?
Comment puis-je connecter le porte-monnaie biométrique D'CENT à l'application mobile?
Le porte-monnaie biométrique D'CENT et l'application mobile se connectent principalement par Bluetooth.
Si vous utilisez Android, veuillez vous référer ici.
Si vous utilisez un iPhone, veuillez vous référer ici.
Sur les téléphones Android, vous pouvez également vous connecter via un câble USB. Cliquez ici pour savoir comment connecter un câble USB avec un téléphone Android.
J'ai plusieurs téléphones. Puis-je télécharger l'application mobile D'CENT sur mon autre téléphone pour utiliser mon porte-monnaie biométrique?
Vous pouvez utiliser le porte-monnaie biométrique avec plusieurs téléphones. Toutefois, vous ne pouvez utiliser le porte-monnaie biométrique qu'avec un téléphone qui est actuellement connecté par Bluetooth. Si vous avez l'intention d'utiliser le porte-monnaie biométrique avec plusieurs téléphones, assurez-vous de désactiver ou de déconnecter la connexion Bluetooth sur le premier téléphone puis d'établir la connexion Bluetooth sur le deuxième téléphone que vous utiliserez.
J'ai perdu mon téléphone / je change de téléphone. Puis-je utiliser le porte-monnaie biométrique sur le nouveau téléphone si je télécharge l'application mobile D'CENT?
Vous pouvez l'utiliser sur un nouveau téléphone. L'application mobile D'CENT (mode portefeuille biométrique) ne contient que des informations accessibles au public telles que les comptes de crypto-monnaies (adresses publiques) que vous avez ajoutés pour la gestion.
D'CENT Mobile App fournit seulement une interface utilisateur pour que vous puissiez obtenir une vue des informations sur les comptes. Notez que chaque fois que vous exécutez D'CENT Mobile App, il se synchronise avec le portefeuille biométrique. Pendant la synchronisation, le portefeuille biométrique fournit les informations correctes du compte (adresse publique) à l'application mobile D'CENT, s'assurant que ce que vous voyez sur l'application mobile est l'adresse correcte du compte.
Pourquoi mon adresse Bitcoin change-t-elle sans cesse?
Dans le cas de Bitcoin, il est recommandé de changer l'adresse une fois qu'elle est utilisée pour protéger un certain niveau de confidentialité, car n'importe qui peut voir les détails de la transaction et le solde lorsque l'adresse est exposée. Cela est proposé dans les spécifications BIP-32 et BIP-44 relatives à Bitcoin, et de nombreuses sociétés de porte-monnaie matériels prennent en charge cette fonction.
Dans le cas de D'CENT, nous fournissons une fonction qui montre la liste des adresses utilisées à partir de l'application mobile pour atténuer l'inconfort de ne pas connaître les adresses Bitcoin précédemment utilisées.
Pour savoir comment vérifier toutes vos adresses publiques BTC, veuillez cliquer sur ici.
Puis-je continuer à utiliser mon adresse Bitcoin avant le changement?
Comme l'application mobile D'CENT conserve un enregistrement des transactions pour toutes les adresses, il n'y a aucun problème pour continuer à utiliser l'adresse bitcoin avant le changement. Pour plus d'informations sur l'adresse bitcoin, veuillez cliquer ici.
Pourquoi le transfert d'une grande quantité de bitcoins prend-elle du temps?
Lors du transfert de bitcoins, des fragments (petites quantités) de bitcoins provenant de nombreux blocs sont collectés et transmis. Si votre solde de bitcoins est fragmenté en trop de blocs, il faudra beaucoup de temps pour les collecter et les envoyer tous. Ce n'est pas toujours le cas, mais plus le nombre de bitcoins que vous envoyez est important, plus il est probable qu'ils seront collectés à partir de plusieurs blocs, ce qui prendra généralement plus de temps.
Si une transaction prend trop de temps, cela peut avoir de multiples effets secondaires. Les clients peuvent penser que la fonction Wallet a cessé de fonctionner et cela augmente en fait les chances d'une erreur. Pour cette raison, D'CENT fournit une méthode pour diviser et transmettre plusieurs transactions si le solde du compte bitcoin est fortement fragmenté. Par exemple, une grande somme de demande de transfert de bitcoin unique peut être divisée en 2 transactions, ainsi le client confirmera deux fois.
Can I cancel a pending transaction?
Due to the nature of blockchain cryptocurrency protocol, a transaction cannot be canceled or changed once the transaction is broadcasted to the blockchain network. The only option you have is to wait for the pending transaction to complete. If a pending transaction is not validated by the blockchain network for an extended period of time, the pending transaction will get dropped.
However, for an Ethereum transaction, a pending transaction can be canceled by sending a new transaction with a small amount of Ethereum and a higher transaction fee to your own Ethereum address. If the newly sent transaction gets validated first before the previous pending transaction, the pending transaction will be canceled.
L'envoi de Ripple (XRP) ne fonctionne pas. Quelles sont les précautions à prendre lors d'un envoi vers un Exchange?
Après le transfert, le solde restant sur votre compte doit être d'au moins 20 XRP.
De nombreux échanges exigent une étiquette de destination (tag) lors du dépôt de XRP en échange. Lorsque vous envoyez de l'argent à un échange, veuillez vous assurer que le Tag de destination est requis avant d'envoyer de l'argent. Si vous ne remplissez pas le Tag, votre argent peut être perdu à jamais ou l'échange peut prendre un temps très long pour récupérer votre fonds.
Pourquoi les 20 XRP restants dans mon portefeuille ne sont-ils pas transférables?
La Politique de Ripple (Ripple's policy) nécessite un transfert de 20 XRP ou plus pour convertir une adresse de portefeuille XRP nouvellement crée en une adresse activée. Le coût de l'activation de l'adresse est de 20 XRP et elle sera verrouillée sur le compte XRP, ce qui signifie que le montant de réserve de 20 XRP ne pourra pas être retiré.
Des coins (pièces) ont été envoyés dans mon portefeuille, mais le solde n'apparaît pas. Que dois-je faire?
Dans la plupart des cas, il s'agit d'une erreur de saisie de l'adresse ou d'un long délai dû à des frais de transaction payés trop faibles.
Si vous avez reçu un coin, veuillez vérifier sur l'application mobile.
Essayez de rafraîchir les soldes des comptes en restant sur l'onglet "Compte". Tirez l'écran vers le bas et relâchez pour rafraîchir.
Essayez de rechercher l'adresse à partir de Block Explorer et vérifiez si l'envoi ou la réception a réussi.
Vous pouvez rechercher sur le moteur de recherche "bitcoin explorer", "ethereum explorer" ou "XRP explorer".
Habituellement, les explorateurs de blocs suivants sont utilisés :
Bitcoin :
Ethereum : /
Ripple :
J'ai créé de nombreux comptes mais, à présent, seuls quelques-uns d'entre eux sont réellement utilisés. Ne puis-je pas voir uniquement les comptes que je souhaite voir ?
Le porte-monnaie biométrique D'CENT affiche toutes les pièces prises en charge.
L'application mobile utilise une méthode d'ajout de compte, veuillez donc ajouter uniquement le compte que vous utilisez réellement. Si vous avez ajouté un grand nombre de comptes à des fins de test, vous pouvez supprimer toutes les informations relatives à ces comptes en suivant les instructions ci-dessous.
Pour supprimer toutes les informations relatives aux comptes sur Biometric Wallet, allez dans [Setting] -> [Security] - > [Delete Account].
N'ajoutez que les comptes que vous voulez voir à partir de l'application mobile.
"Supprimer le compte" ne supprime pas les clés privées ni vos actifs cryptographiques. Veillez à vous souvenir ou à noter les comptes dont vous disposez.
N'est-il pas vulnérable à la sécurité lorsqu'il est connecté via Bluetooth?
À l'exception des données de transaction de la blockchain rendues publiques, TOUTES les données importantes sont traitées dans la puce de sécurité du porte-monnaie biométrique. Par conséquent, même si la transmission des données dans la communication Bluetooth est suivie, les actifs à l'intérieur du portefeuille froid (cold wallet) ne peuvent pas être piratés.
Puis-je utiliser mon téléphone portable et le porte-monnaie biométrique D'CENT en utilisant la connexion filaire?
Pour les téléphones Android, vous pouvez l'utiliser en le connectant avec un câble OTG. Veuillez cliquer ici (here) pour plus d'informations.
Puis-je envoyer des pièces en utilisant uniquement le porte-monnaie biométrique sans l'application mobile ou un logiciel pour PC ?
Le porte-monnaie biométrique D'CENT n'ayant pas de fonction de réseau internet, il est nécessaire de communiquer avec un logiciel externe pour transférer les pièces. Nous recommandons d'utiliser l'application mobile D'CENT.
Quel est le niveau de sécurité de D'CENT Wallet ? Quelles caractéristiques sont incluses pour renforcer la sécurité ?
D'CENT Wallet est un produit réalisé par des experts de haut niveau qui ont longtemps travaillé dans le développement de puces cryptographiques et de systèmes d'exploitation sécurisés. Les cartes de crédit, les cartes bancaires, les cartes USIM, les TEE, etc. sont développées depuis près de 20 ans et D'CENT Wallet est développé en utilisant les techniques de sécurité apprises sur le terrain.
Ce qui suit est une brève introduction aux considérations de sécurité.
Utilisation de la puce de sécurité de la carte à puce (carte de crédit et secteur bancaire certifiés pour la sécurité) pour le stockage sécurisé des clés et le traitement sécurisé de la signature de la transaction.
L'algorithme d'empreintes digitales est monté sur la carte à puce pour traiter les informations relatives aux empreintes digitales uniquement à l'intérieur de la puce de sécurité.
Système d'exploitation propriétaire sécurisé
Le porte-monnaie biométrique D'CENT a été soumis à une inspection de sécurité par un tiers professionnel de l'audit de sécurité, et vous pouvez en vérifier le contenu ici (here).
Puis-je effectuer la mise à jour du micrologiciel depuis mon téléphone portable ?
Actuellement, seul l'environnement PC prend en charge la mise à jour du micrologiciel. La mise à jour du micrologiciel à partir de l'environnement mobile est en cours de développement dans la feuille de route à long terme.
La mise à jour du firmware s'est arrêtée en plein milieu. Que dois-je faire ?
La mise à jour du micrologiciel prend généralement environ 5 minutes. Cela peut prendre jusqu'à 10 minutes. Si la mise à jour ne progresse pas après ce laps de temps, appuyez sur les boutons "Down" et "Power" et maintenez-les enfoncés pour forcer l'arrêt de l'appareil et réessayez. Vous trouverez un guide détaillé ici(here).
Pourrai-je continuer à gérer mes actifs si D'CENT (IoTrust) fait faillite ?
Bien qu'il soit très peu probable que D'CENT (IoTrust) arrête le service de portefeuille, mais si cette situation se produit un jour, vous pourrez continuer à gérer vos actifs de la manière suivante.
Les clients peuvent gérer leurs actifs en transférant des fonds vers d'autres portefeuilles que D'CENT.
D'CENT mettra l'application mobile ou le logiciel à la disposition du public pour que chacun puisse l'utiliser ou le modifier si le service est arrêté.
Nous promouvons continuellement l'intégration avec d'autres portefeuilles de logiciels populaires. Les clients se verront offrir une variété d'options à choisir parmi plusieurs alternatives.
Existe-t-il un moyen pour ma famille d'accéder à mon portefeuille si je décède ou si je ne suis plus en mesure de gérer mon portefeuille pour toute autre raison ?
Les principales informations qui permettent de gérer votre portefeuille sont le mot de passe, l'empreinte digitale et la carte de récupération. En cas d'urgence, vous pouvez le gérer de la manière suivante.
Partager les mots de récupération !
Si vous avez partagé les mots de récupération avec votre famille, celle-ci peut les utiliser pour récupérer les biens.
Enregistrement d'une deuxième empreinte digitale !
Vous pouvez enregistrer jusqu'à deux empreintes digitales sur le porte-monnaie biométrique. Si la deuxième empreinte digitale est enregistrée dans le matériel, elle peut être utilisée pour déverrouiller et accéder aux fonds qu'elle contient.
Veuillez vous enregistrer avec précaution car la deuxième empreinte digitale a également le même pouvoir d'envoyer des Cryptocoins.
Existe-t-il un autre porte-monnaie que l'application mobile D'CENT que je peux utiliser avec le porte-monnaie biométrique ?
Actuellement, il n'y a pas d'autres portefeuilles disponibles que l'application mobile D'CENT. Puisque nous travaillons avec plusieurs portefeuilles logiciels, l'utilisation du matériel D'CENT avec d'autres portefeuilles n'est pas lointaine. Nous l'annoncerons séparément lorsque les travaux seront terminés.
Il existe plusieurs modes de porte-monnaie, tels que le porte-monnaie biométrique, le porte-monnaie à carte et le porte-monnaie logiciel. Utilisent-ils tous la même clé privée ?
Comme chaque portefeuille est distinct, ils utilisent tous des clés différentes. En supposant que vous utilisez l'application mobile dans les trois modes différents, vous utilisez trois portefeuilles différents avec des clés privées différentes.
Comment sauvegarder un portefeuille de type carte ?
The original Card type wallet can be backed up using a BACKUP Card wallet. More information on a BACKUP Card can be found here.
Puis-je utiliser le portefeuille de type carte sur l'iPhone ?
Pour l'iPhone 7 ou supérieur et iOS 13 ou supérieur, vous pouvez utiliser le portefeuille de type carte. Vous pouvez en savoir plus ici (here).
This is a device that allows you to connect a USB device to a smartphone. One side is a micro 5 pin or USB C type, and the other side is a cable with a standard USB port. Just connect the OTG cable to your Android device.
Exemple d’un OTG cable
Le câble OTG n'est pas inclus dans l'emballage du porte-monnaie biométrique D'CENT et doit être acheté séparément. Veuillez acheter et utiliser le câble OTG adapté à votre téléphone mobile.
Câble OTG Micro 5pin
Si le port de charge de votre appareil Android est à micro 5 broches, vous devez utiliser un OTG à micro 5 broches.
Port de câble Micro 5pin
Câble USB C type OTG
Si le port de charge de votre appareil Android est de type USB C, vous devez utiliser un câble OTG de type USB C.
Exemple de Câble OTG de type USB C
Utilisation du porte-monnaie biométrique en le connectant avec un câble OTG
Lancez l'application mobile D'CENT
Veuillez d'abord lancer l'application mobile de D’cent. (Mode porte-monnaie biométrique)
Vous trouverez ci-dessous une photo montrant qu'il n'y a aucun lien avec le portefeuille biométrique.
Connectez votre appareil Android et votre porte-monnaie biométrique avec le câble OTG.
Connectez le Wallet Biometric et l'appareil Android comme indiqué dans la figure ci-dessous.
Autoriser l'accès USB
1) Lorsqu'un câble OTG est connecté, la fenêtre contextuelle suivante s'affiche. Appuyez sur "OK".
2) Lorsque la connexion est établie, la synchronisation commence avec le portefeuille biométrique et vous pouvez commencer à l'utiliser lorsqu'elle est terminée.
How to set up D’CENT Wallet
You can download the latest version of the D’CENT Mobile App here:
👉 For Android
👉 For iOS
If you are using an older version of the firmware on D’CENT Biometric Wallet, you will need to upgrade the firmware to the latest version (v.2.6.0 or higher) from the official firmware update site.
👉 Official Firmware Update Site
How to add Binance Smart Chain account in D’CENT Wallet
Run the D’CENT Mobile App and authenticate to unlock access.
Step 1) From the Account Tab, press the (+) button to add a wallet account.
Step 2) In the search field, type “Binance” to search.
Step 3) Choose Binance Smart Chain from the list shown.
Step 4) Press the ‘Create’ button to proceed.
Step 5) In the Account Tab, notice that a new Binance Smart Chain account has been added to the portfolio.
How to access Binance Smart Chain Dapps from the native Dapp browser in D’CENT Wallet
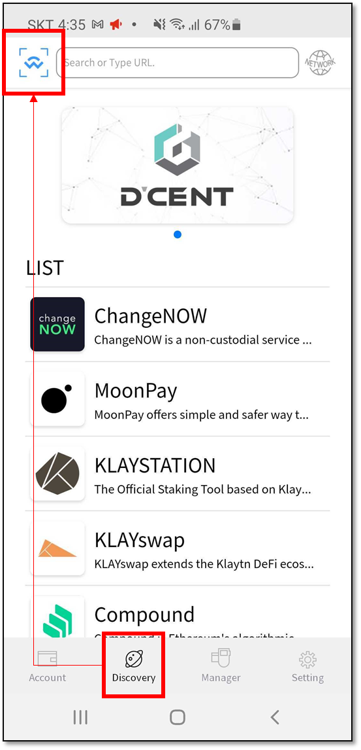
You can access Dapp services using the built-in dapp browser found in the ‘Discovery’ Tab.
Step 1) Go to the ‘Discovery’ tab in the bottom menu.
Step 2) Click on the Network icon(globe icon) located in the upper right-hand corner.
Step 3) Switch the network to ‘Binance Smart Chain’.
Step 4) You can access a dapp service by entering the URL in the search field.
Useful Link: List of Binance Smart Chain Dapp Services
1) From the mobile app, press the “Send” button of the coin account to be used for the transaction.
2) You can directly enter the address of the other party (recipient) in the address field, or
A. Press QR Scan to operate the camera.
B. Click Paste to enter the copied address.
3) When the address is entered, click the "Next" button.
Enter the amount to send and set the fee
1) Enter the number of cryptocurrency you want to send, or enter the amount in local currency.
2) Set the transaction fee. (Economic / Normal / Fast)
By setting it to "fast" and paying more fees, it is likely that the processing time of the transfer transaction will be reduced.
3) Once you have set the amount and fee, click the "Next" button.
4) Check if the transaction details displayed on the screen are correct and click the "Send" button.
Final confirmation from your Biometric Wallet
1) Check the transaction information displayed on the Biometric Wallet again. If the information is correct, click the "OK" button.
2) Scan your fingerprint for final approval of the SEND transaction. If the fingerprint is not registered, enter the PIN number for the final approval.
3) When the transaction data is transmitted to the blockchain, the mobile app displays a message that the transaction has been completed. Click the "OK" button to return to the main screen.
Press OK button again to see the address in hex(numbers + characters) form.
Press OK button for one last time to see the address in the QR code.
Present the QR code to the sender to scan with the mobile camera.
If QR code is read correctly, your address will be automatically inserted in the sender's wallet.
Receive coin using Mobile App
Run the mobile app and you will see your accounts in the main screen.
From your coin account, click "Receive" to view your account address.
Your account address in QR code can be scanned by the sender's camera.
To share the hex address to your sender, use the "Copy" or "Share" function.
You can just run the mobile app to see the account address.
You can use it more safely if you check the address once again from the Biometric Wallet.
Mobile App download for iOS
If you have not installed the D'CENT mobile app, please proceed to download the mobile app.
You can install mobile apps in the following ways:
Download D'CENT mobile app for iOS
To download the D'CENT mobile app for iOS, please click here.
Install by searching from the App Store
You can install D'CENT mobile app by searching for the app directly from the App Store.
Search for the keyword "D'CENT Wallet".
Mobile App basic setting
Choose the Card type mode
When D'CENT mobile app is run for the first time, please make your selection as "D'CENT Card Wallet".
Register Mobile App password
To protect access to your mobile app, please register password. Your password will be 6-digit PIN and you must enter it twice. Each time you run the mobile app, you will need to enter your PIN to unlock it. Choose your PIN wisely and make sure to remember it.
Card wallet tagging
Tag your card wallet against the reader on the back of your mobile phone. The position of the RFID reader on the phone varies by models but usually located on the top as shown in the picture.
After tagging your card wallet, you are finished with the mobile app basic setup.
Create default Account
When the mobile app basic setup is completed, you will see Ethereum as the default account that has been created.
Now, you can add ERC20 Token account. More information on how to add new token accounts can be found here.
For the ERC721 (NFT) Tokens, you do not need to create any separate accounts. You can receive any NFT tokens directly to your Ethereum address.
What is ERC20? To learn more about the basics of ERC20, please visit this link.
What is ERC721? To learn more about the basics of ERC721, please visit this link.
Step 1) Download and install the D’CENT bridge program on your PC. Installing the bridge program will enable communication between the PC browser and the hardware wallet.
Step 2) Plug in your D’CENT Biometric Wallet to the USB port on your PC and authenticate yourself to unlock the hardware wallet.
Step 3) From your browser, click on the Kaikas extension icon.
Step 4) Unlock Kaikas wallet and click the Manage Accounts icon on the top menu.
Step 5) From the Manage Accounts screen, click on Connect. In the next screen, select D’CENT as your hardware wallet and click Connect.
Step 6) From your browser, click on the Kaikas extension icon again to open the wallet service. You will notice that theKaikas wallet now displays the Klaytn account from the D’CENT Biometric Wallet.
You can always switch between multiple Klaytn wallet accounts by pressing the Manage Accounts icon.
When sending XRP to an address that exists on the Exchange, you MUST enter the Destination Tag to complete normal deposit into the recipient's account.
If you send XRP WITHOUT entering the Destination Tag to an address that exists on the Exchange, the deposit amount may be lost forever.
A Destination Tag is not required if you send XRP to a personal wallet such as D'CENT Wallet.
However, if the other party (recipient) provides you with a Destination Tag, you must enter it.
Viewing all the BTC addresses
When your BTC account is created on D'CENT Wallet, it will automatically generate 15 public addresses that you can use. To see the full list of BTC public addresses, run the mobile app and do the following:
1) Press the "Receive" button on your Bitcoin account.
2) On the next screen press the down arrow ( ∨ ) under the current BTC address.
In the last screen shot, you can see a list of your public addresses. The current BTC address is highlighted in "mint" color.
Ce menu permet de connecter le porte-monnaie biométrique via Bluetooth avec un téléphone Android ou iOS.
Pour la connexion de Bluetooth pour Android, plus d'informations peuvent être trouvées ici(here).
Pour la connexion de Bluetooth pour iOS, plus d'informations peuvent être trouvées ici(here).
Security Menu (Menu Sécurité)
Changer PIN
Le PIN (4 à 8 chiffres) est utilisé pour l'authentification si l'authentification par empreinte digitale échoue, et votre PIN est également requis lors de l'ajout ou de la suppression de données d'empreintes digitales. Vous pouvez modifier votre PIN en saisissant l'ancien PIN et en saisissant deux fois le nouveau PIN. Choisissez soigneusement votre PIN et mémorisez-le. Pour obtenir des instructions sur la façon de modifier le code PIN, veuillez vous référer ici().
Enroll Finger (Doigt d'enrôlement)
Vous pouvez enregistrer jusqu'à deux empreintes digitales sur le porte-monnaie biométrique. Lorsque vous enregistrez une nouvelle empreinte digitale, vous devez saisir votre code PIN.
La deuxième empreinte digitale ajoutée a les mêmes privilèges que l'empreinte digitale par défaut. Le transfert de pièces est également possible. Veuillez donc faire très attention lorsque vous ajoutez la deuxième empreinte digitale qui n'est pas la vôtre.
Delete Finger (Effacer un doigt)
Ce menu permet d'effacer toutes les données d'empreintes digitales. Pour supprimer, vous devez d'abord saisir le code PIN et confirmer la suppression.
Si deux données d'empreintes digitales sont enregistrées, elles seront toutes deux supprimées en même temps.
Delete Account (Supprimer un compte)
Le menu Supprimer le compte permet d'effacer toutes les informations publiques de vos comptes de portefeuille. Cependant, cela ne supprimera aucune des clés privées associées aux comptes portefeuilles que vous avez créés. Lorsque vous synchronisez votre porte-monnaie biométrique avec l'application mobile, vous remarquerez qu'aucun compte n'apparaît sous l'onglet "Compte". Si vous ajoutez à nouveau un compte cryptocoin à partir de l'application mobile, votre compte existant réapparaîtra.
Cette fonction est utile si vous avez précédemment ajouté de nombreux comptes de portefeuille mais qu'ils ne sont plus utilisés ou que vous ne souhaitez pas les voir apparaître sur l'application mobile.
Avant de procéder à la suppression de compte "Delete Account”, assurez-vous de garder la trace des comptes cryptocoins que vous avez précédemment créés.
Device Wipe (Effacement de l'appareil)
L'effacement du dispositif permet de réinitialiser votre Biometric Wallet à l'état d'usine. Cela signifie que le porte-monnaie biométrique sera dans le même état que s'il avait été acheté récemment.
Si vous effectuez le nettoyage du dispositif, l'ensemble de votre portefeuille sera supprimé, y compris toutes vos clés privées.
Pour effacer le dispositif, vous devez entrer votre code PIN, lire le message d'avertissement affiché et appuyer sur le bouton OK pour confirmer [OK & OFF]. Lorsque l'appareil est mis sous tension, vous remarquerez que votre porte-monnaie biométrique est dans l'état d'usine.
Lorsque vous confirmez [OK&OFF] pour effacer le dispositif, toutes les informations seront effacées, y compris les clés privées. Assurez-vous d'avoir vos codes mnémoniques avant de procéder à l'effacement du dispositif.
Language Menu (Menu Langue)
Vous pouvez changer la langue utilisée sur le porte-monnaie biométrique.
Device Info Menu (Menu Infos sur l'appareil)
Vous pouvez vérifier les informations sur le dispositif Biométrique Wallet à partir de ce menu.
Guide de dépannage (Troubleshooting)
Mon wallet D'CENT a été déconnecté pendant la mise à jour du micrologiciel. L'appareil est bloqué sur un écran et il ne veut pas s'éteindre. Que dois-je faire ?
Tout d'abord, déconnectez votre porte-monnaie D'CENT de votre PC.
Appuyez et maintenez enfoncés les deux boutons "Down" + "Power" pendant quelques secondes pour forcer l'appareil à s'éteindre.
Si votre appareil est endommagé pendant la mise à jour du micrologiciel, vous pouvez toujours accéder au mode bootloader en maintenant enfoncés les deux boutons "OK" et "Power" pendant 10 secondes.
Depuis le mode bootloader, vous pouvez essayer de mettre à jour le firmware pour récupérer votre portefeuille biométrique.
Sur la page Web de mise à jour du micrologiciel de D'CENT, j'ai appuyé sur le bouton "Update Firmware", mais j'ai reçu le message suivant : "Votre D'CENT est déconnecté. Le processus de mise à jour du micrologiciel est annulé". Que dois-je faire ?
Dans de rares cas, le système Windows ne reconnaît pas le porte-monnaie D'CENT même s'il a été reconnu auparavant. Ce problème peut être résolu en désinstallant le pilote de périphérique et en le réinstallant à nouveau à partir du gestionnaire de périphériques de Windows.
Comment accéder au Gestionnaire de périphériques (méthode n° 1)
Appuyez sur Windows+R sur votre clavier.
Tapez "control panel" et appuyez sur Enter pour accéder au Panneau de configuration (control panel).
Pour Windows 10 ou Windows 8, choisissez Matériel et son, recherchez et choisissez Gestionnaire de périphériques. (Device Manager)
Pour Windows 10 ou Windows 8, vérifiez sous Périphériques et imprimantes.
Pour Windows 7, vérifiez sous Système.
Comment accéder rapidement au Gestionnaire de périphériques (méthode #2)
Appuyez sur Windows+R sur votre clavier.
Tapez "cmd" et appuyez sur Enter pour lancer l'invite de commande
(une fenêtre noire).
Tapez "devmgmt.msc" et appuyez sur Enter.
Que dois-je faire à partir du Gestionnaire de périphériques ?
Dans l'écran du gestionnaire de périphériques, recherchez les dispositifs d'interface humaine (Human Interface Devices)
Vérifiez s'il y a un périphérique d'entrée USB (USB Input Device) marqué comme étant en erreur (triangle jaune avec point d'exclamation). Vous devrez vérifier s'il s'agit bien d'un périphérique D'CENT.
Cliquez avec le bouton droit de la souris sur ce dispositif et sélectionnez Propriétés (Properties).
Dans la fenêtre Propriétés du périphérique d'entrée USB, sélectionnez Détails.
Sous Propriété, sélectionnez Hardware Ids.
L'ID correct du dispositif pour D'CENT est PID_2130.
Depuis le Device Manager, Cliquez avec le bouton droit de la souris sur le périphérique marqué d'une erreur et sélectionnez Uninstall device.
Dans le menu supérieur du Gestionnaire de périphériques, appuyez sur Action puis sélectionnez Analyser les changements de matériel(Scan for hardware changes).
Cela permettra de rechercher tout nouveau périphérique connecté et d'installer automatiquement le pilote pour détecter votre porte-monnaie biométrique.
D'CENT Backup Card Guide (Old version)
This is a guide to creating a copy of your original card wallet to a D'CENT Backup card.
What is a D'CENT Backup card?
D'CENT Backup Card is a hardware wallet with no data inside the security chip, which can be used to make a backup copy of your original card type wallet through secure encryption technology. This means that the data from your original card wallet is encrypted with the user's password and can be transferred to the Backup Card to create an exact same copy of your existing wallet.
How to create a backup copy to a Backup Card
Before you begin the setup, please have your original card wallet and the Backup Card in hand.
Please follow the steps carefully as described in the instructions.
Phase 1) Set up a NEW PIN on your Backup card
Please have your Backup Card ready for Phase 1.
If you have already set up a NEW PIN to your Backup Card, you can skip to Phase 2.
Step 1) From the D'CENT mobile app, go to the Manager tab and click on 'Backup Card'.
Step 2) Press the OK button.
Step 3) Tag your Backup Card against the back of your mobile phone.
Step 4) Choose CHANGE CARD PIN.
Step 5) On your Backup Card, scratch off the ribbon masking to reveal the factory PIN.
Step 6) Enter the 6 digit factory PIN on your mobile app.
Step 7) Enter your own NEW PIN number. ** NEW PIN number must be treated "PRIVATELY".
Step 8) Re-enter NEW PIN number to verify for a match.
Step 9) Tag your Backup Card against the back of your mobile phone to set the NEW PIN to this card.
Phase 2) Create an encrypted backup copy of your original card wallet.
In Phase 2, you will need your original card wallet.
Step 10) Click NEXT button.
Step 11) Enter the PIN number of your original card wallet.
Step 12) Enter a password for encrypting the data in your original card wallet.
Step 13) Tag your original card wallet against the back of your mobile phone.
Phase 3) Finalizing back up process to your Backup Card
For Phase 3, please have your Backup Card ready.
Step 14) Press NEXT button.
Step 15) Enter the 6 digit PIN number of your Backup Card.
Step 16) Enter the same password that was entered to encrypt the card data from Step 12.
Step 17) Tag your Backup Card against the back of your mobile phone.
Step 18) Press END button to complete the backup process. Congratulations, you have successfully backed up your original wallet to a D'CENT Backup Card.
Remember to keep your D'CENT Backup Card stored in a safe place.
How to create a coin account
How to create an account
From the Account tab, click the + button to create an account.
In the case of using the Biometric Wallet mode, your Biometric Wallet must also be connect in order to create an account.
Please refer to the to change the wallet mode of the mobile app.
Select the Coin/Token
Select the coin you want to add from the list. You can also search by coin name or symbol name.
Click for a full list of cryptocurrencies supported by D'CENT Wallet.
What if the Coin/Token you want to add is not on the list?
If you cannot find your coins or tokens to add, you can ask the D'CENT team to add it to the list.
Click the "Crypto Asset Request" link and fill out the form. The D'CENT team will try to reflect your need as quickly as possible.
When trying to add a token account without the fee account
To create token accounts such as ERC20, RRC20, and KCT, the corresponding mainnet account must be created first.
To create ERC20 token account: Ethereum account is required
To create RRC20 token account: RSK account is required
To create KCT token account: Klaytn account is required
Set Account Name
After selecting the coin / token to add, please set the account name. You can also use the default account name. The account name is the nickname for the account, and it is displayed in the account information of the mobile app and also on the Biometric Wallet.
Account created successfully
When the account creation is completed, your account will appear on the main screen. The account balance information is retrieved from the blockchain network.
Now you can try SEND or RECEIVE from your account.
When an account is created in the Biometric Wallet mode
When an account is created in the Biometric Wallet mode, the created account information is also updated in the Biometric Wallet. For more information, refer to .
DApp browser (Discovery)
D’CENT Mobile App features a native DApp browser that is built into the application, which allows accessing web-based blockchain services by connecting a wallet account to log in.
From the DApp browser, you can use Ethereum-based DApp such as Maker Dao, Compound, Uniswap, and Klaytn-based BApp service such as KLAYSTATION.
Using DApp service on the Discovery tab
You can use DApp service in the "Discovery" tab located at the bottom menu of the app. Here, it lists various services that can be used in conjunction with D’CENT wallet. You can simply click on a service to access the DApp.
Unlisted DApp services can be accessed by entering the URL or through Google search.
Listed Services
As of September, 2020, following services are listed. For detailed information on each services, please visit the services sites.
MoonPay () : Buy crypto using your payment or credit card
Compound () : Stake cryptocurrency and earn interest
MakerDAO Oasis () : Stake cryptocurrency as collateral and borrow DAI stablecoin
Many more great services will get added to the list over time.
Caution on using the Card type Wallet
Permanent blocking of the Card type Wallet
While using the Card type Wallet, you will be asked to provide the authentication PIN to unlock access to the security chip which stores the private keys in encrypted secure storage.
Occasions are the followings:
1) To sign the transaction as final confirmation when performing the Send transfer.
2) When changing the current PIN to a new PIN, either during the initial setup or after the setup.
As a security measure, total of 10 attempts are available to enter the correct PIN.
The security chip on the Card type Wallet keeps track of how many attempts have failed.
If you fail to enter the correct PIN within the 10 attempts given, the security chip on the Card type Wallet will be blocked permanently, which renders the Card type Wallet no longer usable.
This also means that any assets stored on the Card type Wallet is no longer accessible and lost forever.
Note that if PIN is entered correctly before the Card type Wallet gets blocked, the total attempts possible will be reset to 10 attempts available.
Using Android mobile phone
Enable NFC
First, you must enable NFC feature and set it to the "Standard mode" on your Android phone.
Recover backup image
How to recover a backup image to a Backup Card
Before you begin, make sure you have changed the initial PIN on your Backup Card. Your initial PIN is found by scratching off the masking on the card surface.
Mobile App introduction
From a single D'CENT mobile app, users are given the choices of using Biometric Wallet, Card type Wallet, or the Software Wallet.
Features History
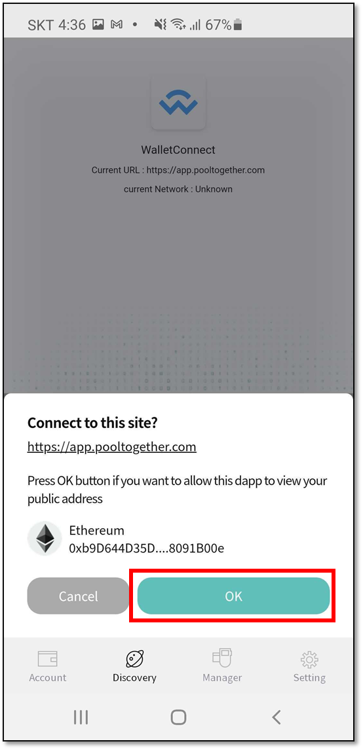
Using Wallet Connect
D’CENT Mobile App has added support for . You can now connect and access your favorite DApps on PC or Mobile browser using D’CENT wallet addresses.
✅ Full list of DApps supporting WalletConnect can be found here:
What is WalletConnect?
WalletConnect is an open protocol for connecting DApps on your browser to mobile wallets using end-to-end encryption by scanning a QR code. This allows users to establish connections to websites (DApps) from a browser and carry out transactions securely from D’CENT Wallet without revealing any secret information to the internet.
Klaystation Staking
What is Klaystation?
KLAYSTATION is the official staking tool based on the Klaytn Network.
Every KLAY holders have the right to stake into Klaytn's Governance Council and earn interest using this tool.
If you have not installed the D'CENT mobile app, please proceed to download the mobile app.
You can install mobile apps in one of three ways:
Download D'CENT mobile app for Android
To download the D'CENT mobile app for Android, please click here.
Download by tagging the Card type Wallet
If your NFC is enabled on your phone, tag the card type wallet against the back of your phone. If the tagging was read correctly, you will be directed to the mobile app download site.
If D'CENT mobile app is already installed on your phone, tagging the card type wallet will automatically run the D'CENT mobile app.
Install by searching from the Google Play Store
You can install D'CENT mobile app by searching for the app directly from the Google Play Store.
Search for the keyword "D'CENT Wallet".
Mobile App basic setting
Choose the Card type mode
When D'CENT mobile app is run for the first time, please make your selection as "D'CENT Card Wallet".
Register Mobile App password
To protect access to your mobile app, please register password. Your password will be 6-digit PIN and you must enter it twice. Each time you run the mobile app, you will need to enter your PIN to unlock it. Choose your PIN wisely and make sure to remember it.
Card wallet tagging
Tag your card wallet against the reader on the back of your mobile phone. The position of the RFID reader on the phone varies by models.
After tagging your card wallet, you are finished with the mobile app basic setup.
Create default Account
When the mobile app basic setup is completed, you will see Ethereum as the default account that has been created.
Now, you can add ERC20 Token account. More information on how to add new token accounts can be found here.
For the ERC721 (NFT) Tokens, you do not need to create any separate accounts. You can receive any NFT tokens directly to your Ethereum address.
What is ERC20? To learn more about the basics of ERC20, please visit this link.
What is ERC721? To learn more about the basics of ERC721, please visit this link.
You can change the initial PIN by selecting 'Change card PIN' from the Manager tab.
Changing Backup Card initial PIN
In order to use the Backup Card, the initial PIN must be changed first. If you have not done so already, please follow the guideline below to change the initial PIN.
Step 1) Go to the Manager tab and select 'Change card PIN'.
Step 2) Press 'Start' to begin.
Step 3) Find the initial PIN by removing masking on the surface of the card. Enter the 6-digit initial PIN.
Step 4) Tag your Backup Card wallet.
Step 5) Enter a new PIN to set to your Backup Card wallet.
Step 6) Re-enter the same PIN from Step 5 above.
Step 7) Tag your Backup Card wallet.
Step 8) Press 'OK' to finish the PIN setup.
How to recover your backup image on a Backup Card
To recover a backup image, please have your Backup Card ready.
Follow the steps carefully as described in the instructions.
Step 1) Go to the Manager tab and select 'Backup and Recover Card'.
Step 2) Select 'Recover backup image'.
Step 3) Press 'Start' to begin.
Step 4) Tag your Backup Card.
Step 5) If the Backup Card is usable for recovery, you will see this screen. Press 'Next' and continue the setup from Step 7.
Step 6) If the Backup Card is detected as 'Unrecoverable card' after tagging from Step 4, you will need to change the initial PIN on the Backup Card first.
Step 7) Paste the encrypted backup image data that you have created. Press 'Next' to continue.
Step 8) Enter the password you have set to the backup image. Press 'Next' to continue.
Step 9) Enter the PIN of your Backup Card wallet.
Step 10) Tag your Backup Card.
Step 11) Press 'Finish' to complete the process.
Make sure to double-check that the Backup Card has been recovered normally.
You can check if the Backup Card is working properly by using 'Scan new card' function from the Manager tab.
Using DApps on PC browser
In this example, we will access a DApp called PoolTogether. You will need your D’CENT Mobile App and PC to access the DApp website.
Step 1) Go to the PoolTogether website from your browser and click on Account.
Step 2) Click on Connect Wallet button.
Step 3) Select WalletConnect from the list and you will get a QRCODE.
Step 4) Launch your D’CENT Mobile App, and go to the ‘Discovery’ tab. On the top of left corner is a WalletConnect Scan icon. Click and scan the QRCODE.
Step 5) After scanning the QRCODE, you will see the following request for confirmation, click OK to connect your wallet address to PoolTogether DApp.
Step 6) When your D’CENT Wallet address is connected to PoolTogether DApp, you will see the following screens on your mobile and PC. Notice the D’CENT wallet address on the top right corner of the PoolTogether DApp.
Step 7) When you perform a transaction on the DApp service you are using, you will be prompted to confirm the transaction on the D’CENT Wallet.
NOTE : Make sure to keep D’CENT Wallet running on your mobile phone and stay on this activity. If you switch to other Apps, the current DApp (ie: PoolTogether) will lose connection and you will have to reconnect again.
Using DApps on Mobile browser
Step 1) Go to the PoolTogether (App) website from your browser and click on Account.
Step 2) Click on Connect Wallet button.
Step 3) Set Mobile as default and click on Connect.
Step 4) D’CENT Mobile App will be a selectable option when it is installed on your mobile phone. Select D’CENT.
Step 5) When D’CENT Wallet opens, authenticate to the access the Wallet App.
Step 6) Click OK to confirm the request to connect Wallet Address to the DApp.
Step 7) Now your D’CENT Wallet address is connected to the DApp.
Step 8) When you perform a transaction on the DApp service you are using, you will be prompted to confirm the transaction on the D’CENT Wallet.
NOTE : Make sure to click on disconnect after when you finish using the DApp service.
Using DApps via D’CENT DApp browser (Discovery)
D’CENT Wallet has a built-in DApp browser, which supports connecting to DApps much easier by using Web3 wallet (ie: D’CENT). Advantage in using the built-in browser is that you only need to use a single application (D’CENT Wallet) to access a DApp service.
If the DApp service does not support the Web3 interface, you can select WalletConnect to establish connection to the DApp. Instructions are similar to the previous methods described in the sections above.
Step 3) From the dashboard, click on Connect Kaikas button.
Step 4) When Kaikas wallet opens, press the Connect button to login to the Klaystation.
Step 5) From the dashboard, press the STAKE NOW button and a new pop-up will open. From the pop-up, set the amount to stake and press the Confirm button.
Step 6) From the Kaikas wallet, press the Confirm button to proceed with the staking transaction.
Step 7) The final confirmation of the staking transaction must be authorized from the D'CENT Biometric wallet. From the hardware wallet, press the Confirm button and authenticate yourself using fingerprint or PIN to finalize the transaction.
Step 8) When the staking transaction is completed successfully, you will the the following message from the Klaystation.
To unstake your KLAY from the Klaystation, press the UNSTAKE NOW button on the dashboard.
For detailed information about Klaystation and its operations, please visit here.
D’CENT biométrique l’Interfaces utilisateur du porte-monnaie
Le porte-monnaie biométrique D'CENT est équipé de 4 boutons pour la navigation.
Boutons haut(∧)/bas(∨) : se déplacer entre les éléments sélectionnables ou modifier la valeur des chiffres ou des caractères.
Bouton OK : confirme l'élément sélectionné ou la valeur saisie.
Bouton de retour : passer au menu précédent ou annuler l'entrée en cours.
Step-1 : Select Language & Create Wallet (Sélectionner la langue et créer un portefeuille)
Allumez D'CENT Biometric
Pour allumer l'appareil, appuyez sur le bouton d'alimentation pendant 3 secondes, situé sur le côté droit.
Sélectionner la langue (Select Language)
Utilisez le bouton ∧(Up) ou ∨(Down) pour sélectionner votre langue et appuyez sur le bouton OK.
Langues prises en charge : anglais, coréen, chinois, japonais, espagnol.
Après avoir configuré votre portefeuille froid, vous pouvez modifier la langue à partir de l'onglet "Langue" menu.
Sélectionner "Create Wallet"
Pour créer un nouveau porte-monnaie, sélectionnez "Create Wallet" dans le menu.
En sélectionnant "Create Wallet", un portefeuille sera créé à partir d'une nouvelle clé privée.
Si vous souhaitez récupérer un porte-monnaie existant, veuillez vous reporter à la rubrique ici ().
Step-2 : Enregistrer le PIN et l'empreinte digitale
Pour protéger l'accès à votre portefeuille, enregistrez un nouveau code PIN et votre empreinte digitale. Les micrologiciels inférieurs à la version 2.5.5 ne prennent en charge que les codes PIN à 4 chiffres.
Enregistrer un nouveau code PIN (4 à 8 chiffres)
Utilisez le bouton ∧(Haut, augmenter la valeur numérique) ou ∨(Bas, diminuer la valeur numérique) pour saisir votre code PIN. En appuyant sur le bouton OK du portefeuille matériel, vous confirmez la saisie.
Lorsque vous avez saisi 4 chiffres, le texte "OK" s'affiche à l'écran. Si vous souhaitez que votre code PIN soit composé de 4 chiffres, appuyez sur le bouton OK du porte-monnaie électronique.
Si vous souhaitez définir le code PIN sur un chiffre plus long, vous pouvez modifier la valeur (texte 'OK') à l'écran en appuyant sur le bouton Haut ou Bas. Votre code PIN peut être défini sur 4, 5, 6, 7 ou 8 chiffres.
Si un écran affiche l'avertissement "Niveau de sécurité faible", cela signifie que le code PIN que vous avez saisi est un mot de passe faible. Si vous souhaitez utiliser un tel code PIN, appuyez sur le bouton "OK" du porte-monnaie électronique pour continuer.
Vérifiez votre
PIN
Saisissez à nouveau le même code PIN que vous avez défini à l'étape précédente pour en vérifier l'exactitude.
※ Si les numéros PIN ne correspondent pas, vous devrez recommencer l'enregistrement du PIN.
Après avoir configuré votre porte-monnaie électronique, vous pouvez modifier la valeur du code PIN à partir du porte-monnaie biométrique menu .
1) Pour enregistrer votre empreinte digitale, touchez votre doigt sur le capteur pour le scanner.
Le capteur d'empreintes digitales est situé au milieu, là où se trouvent les boutons de navigation.Vérifiez l'emplacement du capteur d'empreinte digitale ().
2) Modifiez légèrement le positionnement angulaire du même doigt lors du balayage et répétez l'opération jusqu'à atteindre 100 % (8 balayages corrects).
Scannez votre empreinte digitale une dernière fois pour vérifier l'empreinte digitale enregistrée.
※ Si l'empreinte digitale ne correspond pas, vous devrez recommencer l'enregistrement des empreintes digitales.
※ Si vous réenregistrez votre empreinte digitale, essayez d'utiliser un autre doigt à la place.
※ Si vous ne pouvez pas enregistrer vos empreintes digitales pour une raison quelconque, vous aurez la possibilité de ne pas le faire. Les empreintes digitales peuvent être enregistrées à partir du menu plus tard.
※ Si la vérification des empreintes digitales échoue, votre empreinte digitale ne sera pas enregistrée.
Step-3 : Notez les séquences de mots de récupération (Write down the recovery seeds)
Avant de commencer - Que sont les séquences de mots de récupération, recovery seeds (code mnémonique) ?
Les graines de récupération sont les codes que vous utilisez pour récupérer votre portefeuille.
Si votre portefeuille D'CENT Cold Wallet est perdu, volé, endommagé ou effacé et que vous n'avez plus accès à votre portefeuille, l'utilisation des graines de récupération (les séquences de mots de récupération est la seule méthode pour récupérer votre portefeuille existant).
Vous DEVEZ noter tous les mots de récupération sur la carte de récupération et la conserver en lieu sûr ( 24 mots ).
les Recovery seeds ( 24 mots) nécessaires à la récupération de votre portefeuille existant n'est affichée qu'une seule fois lors de la configuration initiale.
Si vous perdez votre carte de récupération, nous ne pouvons rien faire pour vous aider à récupérer vos fonds.
Vous êtes seul responsable de la sécurité de votre carte de récupération dans tous les cas.
Si vous perdez votre carte de récupération, il n'y a aucun autre moyen de récupérer votre portefeuille existant et vos fonds seront perdus.
Notez les recovery seeds (24 mots de récupération) dans les listes.
1) Appuyez sur le bouton OK uniquement lorsque vous avez bien compris l'avis d'AVERTISSEMENT.
2) Notez toutes les graines de récupération (mots) dans l’ordre affiché sur l'écran de votre portefeuille froid cold wallet. Appuyez sur le bouton OK pour voir la liste de mots suivante.
Il y a 6 listes avec un total de 24 mots et chaque liste a 4 mots montrés. Assurez-vous que vous les écrivez correctement et dans le même ordre que celui indiqué.
3) Lorsque vous avez noté les 24 mots, appuyez sur le bouton OK pour continuer.
Vérification des 24 mots de récupération (Recovery Seeds Verification)
Il vous sera demandé de répondre à un simple quiz. Parmi les 24 mots de la liste, il vous sera demandé de saisir 2 mots choisis au hasard pour compléter la vérification.
Saisissez le mot correct qui correspond à la question posée.
Entrez les 3 premiers caractères
※ Comment saisir : Utilisez les boutons Haut/Bas - ∧(augmentez la valeur de a à z) ou ∨(diminuer la valeur de z à a).
Lorsque vous avez sélectionné le premier caractère, appuyez sur le bouton "OK" pour entrer la valeur. Répétez la saisie des deuxième et troisième caractères.
Recherche d'une suggestion dans la liste affichée
Dans la liste des mots disponibles, sélectionnez le mot correct à l'aide des boutons ∧/∨ et appuyez sur "OK" pour le choisir comme réponse.
※ Si vous vous apercevez que vous avez noté les mots de manière incorrecte, vous pouvez appuyer sur le bouton "Retour" pour revenir sur les graines de récupération des listes pour les réviser.
Step-4 : Terminer la configuration initiale (Initial setup)
Félicitations, vous avez réussi le quiz et votre nouveau porte-monnaie est créé. À partir de votre portefeuille froid, vous pouvez consulter la liste des comptes de pièces disponibles. Vous êtes maintenant prêt à utiliser votre nouveau porte-monnaie avec l'application mobile.
Comment se connecter avec un téléphone Android ()
Comment se connecter avec un téléphone iOS ()
Vous pouvez trouver la liste complète des crypto-monnaies supportées par D'CENT Biometric Wallet sur le site suivant:
Vérifier le dernier firmware
Une fois que vous avez terminé la configuration initiale, assurez-vous de visiter la page d'accueil de D'CENT Wallet et de vérifier la dernière version du firmware disponible. Une version plus récente du firmware peut inclure un support supplémentaire pour les actifs de cryptocurrency et de nouvelles fonctionnalités du portefeuille.
Pour plus d'informations sur la mise à jour du micrologiciel(firmware), consultez le site suivant ici().
How to use Stellar Lumens (XLM) account
Check the Firmware version
Stellar (XLM) coin is supported on the hardware wallet installed with firmware version v2.1.0 or higher. Please refer to the link below for instructions on how to update the firmware.
If you don't have a Stellar Lumen account, create a new account. The coin name for Stellar Lumen is "Stellar (XLM)".
For more details on how to create an account, click the link below.
If you can't create a Stellar account
There is a case where the Stellar account cannot be created even though the current firmware version is v2.1.0 or higher. This is because the new algorithm used by Stellar cannot be used if the firmware version installed in the product was lower than v2.0.1 when it was originally purchased.
In the event when trying to create a Stellar account from the mobile app, the search result will not display Stellar coin as an account that can be added. See the picture below.
Solution:
You can create a Stellar wallet account after recovering the wallet using the recovery words. But first, you must perform the device wipe from the settings menu of the hardware wallet.
1) Click for instructions on how to initialize(device wipe) the hardware wallet.
2) Click for instructions on how to recover your wallet.
Warning! You MUST not reset(device wipe) your device if you do not have your recovery words!
Stellar (XLM) wallet activation
After adding a Stellar (XLM) wallet from your mobile app, it will be in the disabled (not created on the Stellar network) state.
Due to Stellar's policy, a minimum of 1XLM must be transferred to the Stellar address to activate the account on the Stellar network. Depending on the exchange services, transferring fund to an inactive XLM account address may be restricted.
In addition, 1XLM in the account will be permanently locked-up. For example, if you have 100XLM in your account after creating your wallet, you can only transfer 99XLM (including fee). As shown in the figure, the remaining balance of 1XLM cannot be sent to another account even when if you try to send the maximum amount.
In some cases, the lock-up amount may be different. See the link below for more details.
Currently, D'CENT Wallet is running an event to support the cost of activating the XLM account that is created. Please refer to the section below "Receive Stellar coin".
Stellar Memo
The Stellar wallet used by an exchange service uses a single address. In other words, all users of the exchange have the same address. To distinguish each user's account, the exchange service manages the user accounts by assigning a unique identification character (Memo) to each user.
Therefore, when sending XLM to a recipient wallet address created from the Exchange, you MUST enter the Memo so that the Exchange will complete the deposit to the recipient's wallet account.
Receive Stellar coin
From your XLM account, click "Receive" to view your account address.
If your XLM account is inactive, please activate your account by clicking on the (Event) link.
Sending Stellar coin
If you are sending Stellar coins to your exchange account, you MUST enter the Memo.
If you are sending Stellar coins to a personal wallet such as D'CENT Wallet, entering Memo is optional. You can enter any notes in the Memo field or choose to change the Memo options.
When sending money, check the address and memo once again before making the final confirmation.
Using Binance exchange for transfers (XRP example)
Sending fund to your Binance wallet account
Check the receiving address on Binance
To send cryptocurrency to your Binance account, you need to know the address.
First, login to your Binance account and choose a wallet of your choice such as 'Spot Wallet'.
1) Select 'Deposit'
2) Select your cryptocurrency type from the drop down list (ie: XRP).
3) Notice the 9-digit XRP Deposit Tag. This Tag is absolutely required when sending fund to an exchange's wallet address.
4) Also notice the XRP account address. This is the recipient address where you send the XRP fund to.
Preparing for a Send transaction from D'CENT Wallet
Run the D'CENT mobile app on your phone and make sure your smartphone is connected together with the D'CENT Biometric Wallet.
1) From your cryptocurrency account(ie: XRP), press the 'Send' button.
2) Press the 'QR scan' button to scan the QR code presented by Binance. This will automatically enter the recipient address.
3) You MUST enter the destination tag (or deposit tag) assigned to your XRP account by Binance exchange.
4) When you have entered both the recipient address and the destination tag, press 'Next' to continue.
5) Enter the amount to send in either in XRP amount or by fiat value.
6) Press 'Next' to continue.
7) Review the transaction details and press 'Send' to continue.
8) On your D'CENT Biometric Wallet, check the details and press the 'OK' button to confirm. You will also need to authenticate using either your fingerprint or PIN.
9) Once authenticated, your Send transaction will be broadcasted to the blockchain network.
10) Go back to your Binance account and check that you have received the fund sent from your D'CENT Wallet. Look under the section 'Recent Deposit History' for details of your transaction history.
Sending fund to your D'CENT wallet account
Check the receiving address on D'CENT wallet
To send cryptocurrency to your D'CENT wallet account, you need to know the address.
From the mobile, press the 'Receive' button to see the account address.
There are 2 options to copy your account address(in hex form):
Option1) Copy - this will copy the address for pasting it to a message or email.
Option2) Share - this will copy the address and give you an option to share it through a SNS app of choice if installed on your phone.
Preparing for a Send transaction from your Binance account
Login to your Binance account, and click on 'Spot Wallet'.
1) Select 'Withdraw'
2) Select your cryptocurrency type from the drop down list (ie: XRP).
3) Paste D'CENT account address into the line 'Recipient's XRP Address'.
4) Check enable the 'No Tag' box. Note that private wallet such as D'CENT wallet does not have a destination tag.
5) Enter the amount to send.
6) Click the 'Submit' button to continue.
If you have setup a second factor authentication, you will be asked to authenticate for the second time through a different channel. Below is an example of Google Authentication supported by Binance exchange.
7) Confirm the 2nd authentication and your withdraw request will be processed by the Binance exchange.
8) Check for status of your transaction from Binance. You can also check from D'CENT wallet.
Using Coinbase exchange for transfers (Bitcoin example)
Sending fund to your Coinbase wallet account
Check the receiving address on Coinbase
Mise à jour du micrologiciel
Indicateur de mise à jour du micrologiciel (Firmware)
Chaque fois qu'une nouvelle prise en charge des pièces est ajoutée ou qu'un bogue a été corrigé, un nouveau firmware sera disponible pour l'installation. Votre application mobile affichera une indication lorsqu'un nouveau micrologiciel sera disponible.
To send cryptocurrency to your Coinbase account, you need to know the address.
First, login to your Coinbase account and then press the 'Receive' button.
The picture below is an example of how Coinbase displays your account address, for example Bitcoin.
The upper portion is the Bitcoin address shown in QR code and just below it is the same address in hex format.
You can switch to a different cryptocurrency account by making your selection from the 'Currency' section.
Preparing for a Send transaction from D'CENT Wallet
Run the D'CENT mobile app on your phone and make sure you connect your phone together with the D'CENT Biometric Wallet.
1) From your cryptocurrency account(ie: Bitcoin), press the 'Send' button.
2) Press the 'QR scan' button to scan the QR code presented by Coinbase.
3) If the QR code is read correctly, you will see that the recipient address has been entered automatically. It is always a good practice to double check the recipient address and make sure it is the correct address that you want to send fund to.
4) Press 'Next' button to continue.
If the 'Next' button is disabled while a red text message 'Address format is incorrect' is shown, this means that the address is incorrectly entered. Notice that there is extra 'bitcoin:' text in the beginning of the address. If this ever happens, just delete the extra text and the 'Next' button will be enabled.
5) Set the transaction fee first. Fee amount can be changed by using the slider button. If you set the fee to 'High', it is more likely that your transaction will be accepted with priority and processed faster by the blockchain network.
6) Next, set the amount to Send. You can enter the number of cryptocurrency to send or enter the amount by the fiat value. If you intend to send the whole available amount, then just press the 'Max' button.
7) Press the 'Next' button to continue.
8) In the next screen, double check the transaction details of the recipient address and the sending amount. Press the 'Send' button when details are correct.
9) On your D'CENT Biometric Wallet, check the details and press the 'OK' button to confirm. You will also need to authenticate using either your fingerprint or PIN.
10) Once authenticated, your Send transaction will be broadcasted to the blockchain network.
11) Go back to your Coinbase account and check that you have received the fund sent from your D'CENT Wallet.
From Coinbase, you can check the history of Recent Transactions. If the status is showing as 'PENDING', this means that your fund is still being processed by the blockchain network to get more confirmations. To view the detailed transaction history, you can click 'View Transaction', which will open a new window redirecting you to the block explorer where you can check the status.
Sending fund to your D'CENT wallet account
Check the receiving address on D'CENT wallet
To send cryptocurrency to your D'CENT wallet account, you need to know the address.
From the mobile, press the 'Receive' button to see the account address.
There are 2 options to copy your account address(in hex form):
Option1) Copy - this will copy the address for pasting it to a message or email.
Option2) Share - this will copy the address and give you an option to share it through a SNS app of choice if installed on your phone.
Preparing for a Send transaction from your Coinbase account
From your Coinbase account, press the 'Send' button.
Below are the screenshots of Coinbase wallet interface.
1) Enter the amount to send
2) Paste in the D'CENT account address where 'To' is shown.
3) Write something on the 'Note' section if you want to keep track of what the transaction was for (ie: dcentwallet).
4) Press the 'Send' button to continue.
5) The second screenshot on the right will show the detailed information of the Send transaction that you are about to submit. Press the 'Send now' button to continue.
6) Enter the 2-step verification code from SMS that you received.
7) Press 'Confirm' button to submit the Send transaction request.
La mise à jour du micrologiciel ne peut être effectuée que depuis le PC.
Avant de mettre à jour le micrologiciel (firmware)
Assurez-vous d'avoir votre code mnémonique (24 seeds/mots) pour la récupération.
24 mots ont été fournis lors de la configuration initiale de votre porte-monnaie biométrique et vous les avez notés sur la carte de récupération. Vérifiez que vous avez toujours la carte de récupération.
Contrairement à d'autres produits, votre porte-monnaie reste intact dans la puce sécurisée, même après la mise à jour du micrologiciel. Cela signifie que vous n'avez pas besoin de récupérer votre portefeuille à chaque fois que vous mettez à jour le micrologiciel comme d'autres produits vous obligent à le faire.
(Conservez votre carte de récupération en lieu sûr et prête à l'emploi, au cas où votre portefeuille biométrique ne serait plus accessible, peut-être à cause d'un appareil défectueux ou d'un problème survenu au cours du processus de mise à jour).
Après avoir mis à jour le micrologiciel, vous ne pourrez pas revenir à la version précédente.
Pour effectuer la mise à jour du micrologiciel, utilisez le câble USB qui était inclus dans l'emballage d'origine de D'CENT. La mise à jour du micrologiciel prendra environ 10 minutes.
Il est recommandé que l'application mobile D'CENT ne fonctionne pas pendant la mise à jour du micrologiciel.
Comment mettre à jour le firmware
La mise à jour du micrologiciel n'est disponible que depuis un PC, et il est recommandé d'utiliser le navigateur Google Chrome.
Cliquez ici(here) pour mettre à jour le micrologiciel. Il est recommandé de donner à l'écran du navigateur Internet la taille maximale et de procéder à la mise à jour. La mise à jour du micrologiciel se déroule dans l'ordre suivant.
S'il n'y a pas de programme Bridge de D’cent sur votre PC, téléchargez le bridge.
Téléchargez et installez le programme correspondant à votre système d'exploitation.
Télécharger le programme de bridge D'CENT
S'il n'y a pas de programme de bridge D'CENT sur votre PC, téléchargez le programme de bridge. Téléchargez et installez le programme pour votre OS.Télécharger le programme de bridge D'CENT.
Le programme D'CENT bridge est un programme utilisé pour la communication entre votre PC et le porte-monnaie biométrique.
Si la dernière version du programme D'CENT Bridge est déjà installée, la fenêtre de téléchargement n'apparaîtra pas.
Lorsque l'installation est terminée, cliquez sur le bouton "Rafraîchir la page" en bas de l'écran.
Connectez le portefeuille biométrique à votre PC
1) Connectez le PC et le porte-monnaie biométrique à l'aide du câble USB inclus dans l'emballage d'origine.
2) Authentifiez-vous avec votre empreinte digitale ou votre code PIN pour déverrouiller votre porte-monnaie biométrique.
3) Après la connexion, vous devriez voir l'écran suivant apparaître, cliquez sur le bouton "Re-tenter de trouver l'appareil" "Retry to find device" bouton.
Vérifier la version du firmware.
1) Vérifier si le porte-monnaie biométrique est connecté à la dernière version. S'il ne s'agit pas de la dernière version, l'écran suivant apparaît.
2) Appuyez sur le bouton "Update to version ...".
Passage en mode bootloader.
Suivez les instructions et procédez comme indiqué.
1) Séparez votre porte-monnaie biométrique du PC.
2) Éteignez votre porte-monnaie biométrique.
3) Pour entrer dans le mode bootloader, appuyez sur le bouton "OK" et le bouton "Power" de la Biometric Wallet pendant 10 secondes. En entrant dans le mode bootloader, l'écran suivant apparaît sur l'écran du porte-monnaie biométrique.
4) Branchez le porte-monnaie biométrique au câble USB pour le reconnecter à votre ordinateur PC.
5) Appuyez sur le bouton "Update Firmware".
Démarrer la mise à jour du micrologiciel
La mise à jour du micrologiciel à partir de la page Web prendra environ 3 minutes pour atteindre 100%. Veuillez patienter.
Depuis le portefeuille biométrique, vous pouvez également vérifier la progression de la mise à jour du micrologiciel.
Terminer la mise à jour de l’update du micrologiciel
Lorsque la mise à jour du firmware est terminée, redémarrez votre Biometric Wallet.
Lorsque vous achetez un nouveau portefeuille biométrique ou que l'appareil que vous utilisez est réinitialisé en usine, vous pouvez récupérer votre portefeuille existant.
Votre portefeuille existant peut être récupéré en saisissant les 24 mots inscrits sur la carte de récupération qui a été générée lorsque vous avez effectué la configuration initiale.
Récupération du portefeuille après la suppression des données sur l'appareil D'CENT
Pour effectuer la récupération du portefeuille, vous devez d'abord réinitialiser le portefeuille biométrique par le biais du menu "Device Wipe"(). Une fois que l'appareil a été remis à l'état d'usine, suivez les instructions de la section ci-dessous pour récupérer votre porte-monnaie.
"Device Wipe" supprimera toutes les données contenues dans votre porte-monnaie biométrique. Avant de décider d'effacer votre appareil, vérifiez que vous avez bien votre carte de récupération.
Step-1 : Selectionner Language & Recover Wallet
Power on D'CENT Biométrique Wallet
Pour allumer l'appareil, appuyez sur le bouton d'alimentation pendant 3 secondes, situé sur le côté droit.
Sélectionner la langue (Select Language)
Utilisez le bouton ∧(Up) ou ∨(Down) pour sélectionner votre langue et appuyez sur le bouton OK.
Sélectionner "Recover Wallet"
Pour récupérer le portefeuille, sélectionnez "RecoverWallet" dans le menu.
Step-2 : Enregistrer le PIN et l'empreinte digitale (Register PIN & Fingerprint)
Pour protéger l'accès à votre portefeuille, enregistrez un nouveau code PIN et votre empreinte digitale.
Enregistrer un nouveau PIN (4 à 8 digits)
Utilisez le bouton ∧(Haut, augmenter la valeur numérique) ou ∨(Bas, diminuer la valeur numérique) pour saisir votre code PIN. En appuyant sur le bouton OK du portefeuille matériel, vous confirmez la saisie.
Lorsque vous avez saisi 4 chiffres, le texte "OK" s'affiche à l'écran. Si vous souhaitez que votre code PIN soit composé de 4 chiffres, appuyez sur le bouton OK du porte-monnaie électronique.
Si vous souhaitez définir le code PIN sur un chiffre plus long, vous pouvez modifier la valeur (texte 'OK') à l'écran en appuyant sur le bouton Haut ou Bas. Votre code PIN peut être défini sur 4, 5, 6, 7 ou 8 chiffres.
Si un écran affiche l'avertissement "Niveau de sécurité faible" (Security level is low), cela signifie que le code PIN que vous avez saisi est un mot de passe faible. Si vous souhaitez utiliser un tel code PIN, appuyez sur le bouton "OK" du porte-monnaie électronique pour continuer.
Vérifiez votre code PIN (Verify your PIN)
Saisissez à nouveau le même code PIN que vous avez défini à l'étape précédente pour en vérifier l'exactitude.
※ Si les numéros PIN ne correspondent pas, vous devrez recommencer l'enregistrement du code PIN.
Après avoir configuré votre cold wallet, vous pouvez modifier la valeur du code PIN à partir de la page menu.
1) Pour enregistrer votre empreinte digitale, touchez votre doigt sur le capteur pour sensor to scan.
Le capteur d'empreintes digitales est situé au milieu de l'endroit où se trouvent les boutons de navigation. Vérifiez l'emplacement du capteur d'empreintes digitales. .
2) Modifiez légèrement le positionnement angulaire du même doigt lors du balayage et répétez l'opération jusqu'à atteindre 100 % (8 balayages corrects).
Scannez votre empreinte digitale une dernière fois pour vérifier l'empreinte digitale enregistrée.
※ Si l'empreinte digitale ne correspond pas, vous devrez recommencer l'enregistrement des empreintes digitales.
※ Si vous réenregistrez votre empreinte digitale, essayez d'utiliser un autre doigt à la place.
※ Si vous ne pouvez pas enregistrer votre empreinte digitale pour une raison quelconque, vous aurez la possibilité d'ignorer l'enregistrement de l'empreinte digitale. L'empreinte digitale peut être enregistrée ultérieurement à partir du menu .
※ Si la vérification des empreintes digitales échoue, votre empreinte digitale ne sera pas enregistrée.
Step-3 : entrez les mots de récupération (recovery words)
1) Entrez les 24 mots de récupération enregistrés sur la carte de récupération, numérotés de 1 à 24.
2) Appuyez sur le bouton Bas (∨) pour vérifier si les 24 mots de récupération ont été saisis correctement dans l'ordre.
3) Si tous les mots sont entrés correctement, sélectionnez "Je suis prêt" en bas du menu de révision.
Ne prenez pas de photo et n'enregistrez pas le mot de récupération ou la carte de récupération sous forme d'image. L'utilisateur est responsable de la manipulation du mot de récupération en toute sécurité.
D'CENT n'est pas responsable des dommages ou des pertes d'actifs en crypto-monnaies causés par la négligence de l'utilisateur, tels que le vol de cartes de récupération ou le stockage de fichiers d'images.
Une attention particulière est requise pour un stockage sûr (à l'abri du feu, de l'eau, du soleil ou des animaux domestiques).
Step-4 : Terminer la récupération du portefeuille (Completing the Wallet Recovery)
Vous avez terminé la récupération du portefeuille. Depuis votre portefeuille froid, vous pouvez vérifier les listes des comptes de pièces disponibles. Vous êtes maintenant prêt à utiliser votre nouveau porte-monnaie avec l'application mobile.
Comment se connecter avec un téléphone Android()
Comment se connecter avec un téléphone iOS()
Vous pouvez trouver la liste complète des crypto-monnaies supportées par D'CENT Biometric Wallet sur le site suivant
Vérifier le dernier firmware
Une fois que vous avez terminé la configuration initiale, assurez-vous de visiter la page d'accueil de D'CENT Wallet et de vérifier la dernière version du firmware disponible. Une version plus récente du firmware peut inclure un support supplémentaire pour les actifs de cryptocurrency et de nouvelles fonctionnalités du portefeuille.
Pour plus d'informations sur la mise à jour du micrologiciel, consultez le site suivant ici().